Table of Contents
Advertisement
Advertisement
Table of Contents

Related Manuals for Amazon B00LILH3V4


Summary of Contents for Amazon B00LILH3V4
- Page 1 Patio Heater B00LILH3V4 B00LILH47C...
- Page 2 English ..... .5...
- Page 3 Safety and compliance...
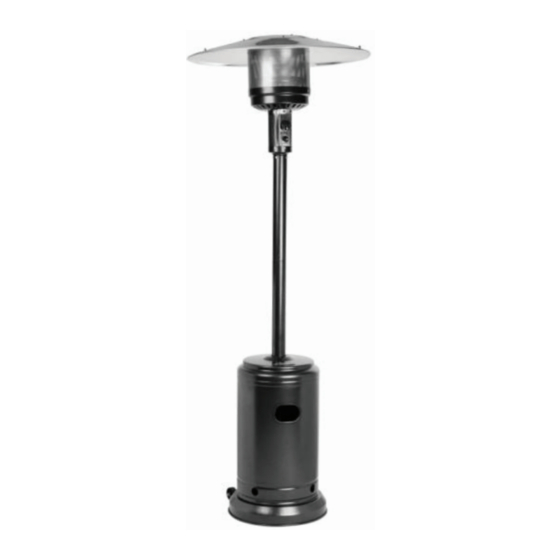
- Page 5 English Instruction Manual · English AmazonBasics Patio Heater For setup questions and missing parts replacement, please call Well Traveled Living’s specialized customer service hotline for AmazonBasics Outdoor Heating Products at 1-904-557-7011, 9 a.m. - 6 p.m., EST, Monday – Friday. Contents Make sure that the package contains the following parts and hardware before you begin assembly:...
- Page 6 Large screw (4) Large bolt (6) Small bolt (5) Small flange nut (6) Large flat washer (9) Small screw (12) Cap nut (12) Large nut (4) Wing nut (3) Wrench (1) Reflector stud (3) Tools required for assembly (not included): •...
-
Page 7: Assembly Instructions
Assembly Instructions Step 1: Remove the four large screws and large nuts that secure the base to the sandbox, then pry open the plastic cap on the top. Fill the sandbox with water or sand, then replace the plas- tic cap. Slide the base back on the sandbox, then reinsert the screws and secure by tightening the nuts on the bolts. - Page 8 Step 3: Align the holes in the bottom of the post support (I) and base, then secure with a small bolt (hand tighten). Repeat with the other two post supports, then tighten all bolts with the wrench. Small bolt (3) Step 4: Align the holes in the lower post (G) with the holes in the tops of the post supports.
- Page 9 Step 6: Insert the tank housing (D) onto the upper post and lower it until it rests on the base. Step 7: Insert the reflector studs into the large flat washers, then push them into the holes on the top of the head assembly (C). Reflector stud (6) Large flat...
- Page 10 Step 8: Remove the four small bolts and lock washers from the head assembly. Route the gas hose (E) down through the post assembly, then place the head assembly on the upper post, making sure that the screw holes on the head assembly align with the holes in the upper post (the control knob should be above the decal on the post).
- Page 11 Slide the reflector center cap (B) onto the assembled reflector panels. Insert one small screw and loosely screw on a cap nut. Repeat with two more small screws and cap nuts to complete reflector assembly. Fully tighten all screws and cap nuts. Assembly Tip: If the reflector sections aren't aligning, loosen each screw before further assembly and retighten after the sections are aligned.
- Page 12 Move the propane tank onto base of the heater. Secure the propane tank by attaching the chain to the post supports. Lower the tank housing. Note: Only use a standard 20 lb. propane tank with this heater. Use this heater only with a propane vapor withdrawal supply system.
- Page 13 Note: Whenever gas connections are loosened or removed, you must perform a complete leak test. Using your patio heater Caution: Do not attempt to operate this appliance until you have read and understand all of the safety information in the manual, the assembly is complete, and leak tests have been performed.
- Page 14 2. Fully open the propane tank valve. 3. Push the control knob in and rotate it half way between HI and LO. 4. While pushing in the control knob, press the red IGNITOR button repeatedly until the main burner lights. Continue to hold the control knob in for 30 more seconds, then release the it. 5.
-
Page 15: Operation Checklist
2. Wait at least five minutes to allow gas to dissipate before re-lighting. See “Lighting your heater” for instructions. Shutting down your heater 1. Push in the control knob and turn it OFF. The burner may make a slight popping noise as it turns off. - Page 16 11.Heater is at least 36 in. on top and at least 24 in. on sides from combustible materials. 12.Heater is on a hard and level surface. 13.There are no signs of spider or insect nests in the heater. 14.All burner passages are clear. 15.All air circulation passages are clear.
-
Page 17: Troubleshooting
225 lbs. (102.1 kg) You may return this item sold by Amazon.com within 30 days of delivery for a full refund. Ama- zon.com will pay the return shipping cost if the return is a result of our error. Please note that we are unable to exchange items. - Page 20 Made in China V6 15-0285...
Need help?
Do you have a question about the B00LILH3V4 and is the answer not in the manual?
Questions and answers