Table of Contents
Advertisement
Available languages
Available languages
Quick Links
Advertisement
Table of Contents

Related Manuals for Electrohome Archer EAnos300


Summary of Contents for Electrohome Archer EAnos300
- Page 1 ARCheR™ TURNTAbLe STeReO SySTeM eANOS300 INSTRUCTION MANUAL Thank you for your purchase of this Electrohome product. Please read this instruction manual carefully before using product to ensure proper use. Keep this manual in a safe place for future reference. www.electrohome.com...
-
Page 2: Important Safety Instructions
IMPORTANT SAFeTy INSTRUCTIONS TO PREVENT FIRE OR SHOCK HAZARD, DO NOT USE THIS PLUG WITH AN EXTENSION CORD, RECEPTACLE OR OTHER OUTLET UNLESS THE BLADES CAN BE FULLY INSERTED TO PREVENT BLADE EXPOSURE. TO PREVENT FIRE OR SHOCK HAZARD, DO NOT EXPOSE THIS APPLIANCE TO RAIN OR MOISTURE. - Page 3 IMPORTANT SAFeTy INSTRUCTIONS • Avoid installing this unit in places exposed to direct sunlight or close to heat radiating appliances such as electric heaters, on top of other stereo equipment that radiates too much heat, places lacking ventilation or dusty areas, places subject to constant vibration and/or humid or moist areas.
-
Page 4: Table Of Contents
USB Operation ............................9 Removing the USB ..........................9 Care and Maintenance ..........................10 Replacing the Stylus ..........................10 Transporting the System ........................10 Care of the Cabinet ..........................10 Replacing the Cartridge ........................11 electrohome Warranty ...........................12 WhAT’S INCLUDeD • Suitcase Turntable • Stylus Needle •... -
Page 5: Buttons And Connections
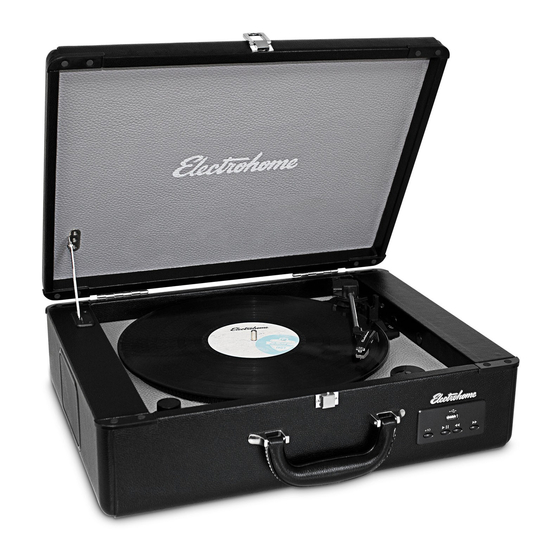
bUTTONS AND CONNeCTIONS Main Unit Side 12 13 Phonograph Lid Support Bracket SKIP + Button OFF/VOLUME Control 10 + Button Speakers 10. USB input Handle 11. Phonograph Lid Latch 12. 3.5mm AUX IN Jack PLAY-PAUSE Button 13. AUX-PHONO Function Selector SKIP –... -
Page 6: Preparation For Use
bUTTONS AND CONNeCTIONS Turntable Transit Screw Tone Arm Lock Turntable Tone Arm with Stylus Cue Lever 45 RPM Adapter Speed Selector (33/45/78 RPM) PRePARATION FOR USe POWeR SOURCe This system is designed to operate on normal 120V 60Hz AC only. Attempting to operate this system from any other power source may cause damage to the system, and such damage is not covered by your warranty. -
Page 7: Unpacking And Setup
PRePARATION FOR USe UNPACKING AND SeTUP Transit Screw • Carefully remove the unit from the display carton and remove all packing material from the unit. • Unwind the AC power cord and extend it to its full length. • Place the unit on a stable, level surface, close to an AC outlet, out of direct sunlight, and away from sources of excess heat, dust, moisture, humidity, or strong magnetic fields. -
Page 8: Operation
OPeRATION POWeRING ON The UNIT Connect the AC Adapter to the AC POWER Socket on the side of the unit. To turn the system ON, rotate the POWER/VOLUME button clockwise until a "click" is heard and set the volume to a low level. When you have finished using the system, rotate the POWER/VOLUME button counter-clockwise until a "click"... -
Page 9: Usb Operation
OPeRATION When the tone arm reaches the end of the record it automatically returns to the tone arm rest and the record player stops. Rotate the POWER/VOLUME button counter-clockwise until a "click" is heard to turn off the unit when you are done. -
Page 10: Care And Maintenance
CARe AND MAINTeNANCe RePLACING The STyLUS Lift the tone arm off the tone arm rest. At the front end of the tone arm, place the tip of your fingernail between the red stylus holder and the black cartridge housing as shown, press down on the red stylus holder until it separates from the cartridge housing. -
Page 11: Replacing The Cartridge
CARe AND MAINTeNANCe TO RePLACe The CARTRIDGe FROM TONe ARM PLeASe FOLLOW The PROCeDUReS beLOW. Gently lift off the tone arm from the WhITe WIRe ReD WIRe tone arm rest. By using your left hand to hold the tone arm and using your right hand to bLACK WIRe hold the rear portion of the cartridge. -
Page 12: Electrohome Warranty
ELECTROHOME product or the loss of information. The purchaser will be responsible for any removal, reinstallation, transportation and insurance costs incurred. - Page 13 ELECTROHOME garantit que cet appareil est exempt de tout défaut de matériau et de fabrication dans des conditions d’utilisation et d’ e ntretien normales. Si un défaut est décelé dans ce produit pendant la période de cette garantie, ELECTROHOME s’ e ngage à le réparer ou, le cas échéant et à...
- Page 14 eNTReTIeN POUR ReMPLACeR LA CARTOUChe DU bRAS De LeCTURe, VeUILLez SUIVRe LA PROCéDURe SUIVANTe . FIL bLANC FIL ROUGe Veuillez débranchez l'appareil avant de remplacer la cartouche. Soulevez délicatement le bras de lecture FIL NOIR du support. En utilisant votre main gauche pour tenir le bras et à...
- Page 15 eNTReTIeN ReMPLACeR Le STyLeT Levez le bras de lecture du support. Sur l’ e xtrémité du bras de lecture, placer le bout de votre ongle entre le porte-stylet rouge et le boîtier de cartouche noir comme dans le schéma, appuyer sur le porte-stylet rouge jusqu'à ce qu'il se sépare du boîtier de cartouche.
- Page 16 UTILISATION Lorsque le bras de lecture atteint la fin du disque, il retourne automatiquement au support du bras de lecture et le tourne-disque s'arrêtera. Tournez le bouton ARRÊT/Réglage du volume dans le sens antihoraire jusqu'à ce qu'un « clic » est entendu pour désactiver l'appareil.
- Page 17 UTILISATION ALIMeNTeR L'APPAReIL Branchez l`adaptateur CA à l'entrée d'alimentation CA sur le côté de l'appareil. Pour activer le système, tournez le bouton ARRÊT/Réglage du volume dans le sens horaire jusqu'à ce qu'un « clic » est entendu et réglez le volume à un niveau bas. Lorsque vous avez fini d'utiliser le système, tournez le bouton ARRÊT/Réglage du volume dans le sens antihoraire jusqu'à...
- Page 18 CONFIGURATION DébALLAGe eT INSTALLATION Vis de Transit • Retirer avec précaution l’unité du carton d’ e mballage et retirer tous les emballages de l’unité. • Dérouler le câble d’alimentation jusqu’à sa longueur maximale. • Dérouler le câble d’antenne FM jusqu’à sa longueur maximale. •...
- Page 19 TOUCheS eT CONNeXIONS Plateau Vis de transport Verrou du Bras de Lecture Tourne-disque Bras de Lecture avec stylet Levier Marqueur Adaptateur 45 tr/min Sélecteur de vitesse (33/45/78 tr/min) CONFIGURATION SOURCe D’ALIMeNTATION Ce système est prévu pour une utilisation avec une prise normale 120V 60Hz seulement. Utiliser ce système avec une autre source d’alimentation peut causer des dommages au système, et de tels dommages ne sont pas couverts par votre garantie.
- Page 20 TOUCheS eT CONNeXIONS Unité principale Côté 12 13 Support du couvercle Bouton SKIP + ARRÊT/Réglage du volume Bouton 10 + Haut-parleurs 10. Entrée USB Poignée 11. Couvercle du tourne-disque Loquet 12. Entrée AUX IN 3,5mm Bouton PLAY-PAUSE (lecture/pause) 13. Sélecteur de fonction AUX-PHONO Bouton SKIP –...
- Page 21 Fonctionnement USB ........................... 9 Enlever la clé USB ..........................9 entretien ..............................10 Replacer le stylet ..........................10 Transporter le système ........................10 Entretien du boîtier ..........................10 Replacer la cartouche ..........................11 Garantie electrohome ..........................12 Ce qUI eST INCLUS • Tourne-disque style valise • Stylet •...
- Page 22 NOTeS IMPORTANTeS • Évitez l’installation de cet appareil dans des endroits exposés à la lumière directe du soleil ou à proximité d’appareils de chauffage comme les radiateurs électriques, le dessus d’ é quipement stéréo qui produisent trop de chaleur, des endroits sans ventilation, des zones poussiéreuses, des endroits sujets à...
- Page 23 INSTRUCTIONS De SéCURITé IMPORTANTeS AFIN D’ÉVITER TOUT RISQUE DE FEU OU DE RISQUE ÉLECTRIQUE, N’UTILISEZ PAS CETTE PRISE AVEC UNE RALLONGE, UN RÉCEPTACLE OU UNE AUTRE PRISE À MOINS QUE LES LAMES NE PUISSENT ÊTRE TOTALEMENT INSÉRÉES POUR ÉVITER L’EXPOSITION DES LAMES. POUR ÉVITER TOUT RISQUE DE FEU OU DE RISQUE ÉLECTRIQUE, N’EXPOSEZ PAS CE MATÉRIEL À L’HUMIDITÉ...
- Page 24 MANUeL D’ INSTRUCTION eANOS300 Merci d’avoir fait l’achat de cet appareil Electrohome. Veuillez lire ce manuel attentivement avant de faire fonctionner l’appareil pour vous assurer de l’utiliser correctement. Conservez ce manuel dans un endroit sûr afin de pouvoir vous y référer au besoin.
Need help?
Do you have a question about the Archer EAnos300 and is the answer not in the manual?
Questions and answers