Table of Contents
Advertisement
Advertisement
Table of Contents

Related Manuals for Archos 10


Summary of Contents for Archos 10
- Page 1 English User Manual...
- Page 2 Preface © Copyright 2009 © All Rights Reserved. The information in this document is subject to change without prior notice in order to improve reliability, design and function and does not represent a commitment on the part of the manufacturer. In no event will the manufacturer be liable for direct, indirect, special, incidental, or consequential damages arising out of the use or inability to use the product or documentation, even if advised of the possibility of such damages.
-
Page 3: Table Of Contents
Table of Content ... 2 EFORE YOU TART ... 6 NTRODUCTION ... 11 ETTING TARTED PC ... 14 SING THE ... 22 NTERNET ONNECTION BIOS S ... 25 UNNING THE ETUP ... 32 CREEN TILITIES ... 36 ROUBLESHOOTING ... 41 PECIFICATIONS... -
Page 5: Before You Start
Using this manual will help you get the most from your mini PC. If you are an experienced user of computers and/or Microsoft’s Windows operating systems, you might find it useful to read the Quick Start Guide that comes in the box. If you are a less experienced user, you should through this manual carefully before using your computer. - Page 6 The cord set must be approved for the country in which it is used. The appliance coupler must have a configuration for mating with a CEE22/EN6032/IEC 320 appliance inlet. For U.S. and Canada: The cord set must be UL Listed and CSA Certified. The minimum specifications for the flexible cord are No.
-
Page 7: Let Your Computer Acclimate Itself
Let your computer acclimate itself Your notebook can easily stand temperature extremes but it doesn’t like rapid changes in temperature, like going from the cold outdoors to a warm office. Rapid changes in temperature can cause water droplets to condense inside your case, threatening to damage the electronic parts inside. After receiving your notebook when it’s hot or cold outside, try not to power up the computer immediately;... -
Page 9: Introduction
Install the battery pack Connect the AC adapter Turn on your computer... -
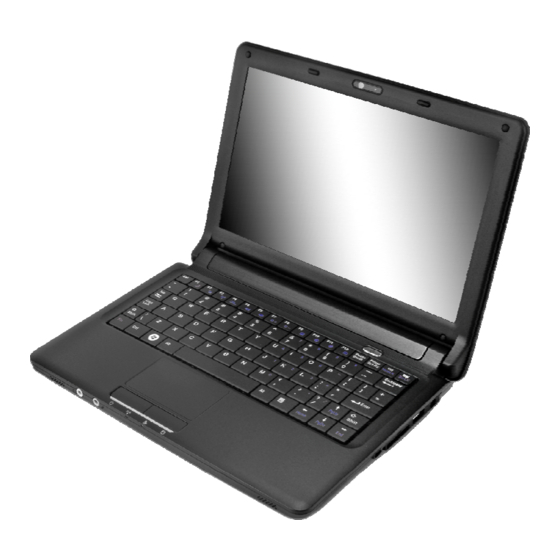
Page 10: Front View
1. Do not slam the display upon closing it. 2. Do not place any object on top of it when it is closed or open. 3. Be sure the system is turned off or in suspend mode before you close the display panel. With the LCD screen open, you will see several features important for operating your mini PC. -
Page 11: Left Side View
LED Graphic Symbol Blue light indicates the system is ON. Blinking blue light indicates the notebook is in suspend mode. Blue light indicates the WLAN/Bluetooth is active. Battery status Charging – Lavender Full – Blue Low - Red Blue light indicates the hard drive and/or optical drive is being accessed. -
Page 12: Right Side View
Right Side View Kensington Lock 4-in-1 Card Reader (SD/MMC/MS/MS Pro Memory Card) USB 2.0 Port DC In Bottom View Battery lock Battery Battery release latch... -
Page 14: Started
Connecting the AC Adapter A universal AC adapter is provided to supply your computer with power and also charge the computer’s battery pack. The adapter’s AC input voltage can range anywhere from 100 to 240 volts, covering the standard voltages available in most countries. To connect the computer to an external power source: result in damage to your mini PC. -
Page 15: To Install The Battery Pack
The installed battery pack charges automatically any time the computer is connected to the AC adapter and an external power source. It is a good idea to occasionally discharge the battery pack fully to preserve its operating performance. Only use batteries that are approved by ARCHOS. All batteries are... -
Page 17: Using The Mini Pc
The LCD screen display can be adjusted by the following key combinations. LCD Care LCD screens are delicate devices that need careful handling. Please pay attention to the following precautions: When you are not using the computer, keep the LCD screen closed to protect it from dust. If you need to clean your LCD screen, use a soft tissue to gently wipe the LCD surface. -
Page 18: Function Keys (Quick Keys)
’ ’ Function Keys (Quick Keys) - Enters the Suspend Mode. - HSPA on/off - WLAN on/off - Changes Display Mode: LCD-only, CRT-only, LCD/CRT simultaneously - Increases the speaker volume. - Decreases the speaker volume. - Increases the brightness level. - Decreases the brightness level. -
Page 19: The Battery Power System
The touchpad is a rectangular electronic panel located just below your keyboard. You can use this panel of the touchpad and slide your finger over the surface it to move the cursor. You can use the buttons below the touchpad as left and right mouse buttons. TouchPad Precautions The TouchPad is a pressure sensitive device. -
Page 20: Preparing The Battery Pack For Use (Battery Calibration)
To remove the battery pack from its compartment, refer to Chapter 3, Installing and Removing the Battery Pack. Preparing the Battery Pack for Use (Battery Calibration) Before using the battery pack for the first time, the Smart Battery IC within the battery pack should be calibrated in order to get accurate reporting of remaining battery life status. -
Page 21: Small Battery For The Real Time Clock
Battery Low Warning When the battery initially reaches the “Battery Low” state, there are approximately 7 to 10 minutes of usable battery life left. You will hear an audible beep signal every 15 seconds alerting you to the “Battery Low” status. When the battery power reaches the “very low” status the beeping sound will accelerate. -
Page 22: Windows Help
Windows Help For Windows XP help, click Start Desktop The desktop will vary depending on the software installed in your notebook with different or additional shortcuts. Used for storing deleted files in case you want to recover and save it in your system. The files will be deleted from the Recycle Bin permanently only if you empty it by right clicking on it and selecting the “Empty Recycle Bin.”... - Page 23 Allows easy access to all Windows programs. The Start menu allows you to adapt and show the programs used most frequently. If you wish to keep an item, right click the item and click Pin to Start menu. Selecting Log Off will enable the current user to log off and allows a new user to log on.
-
Page 25: Internet Connection
There are numerous ways to connect to the Internet. This may vary according to the user’s working environment as well as system specifications. Using a wireless LAN (Local Area Network) Using a wired LAN (Local Area Network) - Page 26 For a connection to the Internet, a wired LAN environment normally uses the company’s LAN or a broadband modem.
-
Page 28: Running The Bios Setup
This Setup Utility is a hardware configuration program built into your computer’s BIOS (Basic Input/Output System). It runs and maintains a variety of hardware functions. It is menu-driven software, which allows you to easily configure and change the settings. Attention: You should be very careful using BIOS settings as you could render you computer unusable if you do not understand what you are doing. -
Page 29: Advanced Setup
Advanced Setup... - Page 30 Security Boot Setup...
-
Page 31: System Recovery
Exit Setup System Recovery This process enables you to restore your system whether your system is damaged or for some other reason that you can not operate your computer. This process will delete all personal files that you have stored and return the computer to the same state as when you first bought it. First turn on the power. - Page 32 Click the “Recover your computer” to start the recovery procedure. You will be asked whether you would like to proceed with the recovery procedures. Click “OK” if you want to proceed or “Cancel” if you want to discontinue with the recovery procedures. This illustration will be shown twice after you made the first decision in case you change your mind to discontinue with the recovery procedures.
- Page 33 This illustration indicates the system has finished the recovery procedure.
-
Page 35: Screen Utilities
You can click the touchpad or mouse right button on the desktop where there are no icons and select the “Properties” item. Select the “Display Settings” option. Click on the “Advanced Settings” tab to enter “Digital Flat Panel (1024x768) on Mobile Intel® 945 Express Chipset” window display. -
Page 39: Troubleshooting
If the error continues, make sure it is related to the device itself and now a Windows problem before contacting ARCHOS technical support for service information. Before taking further actions, consider the following suggestions: Check to see if the problem persists when all the external devices are removed. - Page 40 Double-click the speaker icon on the lower right corner of the taskbar to see if the microphone has been muted. Click Options and select Properties. Select Recording and make sure the proper boxes are enabled (checked). Click on OK. After Clicking the OK button, the recording volume control panel will appear. Go to [Start >...
- Page 41 Go to [Start > Settings > Control Panel] and double-click the Display icon. Under the Settings page, set the screen resolution to1024x600. It is normal if the display flickers a few times during shutting down or powering up. Make sure there is no excess perspiration or humidity on your hand when using the touch pad. Keep the surface of the touch pad clean and dry.
- Page 42 Check the settings in the Windows Control Panel. Make sure you have installed the necessary device drivers from the manufacturer of the device. Contact the device vendor for additional support.
-
Page 44: Specifications
IEEE 802.11 b/g Single Antenna support Supports 1.3M & 0.3M Camera 81 keys KB support PS2 Touch Pad with 2 buttons Touch Pad mylar w/ printing 10.2" WXGA, LED backlight,1024 X 600 Pixels Non-Glare/Wide view type One channel LVDS Interface... - Page 45 Single 2.5" 9.5mm HDD SATA Supports SATA 2.0 3 cells 11.1V/2200mAH ( 3S1P ) GLW BAK 2.2mAH/SMP BAK 2.2mAH 6 cells 11.1V/4400mAH ( 3S2P ) GLW BAK 2.2mAH/SMP BAK 2.2mAH Automatics Voltage adjustment between AC 100 & 240V, 20V. 40W Watts Two built-in speakers Built-in Microphone and external microphone jack Supports PnP, ACPI 3.0...
Need help?
Do you have a question about the 10 and is the answer not in the manual?
Questions and answers