Table of Contents
Advertisement
SPEAKERS
+
-
ZONE 1
~ AC IN
OVER #2
L
R
+
INPUT
OVER #1
3-CH MODE
4-CH MODE
DA950-U Amplifier
REFER TO YOUR INSTRUCTION MANUAL FOR
PROPER INSTALLATION, OPERATING
PROCEDURES AND DETAILED INFORMATION
ABOUT CONNECTIVITY AND FEATURES.
INCORRECT WIRING MAY RESULT IN DAMAGE
AND / OR POOR PERFORMANCE.
SPEAKERS
ZONE 2 / 3CH SAT
L
R
L
R
+
+
POWER AMP #2
POWER AMP #1
3-CH MODE
BASS BOST
AMPLIFIER
P/N: 700720-001
REV:
SERIAL NUMBER
DA950-U Amplifier
User Guide
Advertisement
Table of Contents

Related Manuals for TouchTunes DA950-U

Summary of Contents for TouchTunes DA950-U
-
Page 1: User Guide
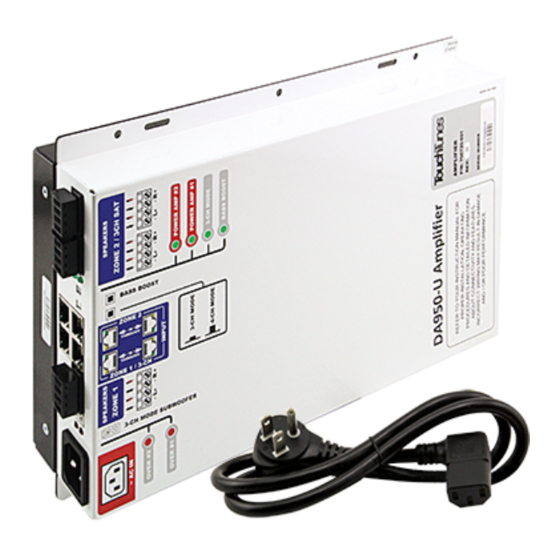
INPUT OVER #1 POWER AMP #2 3-CH MODE POWER AMP #1 3-CH MODE 4-CH MODE BASS BOST DA950-U Amplifier AMPLIFIER REFER TO YOUR INSTRUCTION MANUAL FOR P/N: 700720-001 PROPER INSTALLATION, OPERATING REV: PROCEDURES AND DETAILED INFORMATION ABOUT CONNECTIVITY AND FEATURES. - Page 2 Telephone: 1-847-419-3300 Fax: (847) 419-3304 TouchTunes may use or distribute whatever information you supply in any way it believes appropriate without incurring any obligations to you. Copyright © 2013 TouchTunes Interactive Networks. All rights reserved, including those to reproduce this...
-
Page 3: Table Of Contents
Contacting TouchTunes ........ -
Page 5: Introduction
• The DA950-U is a drop-in replacement for all existing configurations of the DA415 amplifier. • The DA950-U amplifier can be used as a 3-channel amplifier (to power a subwoofer and stereo satellites) or a 4-channel amplifier (to power two separate stereo zones.) •... -
Page 6: Package Contents
Introduction Package Contents The DA950-U package (TouchTunes P/N 600170-001) contains the following components: Part No. Description Quantity 700720-001 DA950-U amplifier 300615-035 AC power cable 100000-001 Euroblock connectors (pre-installed in their sockets on the DA950-U) 900701-001 This document Specifications • Left channel / Right channel: 125W (RMS), 4 ohms per channel. - Page 7 CAUTION: Do not use the DA950-U immediately after transferring the unit from a cold place to a warm place as condensation may have occurred on internal components.
- Page 8 Introduction • Read these instructions. • Keep these instructions. • Heed all warnings. • Follow all instructions. Clean only with dry cloth. Do not block any ventilation openings. Install in accordance with the manufacturer’s instructions. Do not install near any heat sources such as radiators, heat registers, stoves, or other apparatus (including amplifiers) that produce heat.
-
Page 9: Contacting Touchtunes
• The serial number of any component you believe to be defective. • The date/time of the problem. • Actions performed immediately before the problem occurred. • Any additional comments. If you require assistance with this or any other TouchTunes product, please call or email technical support. We value your comments. - Page 10 Introduction...
-
Page 11: Hardware Overview And Installation
This section provides an overview of the DA950-U amplifier, and explains important installation procedures. Topics Overview Features Connectors and Controls Speaker Wiring Guide Overview The TouchTunes DA950-U is a Class-D digital audio amplifier that uses Bang & Olufsen ® ICEpower technology. -
Page 12: Features
Hardware Overview and Installation Features The DA950-U amplifier incorporates the following features: • Class-D Architecture • Dynamic range of 117dB • Over-current protection • Thermal protection shutdow • Mute input • Turn-on and turn-off pop suppression • High speed switching power supply ≤... -
Page 13: Connectors And Controls
4. Balanced audio input/output connectors, Zone 1: Two RJ45 connectors are provided to connect the DA950-U to other audio equipment via standard category 5 cable. Wired in parellel. One should be used as input, and the other can then be used as a "thru"... - Page 14 Hardware Overview and Installation You can purchase pre-wired cable, or you can wire your own cable as follows: Straight-through category 5 cable wiring RJ45 connector Near Color Color white + orange white + orange orange orange white + green white + green blue blue white + blue...
-
Page 15: Speaker Wiring Guide
Each speaker circuit should fall between 4 and 8 ohms for best performance. NOTE: When using the DA950-U as a 4-channel amplifier, be sure to use full- range speakers. Using satellites designed to be used along with a subwoofer will lead to degraded audio. - Page 16 Hardware Overview and Installation Example 1: TouchTunes 2-Way Speakers This example illustrates wiring of TouchTunes 2-way speakers (maximum 4 per channel) for a total impedance load of 4 ohms. Requires setting 4-channel mode on the DA950-U. Row 1 Row 2...
-
Page 17: Software Audio Settings
Bass Boost There is a bass boost setting on the DA950-U, and there is also a Bass Boost setting on Virtuo, as well as an equivalent setting labeled "DSP EQ" on some JCB-based Gen3 jukeboxes. - Page 18 Hardware Overview and Installation...
-
Page 19: Configurations
• When the DA950-U amplifier is used to power a subwoofer and satellites, 3-channel mode should be used. • When using 3-channel mode, Zone 2 input is disabled. Use Zone 1 input. The DA950-U will output the bass signal to the dedicated subwoofer connector, and the mid/high signal to the “Zone 2 / 3-CH SAT” outputs. -
Page 20: Allegro Mx-1 / Mx-1V
4-channel. We will cover both amps separately, while highlighting the fact that the DA950-U can replace either the 3-Channel DA415 or the 4-Channel DA415 (i.e., two identical DA950-U will be able to replace both amps in the MX-1.) Replacing the 3-Channel DA415 1. - Page 21 3. Remove the four screws that hold the amplifier in place. 4. Pull the DA415 out of the jukebox. 5. Set the switches on the DA950-U to 4-channel and Bass Boost OFF. 6. Place the DA950-U into the position previously occupied by the DA415.
-
Page 22: Ovation & Ovation Ii
3. Remove the four screws that hold the amplifier in place. 4. Pull the DA415 out of the jukebox. 5. Set the switches on the DA950-U to 4-channel and Bass Boost OFF. 6. Place the DA950-U into the position previously occupied by the DA415. -
Page 23: Virtuo Floor Stand
4. Remove the four screws that hold the amplifier in place. 5. Pull the DA415 out of the floor stand. 6. Set the switches on the DA950-U to 4-channel and Bass Boost OFF. 7. Place the DA950-U into the position previously occupied by the DA415. -
Page 24: Performax Quad
5. Remove the two screws that hold the DA415 amplifier to the panel, then pull the DA415 out of the panel. 6. Set the switches on the DA950-U to 3-channel and Bass Boost OFF. 7. Place the DA950-U into the position previously occupied by the DA415 on the panel, then fasten using the screws you removed at step 5. -
Page 25: Powerpack 725
6. Set the switches on the replacement DA950-U to 3-channel and Bass Boost ON. 7. Position the replacement DA950-U into the spot previously occupied by the original DA950-U. 8. Fasten the replacement DA950-U using the screws you just removed from the original DA950-U. 9. Reconnect all the cables. - Page 26 Configurations...
- Page 30 TouchTunes Interactive Networks, Inc. TouchTunes Interactive Networks, Inc. Technical Support 400 Sainte Croix Avenue, Suite 200 E 3455 Salt Creek Lane, Suite 100 847-353-1954 Montreal, Quebec, Arlington Heights, IL 60005 www.touchtunes.com Canada, H4N 3L4 Copyright © 2013 TouchTunes Interactive Networks...
Need help?
Do you have a question about the DA950-U and is the answer not in the manual?
Questions and answers