Table of Contents
Advertisement
Quick Links
Advertisement
Table of Contents

Related Manuals for Data Flow Systems Hyper SCADA HSS001

Summary of Contents for Data Flow Systems Hyper SCADA HSS001
- Page 1 HSS Serial Number HSM Serial Number NIM Serial Number NSM Serial Number PSM Serial Number HSM IP Address: _________________________________________________ NIM IP Address: _________________________________________________ Backup Computer IP Address: _____________________________________...
- Page 2 However, questions regarding the information contained in this document are welcomed. Data Flow Systems also reserves the right to make changes to the specifications of the Hyper SCADA Server, Hyper Server Module, Network Interface Module, Fiber Interface Module, Network Fiber Module, Network Switch Module, and the HT3 SCADA software and to the information contained in this document at any time without notice.
-
Page 3: Parts List
HSS001 Quick Start Guide This document describes the basic procedures for cabling and configuring the Hyper SCADA Server (HSS001). For detailed cabling and installation information, see the Hyper SCADA Server Installation and Operation Manual, available for download from DFS’ web site (www.dataflowsys.com). For detailed information on configuring the HT3 SCADA software, see the HT3 User Guide (available from within the HT3 software and also available on the DFS website). -
Page 4: Installation Checklist
HSS001 Quick Start Guide Installation Checklist Mount HSS001 to wall Connect to network or primary workstation Connect to serial device(s) Configure NIM’s IP address Connect telephone lines for dial in and dial out Connect audio device (optional) ... -
Page 5: Protecting Against Electrostatic Discharge
HSS001 Quick Start Guide Protecting Against Electrostatic Discharge Static electricity can harm delicate components inside the HSS. To prevent static damage, put on an electrostatic discharge wrist strap before touching any of the HSS' electronic components. In addition to the preceding precautions, the following steps can be taken to prevent damage from electrostatic discharge (ESD): ... - Page 6 HSS001 Quick Start Guide install the unit in a horizontal position or lay the unit down on its front, top, back, or sides. The HSS is designed to operate in an air conditioned, moisture-free, office-type environment [41-86°F (5-30°C)]. When selecting an installation site, make sure that it provides an acceptable environment.
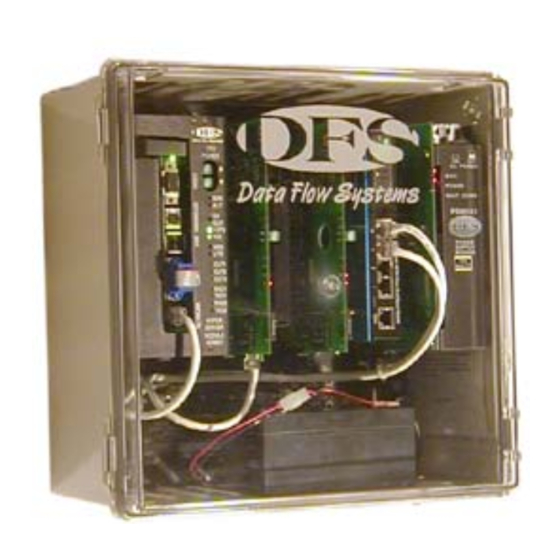
- Page 7 HSS001 Quick Start Guide HSS with FIM/NFM CAT5 TEL. AUDIO COM2 COM1 LINES POWER To Local Area Network/ Dedicated Master Workstation To Tunnel CTU Connect the HSS to a Serial Device The Hyper SCADA Server (HSS001) features two ports (COM1 and COM2) for connecting serial-type devices, including Modbus devices.
- Page 8 HSS001 Quick Start Guide COM1 and COM2: Pin 2 = RXD Pin 3 = TXD Pin 5 = GND Pin 7 = RTS Pin 8 = CTS COM2 COM1 TEL. AUDIO LINES POWER BATTERY To Serial Device 1 To Serial Device 2 Configure the NIM’s IP Address The HSS' NIM acts as an interface between the serial devices connected to the HSS and the network.
- Page 9 HSS001 Quick Start Guide When the NIM boots up, it receives a broadcast from the HSM that says, "This is your subnet." The NIM reads its subnet, mates it with the tunnel address, and begins to talk at that IP address. Connect the HSS to a Telephone Line Note: By default, HT3 software is configured for two phone lines.
- Page 10 HSS001 Quick Start Guide Two Telephone Line Setup Follow these instructions when using two separate telephone lines for the Call Out and Call In functions. From your telephone room or telephone wall jack, locate line 1's and line 2's tip and ring wires. Terminate each line's tip and ring wires using an RJ11 modular telephone connector.
- Page 11 HSS001 Quick Start Guide Connect HSS to External Alarm Light/Horn (optional) The HSS includes alarm terminals (source and load) that can be used to connect an external light or horn. The alarm terminals are rated for 125 VAC/60 VDC max./.5 mA max. An alarm silence button is not included.
- Page 12 HSS001 Quick Start Guide We recommend that you keep the keyboard and monitor attached to the HSM until you verify that you can communicate with the HSM from a Windows workstation. Note: NIMs and FIMs are designed to reset themselves and obtain an IP address after detecting that network communications have been lost and then restored.
- Page 13 HSS001 Quick Start Guide Select Save As from the File menu. Verify that the name hosts appears in the File Name field and click OK. Verify Connection to HSM After the hosts file has been created and saved, use the ping command to verify that your computer can connect to the Hyper SCADA Server using the assigned host name.
- Page 14 HSS001 Quick Start Guide Start HT3 When installation of the plug-ins and the Java policy file is complete, type ht3 in Internet Explorer's Address box. On the HT3 login page, enter your Login and Password and click OK. Bookmark HT3 in your browser or create a shortcut to HT3 on your desktop.
- Page 15 HSS001 Quick Start Guide Enter HSU for the Shared as name. C. Enter a password in the Full Access Password box. Windows 2000/NT or XP or newer A. Change the share name of the folder to HSS. Set all shared folder permissions to Full Control. C.
- Page 16 HSS001 Quick Start Guide Verify that all of the above information is correct and click OK.
- Page 17 HSS001 Quick Start Guide HT3 Overview After the necessary hardware and software has been installed and the system is up and running, you can begin configuring HT3 to interface with your system’s components (e.g., PLCs, surveillance cameras); set up user accounts; configure alarms for call out;...
- Page 18 HSS001 Quick Start Guide Menus When you click an item on the HT3 main menu, the submenu for that item opens and the main menu item changes color. If you click another item on the main menu, the submenu changes to reflect the choices for that item. When you click an item on the submenu, the submenu item changes color and the work space displays the interface for the chosen item except if Screen Builder, Logic Builder, or PCU Editor is selected.
- Page 19 HSS001 Quick Start Guide reboot. This screen (which comes with your system and is built with Screen Builder) uses built-in external status points that monitor the health of your system. Custom Screen Viewer displays the custom screens (graphical representations of telemetry) that you create using HT3’s Screen Builder application.
- Page 20 HSS001 Quick Start Guide Calculating the flow at sewage lift stations that aren't equipped with analog flow meters. Generating a chronological listing of all events that occurred at the requested telemetry addresses for the specified time period. Listing all DFS stations that are digipeating and providing their relay paths.
- Page 21 HSS001 Quick Start Guide local Windows workstation: report .csv files; report .txt files; driver log files. You can also use this utility to delete files (.csv and .txt report files) from the server. HT3’s Module Patching Utility is designed to help maintain the latest patch levels (updates to the original program) on all DFS function modules.
- Page 22 HSS001 Quick Start Guide HT3’s Screen Builder application lets you create a graphical representation of your telemetry system using text, images, objects, and animation. The screen's components can be linked to actual telemetry points; providing you with a quick, real-time view of your operation. Virtual Logic Builder is a user-friendly application that enables you to construct "ladder logic"-style programs that run on the HT3 central computer.
-
Page 23: Backup Battery
HSS001 Quick Start Guide SDN then goes constant indicating that services to the HSM have been turned off. After a few moments, the CPU power LED (+CPU) goes out indicating that it is now safe to remove power. Disconnect the battery. Turn off the PSM. - Page 24 HSS001 Quick Start Guide To clean the interior of the HSS001, use a dry, lint-free cloth, a mini computer vacuum, soft brush, or an aerosol can of compressed air.
-
Page 25: Replacement Parts
STEP 1: Replace the failed module with a spare module of the same type, if one is available. STEP 2: Contact Data Flow Systems Inc. in one of the following ways to receive an RA#: Email DFS at rma@dataflowsys.com. - Page 26 STEP 4: Address the box to: RA Department # {the RA number you received here} Data Flow Systems, Inc. 605 N. John Rodes Blvd. Melbourne, FL 32934-9105 STEP 5: Ship the box to DFS using any typical shipping carrier (for example, UPS, FedEx, etc.).
-
Page 27: Warranty
Warranty Certificate, or the Warranty Statement included with your contract, for details on the terms of your warranty. If you lose your Warranty Certificate/Statement, contact Data Flow Systems’ Sales Department to obtain the warranty terms and to replace your Warranty Certificate/Statement. - Page 28 HSS001 Quick Start Guide Notes:...
- Page 29 HSS001 Quick Start Guide Notes:...
- Page 30 Data Flow Systems, Inc. 605 N. John Rodes Blvd. Melbourne, FL 32934 321-259-5009 www.dataflowsys.com...
Need help?
Do you have a question about the Hyper SCADA HSS001 and is the answer not in the manual?
Questions and answers