
Related Manuals for 909 G1100KU

Summary of Contents for 909 G1100KU
- Page 1 INSTRUCTION MANUAL G1100KU A2300 G2300KU G3800KU G6000KU AVR PETROL GENERATOR RANGE...
-
Page 2: Table Of Contents
CONTENTS Warranty Power Tools Warranty Introduction For full details please visit us at www.909.com Environmental protection Scope of product Description of symbols Specifications Safety instructions Risk of electrocution and fire Risk of fire Risk of injury and property damage when transporting generator Risk of breathing –... -
Page 3: Introduction
Cautions and Warnings. caravans etc. Your 909 power tool has many features that will make It is highly recommended to have a surge protector your job faster and easier. Safety, performance, and dependability have been given top priority in the connected to the generator. -
Page 4: Specifications
Specifications G1100KU A2300 G2300KU G3800KU G6000KU AC output: 240Vac ~ 50Hz 240Vac ~ 50Hz 240Vac ~ 50Hz 240Vac ~ 50Hz 240Vac ~ 50Hz Rated power: 900W 2000W 2000W 3200W 5000W Peak power: 1100W 2300W 2300W 3800W 6000W Phase: Single Single... -
Page 5: Safety Instructions
Safety instructions Personal safety Stay alert, watch what you are doing and use • WARNING. Read and understand all instructions. common sense when operating a power tool. Failure to follow all instructions listed below may result in Do not use a power tool while you are tired or under the electric shock, fire and/or serious injury. - Page 6 • Disconnect the plug from the power source before making any adjustments, changing accessories, or storing power tools. Such preventive safety measures reduce the risk of starting the power tool accidentally. • Store idle power tools out of the reach of children and do not allow persons unfamiliar with the power tool or these instructions to operate the power tool.
-
Page 7: Risk Of Electrocution And Fire
Risk of electrocution and fire Hazard What could happen How to prevent it Extension cord can come into contact Remove extension cord from the Improper storage of extension cord. with hot engine parts resulting in generator and store separately away damage. -
Page 8: Risk Of Fire
Risk of fire Hazard What could happen How to prevent it Fuel and fuel vapours can become ignited Turn engine off and allow it to cool before Attempting to fill the fuel by coming in contact with hot components adding fuel to the tank. Equip area of tank while the engine is such as the muffler, engine exhaust gases, operation with a fire extinguisher certified... -
Page 9: Risk Of Injury And Property Damage When Transporting Generator
Risk of injury and property damage when transporting generator Hazard What could happen How to prevent it Fuel or oil can leak or spill and The generator is equipped with a fuel drain valve, Fire, inhalation, damage could result in fire or breathing turn the valve to the off position before transporting to to vehicle surfaces hazard, serious injury or death... -
Page 10: Risk Of Hot Surfaces
Risk of hot surfaces Hazard What could happen How to prevent it Contact with hot surfaces, such as During operation, touch only the Contact with hot engine and engines exhaust components, could control surfaces of the generator. Keep generator components. result in serious burns. -
Page 11: Additional Safety Rules For Generators
Due to modern mass production techniques, it is unlikely spilling of fuel as this may also ignite with the hot motor. that your 909 generator is faulty or that a part is missing. Never refuel whilst the engine running. If you find anything wrong, do not operate the tool until the •... -
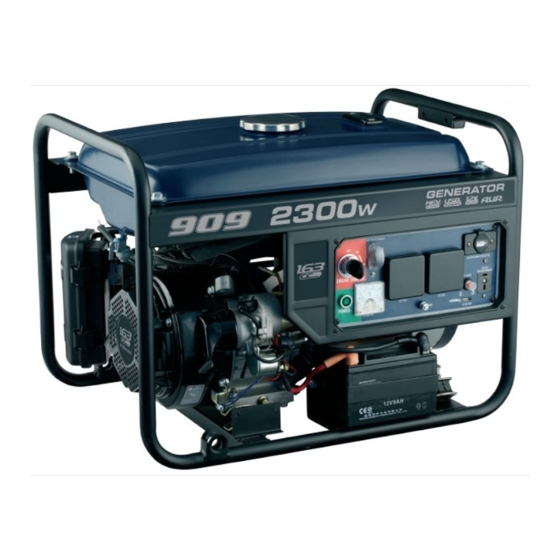
Page 12: Know Your Product
Know your product 1. Fuel tank 2. Fuel tank cap 3. Fuel level gauge (not fitted on G1100KU) 4. AC circuit breaker 4a. AC circuit breaker (as fitted to G1100KU) 5. DC reset button 6. Ground (frame) terminal 7. Oil filler cap 8. -
Page 13: Automatic Voltage Regulator (Avr)
The AVR maintains a regulated AC output and reacts built in electronic inverter equipment. substantially quicker to rapid surges in voltage, therefore, reducing the possibility of damage to the generator and attached equipment. What can I use these generators for? G1100KU A2300 G2300KU G3800KU G6000KU 900W... -
Page 14: Preparing The Generator
LCD / plasma G1100KU televisions, computers, microwaves etc, and including • Lights caravans which have internal inverter controls. • Small pumps up to 400W It is also recommended to use a surge protector on the •... -
Page 15: Checking The Engine Oil
1. Check the Red positive wire is connected to the battery Checking the engine oil terminal and the insulating cover is fully pulled over the The motor of this generator is not filled with oil when unpacked. terminal. Prior to starting the motor ensure the crank case is filled with 2. -
Page 16: Starting The Engine With Key Start (Electric Start Models)
2. Turn the fuel valve (20) clockwise to the ‘on’ position (Fig. F). position. 3. Move the choke lever (14) to the full choke position. This • G1100KU Move lever towards the rear of generator. is not necessary if the engine is already warm. •... -
Page 17: Starting The Engine Manually
6. Once you hear the motor operating, move the choke Where fitted, turn off the AC lever (14) back to the run position (refer point 6 above). circuit breaker (all models except G1100KU). Check the appliance to be connected is turned ‘OFF’. Insert the 3 pin plug into the 240V outlet socket of the generator (Fig. -
Page 18: Ac Circuit Breaker
“OFF” both the circuit breaker (4) (not applicable generator, check the rating label of the appliance. The to G1100KU as the safety switch cannot be turned off generator has a rated value and is shown on the generator manually) and or the generator engine switch (12a or 12b) label, so if the appliance being connected is higher than immediately. -
Page 19: To Use The Battery Charging Outlet
The 12V – 14V outlets are suitable to charge most size lead To use the battery charging outlet acid type car batteries while the appliance outlet will run The generator is fitted with most 12V appliances fitted with the car cigarette type plug, a socket outlet specifically rated up to 5A. -
Page 20: To Use The Usb Power Outlet
to the battery, RECHECK to ensure the connections are To use the USB power outlet as above. These range of generators are fitted with a 5 Volt USB 2. Start the generator and allow the generator to warm up. power outlet. 3. -
Page 21: To Use The Dc Appliance Outlet Or Usb Without The Generator Being Operated
To use the DC appliance outlet or USB 12V appliance socket: 10 amp. without the generator being operated 5 V USB: 1 amp. Both sockets can be used at the one time. The 12 volt appliance outlet and or the USB outlet can be used if a 12V car battery is connected to the charging socket Note. -
Page 22: Carbon Build Up
5. When re connecting appliances, reduce the load to that If the generator is being used for solely charging a battery, which previously overloaded the generator. it is recommended to run the 240Vac at around 500W for the generators up to 2000W and 1000W for the generators Note. -
Page 23: Periodic Maintenance
Periodic maintenance Item Remarks Pre-operation Initial 1 Every 3 Every 6 Every 12 check (daily) months months months months or 20Hr or 50Hr or 100Hr or 300Hr Check condition, adjust gap and Spark plug • clean. Replace if necessary. Check oil level. •... -
Page 24: Storage
0.7– 0.8mm (0.028”– 0.031”) cover at the front side of the filter housing (Fig. U1). 5. The recommended spark plugs are as follows: BPR6ES (NGK) RN11YC (Champion) WR6DC (Bosch) Model G1100KU W7RBC (Bosch) RL87BC(Champion) BPR7HS (NGK) -
Page 25: Petrol Tank Filter
1b. (For model G1100KU) Tap extension fuel filter Remove the air filter A small fuel filter has been fitted to the inlet side of the fuel cover on the side of the valve (20), inside the tank. This tap extension fuel filter (24) generator by removing prevents any dirt in the fuel from entering the fuel system. -
Page 26: Cleaning
replaced. Do not operate the generator without this filter in Cleaning place. To replace the filter after cleaning, or with a new filter, 1. Keep your machine clean. The outside of the machine simply screw the filter into the inlet side of the tap. can be cleaned using a damp soft cloth with a mild 5. -
Page 27: Troubleshooting
Troubleshooting Trouble Possible cause Suggested remedy 1. Low on fuel or oil content 1a. Add Fuel ( ensure fuel is fresh) Engine will not start 1b. Fill oil in motor until oil runs out of filler hole 2. Generator not sitting on level ground. 2. - Page 28 Troubleshooting (continued) Trouble Possible cause Suggested remedy 1. Generator overloaded 1. Reduce load Generator overheating 2. Insufficient ventilation 2. Move to adequate supply of fresh air 1. DC circuit overloaded. 1a. Remove DC load and reset cut out No DC Output after 5 min 1b.
Need help?
Do you have a question about the G1100KU and is the answer not in the manual?
Questions and answers