
Subscribe to Our Youtube Channel
Related Manuals for Gigatech K-350R

Summary of Contents for Gigatech K-350R
- Page 1 HF COLOR VIDEO INTERCOM WITH RECORDING K-350R KIT OWNER S MANUAL INSTALLATION AND OPERATION...
-
Page 2: Table Of Contents
2.2.Door Camera 2.3.K-350R KIT Packaging 3.K-350R KIT Installation 3.1. Positioning the devices 3.2. Installation 3.3. Door Release Options 4. K-350R KIT read before operation .1. Attention 4.2. On screen menu icons 4.3. Setup menu 4.4. Intercom function operations 4.5. Privacy function 4.6. -
Page 3: K-350R Kit Video Intercom System
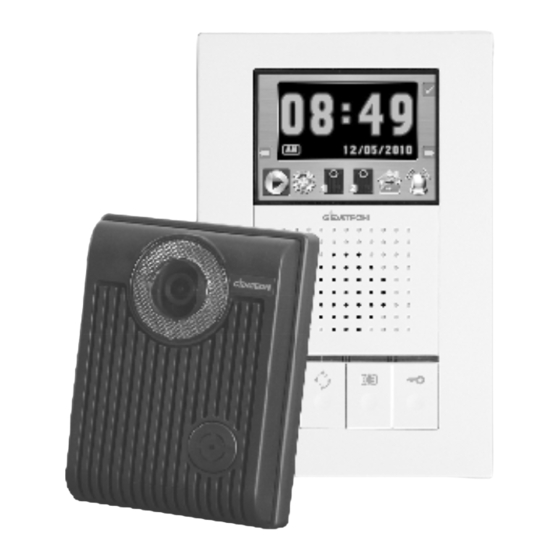
K-350R Video intercom system Introduction 2011-01 K-350R KIT VIDEO INTERCOM SYSTEM 1. K-350R KIT introduction Thank you for purchasing this Video Intercom System. This advanced system not only allows you to identify and communicate with visitors at the door and allows for remote door strike release, it can also record the video intercom communication on a micro SD card for later playback. -
Page 4: K-350R Kit Parts Identification
K-350R Video intercom system Introduction 2011-01 2.K-350R KIT Parts Identification 2.1. Main Monitor 178mm (7.0 ) 36mm 10 11 12 13 (1.42 ) 118mm (4.65 ) K-350R Main monitor identification: Micro SD card slot socket 3.5" Color TFT Screen Touch sensitive buttons (4 on each side, unmarked) - Page 5 K-350R Video intercom system Introduction 2011-01 K-350R Main menu identification: Confirm Video and menu display area Tab right Tab left Play Setup 1st doorbell camera 2st doorbell camera Paging other monitor Chime enable or disable Main monitor w all mount bracket...
-
Page 6: Door Camera
K-350R Video intercom system Introduction 2011-01 2.2. Door Camera 130mm (5.12 ) " 36mm 98mm (1.42 ) " (3.86 ) " K-350R Door Camera identification: White LED Illumination Speaker 1/3" Color CCD Microphone Call button Screw cover CCD view angle knob... -
Page 7: K-350R Kit Installation
K-350R Video intercom system Introduction 2011-01 3. K-350R KIT Installation 3.1. Positioning the devices Main monitor Door camera Proper height: View Angle: 70cm 100cm (27.6 ) " (39.3 ) " 165cm 170cm (64.9 ) " (66.9 ) " 50cm(19.7 ) "... -
Page 8: Installation
K-350R Video intercom system Introduction 2011-01 3.2. Installation STAGE 1: Installation of main monitor A. Fasten the wall mount bracket using the provided hardware. B. Fasten wires on terminals accordingly. (Refer to STAGE 3) C. Plug pin wires and mount the monitor unit on bracket. - Page 9 K-350R Video intercom system Introduction 2011-01 STAGE 3: Wiring and settings A. Wire the system from door camera terminals to monitor terminals accordingly. B. Select and plug JP2 to its RIGHT( ) to disable LED illumination of the doorbell camera when it's activated. Factory setting is LEFT( ) which enables automatic LED illumination.
-
Page 10: Door Release Options
K-350R Video intercom system Introduction 2011-01 3.3. Door Release Options Each Door Camera on the system is able to operate and release one electric lock. On a full system with 2 door cameras, the user is able to release up to two electric locks. The system can only release one electric lock at a time, depending on which door camera the call originated from. -
Page 11: K-350R Kit Read Before Operation
K-350R Video intercom system Introduction 2011-01 4. K-350R KIT read before operation 4.1. Attention A. Micro SD card, SDHC(High Capacity SD card), is not included in this product package. B. Insert SD card properly. The SD card can be 2GB to 16GB memory size. -
Page 12: Setup Menu
K-350R Video intercom system Introduction 2011-01 4.3. Setup menu A. Move cursor to SETUP icon at main menu; B. Press can enter setup menu. 4.3.1. Adjust clock A. At setup menu, can move the cursor; can alter parameter (figure 1);... - Page 13 K-350R Video intercom system Introduction 2011-01 4.3.3 Video or photo recording A. At setup menu, can move the cursor to the mode you like; can save your setup. B. If select , enable automatic video recording mode, 20 seconds a section, when visitor calls from doorbell camera (figure 3) .
-
Page 14: Intercom Function Operations
K-350R Video intercom system Introduction 2011-01 4.4. Intercom function operations 4.4.1. Push to talk function A. Speach open LED on means voice is free to go out from monitor to door camera. B. During conversation, press Monitor Button for 2 seconds to switch to push to talk mode. - Page 15 K-350R Video intercom system Introduction 2011-01 4.4.3. zoom and p an/tilt function A. While talking to the doorbell camera from main monitor, tenant can at the same time operate the on-screen-menu to stop or resume video recording. B. To operate zoom and pan/tilt function has to stop recording first and resume afterward.
-
Page 16: Privacy Function
K-350R Video intercom system Introduction 2011-01 4.4.5. All page announcement and intercom among monitors A. From any monitor, tenant can press intercom button or select the function from the on-screen main monitor menu to page and make nnoucements to other monitors (figure 12). - Page 17 K-350R Video intercom system Introduction 2011-01 10062800 /100401-1 1 01224 00 10/06/28 04 57 39 (figure 13) (figure 14) 2010/06/28 04 5 7 3 9 1 0 1 2 0 8 0 0 1 0 / 1 2/ 0 8...
-
Page 18: Expansion Options
K-350R Video intercom system Introduction 2011-01 EXPANSION OPTIONS System layout 1: NOTE: the system is capable of expanding up to a total of 4 monitors (1 main video monitor + 3 expansion video monitor or 3 expansion audio monitor (video or audio mixing types) and 2 door cameras. -
Page 19: System Layout 2
K-350R Video intercom system Introduction 2011-01 System layout 2: NOTE 1: The wiring HUB can amplify and distribute the 2-wire signal among the main monitor and sub-monitors. NOTE 2: the system is capable of expanding up to a total of 5 monitors with 1 EX-HUB or 8 total monitors with 2 EX-HUBs connected in one system. - Page 20 K-350R Video intercom system Introduction 2011-01 A Max A Max K-350R EX-350D EX-350H or EX-350A B Max C Max HB-140 OUT1 OUT2 OUT3 POWER OUT4 POWER LED EX-350H or EX-350A NOT E 1:OUT4 can also be used to connect to a expansion monitor.
-
Page 21: Expansion Video Monitor (Ex-350H)
K-350R Video intercom system Introduction 2011-01 1. Expansion Video Monitor (EX-350H) 1.1. EX-350H Identification EX-350H 178mm (7.0 ) 36mm 10 11 (1.42 ) 118mm (4.65 ) EX-350H identification: 3.5" Color TFT Screen Speaker In use LED Monitor LED Intercom LED... - Page 22 <-> 89mm (3.5 ) 8.4mm(0.33 ) Magnetic switch sensor connection: for door status detection OUT: to next EX-350H monitor, w/polarity IN: from K-350R or EX-350H monitor, w/polarity Power adapter connection EX-350H packaging OUT + OUT- <+ > P O WE R <->...
-
Page 23: Ex-350H Installation
K-350R Video intercom system Introduction 2011-01 1.2. EX-350H Installation STAGE 1: Installation of the expansion monitor A. Fasten the wall mount bracket using the provided hardware. B. Fasten wires on terminals accordingly. (Refer to STAGE 2) C. Plug pin wires and mount the monitor unit on bracket. -
Page 24: Ex-350H Operation
K-350R Video intercom system Introduction 2011-01 1.3. EX-350H Operation 1.3.1. Visitor Calls from Door Camera A. When the Call button on the camera is pressed, All monitors on the system will ring with a chime sound and all monitors will be activated. -
Page 25: Expansion Audio Monitor (Ex-350A)
K-350R Video intercom system Introduction 2011-01 2. Expansion audio Monitor (EX-350A) 2.1. EX-350A Identification 178mm (7.0 ) 36mm (1.42 ) 118mm (4.65 ) EX-350A identification: Speaker In use LED Monitor LED Intercom LED peach open Microphone Cut-off button( ) Intercom button( ) - Page 26 <-> 89mm (3.5 ) 8.4mm(0.33 ) Magnetic switch sensor connection: for door status detection OUT: to next EX-350A audio monitor, w/polarity IN: from K-350R or EX-350A monitor, w/polarity Power adapter connection EX-350A packaging OUT+ OUT- <+ > P O WE R <->...
-
Page 27: Ex-350A Installation
K-350R Video intercom system Introduction 2011-01 2.2. EX-350A Installation STAGE 1: Installation of the expansion monitor A. Fasten the wall mount bracket using the provided hardware. B. Fasten wires on terminals accordingly. (Refer to STAGE 2) C. Plug pin wires and mount the monitor unit on bracket. -
Page 28: Ex-350A Operation
K-350R Video intercom system Introduction 2011-01 2.3. EX-350A Operation A. Operates the same as EX-350H (Refer to page 22). B. EX-350A audio only function, no video function. 2.3.1. All-page and intercom function A. When system consists of main monitor and expansion audio monitor and an outdoor doorbell/camera unit, the system can provide intercom function. -
Page 29: Door Camera (Ex-350D)
K-350R Video intercom system Introduction 2011-01 3. Door Camera (EX-350D) 3.1. EX-350D Identification 130mm (5.12 ) " 36mm 98mm (1.42 ) " (3.86 ) " EX-350D identification: White LED Illumination 1/3" Color CCD Microphone Speaker Call button Screw cover CCD view angle knob... -
Page 30: Ex-350D Installation
K-350R Video intercom system Introduction 2011-01 3.2. EX-350D Installation STAGE 1: Installation of the door camera A. Use security screw wrench disassemble screw and remove door camera unit from bracket. B. Fasten wall mount bracket on position. C. Fasten wires on terminals and select jumpers for desired function. -
Page 31: Metal Door Camera Housing (Ex-350V)
K-350R Video intercom system Introduction 2011-01 Metal Door Camera Housing (EX-350V) 4.1. EX-350V contents EX-350V is an optional housing assembly kit to enclose EX-350D to become flush mount metal doorbell camera. Bracket 1 Front panel Rubber seal 4.5 x10mm Screw 3.0 x6mm Screw... -
Page 32: Assembly Procedure
K-350R Video intercom system Introduction 2011-01 4.3. Assembly Procedure STEP 1-1 : A. If on wooden wall, cut open space is 100x150x41mm. B. Embed box may not necessary. Go to Step 2. STEP 1-2 : A. If on cement or brick wall, cut open a hole size of 114x165x49mm. -
Page 33: Technical Specifications
K-350R Video intercom system Introduction 2011-01 TECHNICAL SPECIFICATIONS K-350R(main monitor) Display: 3.5 digital TFT-LCD " Resolution: 320 x 240 pixels Auto Timer (visitor call): 30 seconds time out; 90 seconds for conversation Auto Timer (intercom): 30 seconds time out; 90 seconds for conversation... - Page 34 K-350R Video intercom system Introduction 2011-01 EX-350H(optional expansion monitor) Display: 3.5 digital TFT-LCD " Resolution: 320 x 240 pixels Auto Timer (visitor call): 30 seconds time out; 90 seconds for conversation Auto Timer (intercom): 30 seconds time out; 90 seconds for conversation...
-
Page 35: Trouble Shooting
K-350R Video intercom system Introduction 2011-01 TROUBLE SHOOTING Before requesting service, check the troubleshooting quide to solve the problem. Problem Solution Make sure AC plug is firmly inserted into the AC outlet. Make sure the power terminal is No power firmly connected into the monitor unit. -
Page 36: Service And Warranty
SERVICE AND WARRANTY To receive after sales service, please provide the follow ing information when contact. a. Name of the product b. Model and serial number of the product c. The store s name where you purchased d. Date purchased e.
Need help?
Do you have a question about the K-350R and is the answer not in the manual?
Questions and answers