Table of Contents
Advertisement
Quick Links
Advertisement
Table of Contents

Subscribe to Our Youtube Channel
Related Manuals for Sun Microsystems 2CSB-LP

Summary of Contents for Sun Microsystems 2CSB-LP
-
Page 1: Side Burner Models
Side Burner Models 2CSB Double Slide-In Side Burner LP/NG 1SSB Single Drop-In Side Burner LP/NG For Outdoor Use Only To installer or person assembling side burner: Leave this manual with side burner for future reference. To consumer: Keep this manual for future reference. www.sunstonegasgrills.com... - Page 2 Welcome & Congratulations Congratulations on your purchase of a new side burner! We are very proud of our products and we are completely committed to providing you with the best service possible. Your satisfaction is our #1 priority. Please read this manual carefully to understand all the instructions about how to install, operate and maintain for optimum performance and longevity.
-
Page 3: Table Of Contents
Table of Contents Safety Instructions ...... 4 WARNING Burner Models ......5 Gas Requirement......6 IF YOU SMELL GAS: Locating the Grill ......10 1. Shut off gas to the appliance. Pre Operation Leak Testing ..12 2. Extinguish any open flame. Parts List ........ -
Page 4: Safety Instructions
Safety Instructions WARNING: Improper installation, adjustment, alteration, service or maintenance can cause injury or property damage. Read the installation, operating and maintenance instructions thoroughly before installing or servicing this equipment. General Safety Instructions For Household Outdoor Use Only – DO NOT use indoors or in any type of enclosed area such as a garage, shed or breezeway. -
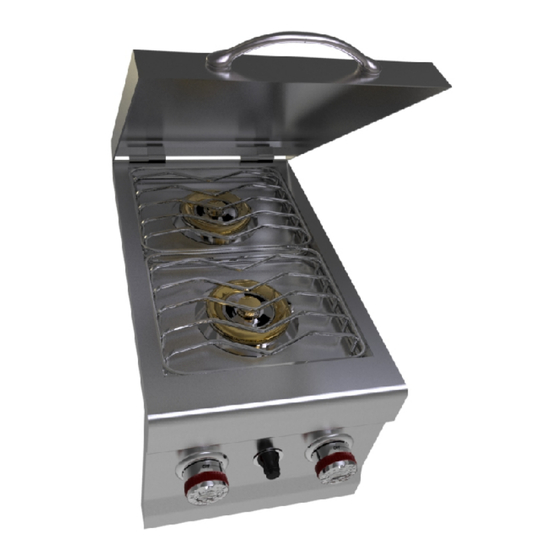
Page 5: Burner Models
(Need to describe their main characteristic what a feature that helps to identify, tell apart, or describe recognizably; a distinguishing mark or trait) 1SSB Single Drop-In Side Burner LP/NG 2CSB Double Slide-In Side Burner LP/NG Model No. Product Size Burner(s) 2CSB-LP 13” Width 30,000 Two burners 2CSB-NG 22-1/2” Depth 1SSB-LP 11”... -
Page 6: Gas Requirement
Gas Requirement NOTE: Always have a qualified service technician perform difficult conversions or modifications. WARNING: Never attach an unregulated gas line to the appliance. Connection to an unregulated gas line can cause excessive heat or fire. IMPORTANT: Before connecting side burner to gas source, make sure burner control knobs are in “OFF”... - Page 7 Cylinder Specifications Any L.P. gas supply cylinder used with this appliance must be approximately 12 inches diameter and 18 inches high. The maximum fuel capacity is 80% and is approximately 20 pounds of propane. The L.P. cylinder must have a shut-off valve (see picture) terminating in a Type 1 L.P.
- Page 8 Never leave a LP tank inside a vehicle which may become overheated by the sun. Do not store LP tank in an area where children play.
- Page 9 test new and exchanged LP tanks BEFORE connecting to burner. Natural Gas Hook-up Always check the rating plate to make sure the gas supply you are hooking up to is the gas type the side burner is manufactured for. This natural gas burner is designed to operate on natural gas ONLY, at a pressure regulated at 4” (101.6mm) water column (W.C.) when equipped with the correct natural gas orifices on the valves and a natural gas regulator on the supply line regulated at the residential meter.
-
Page 10: Locating The Grill
Locating the Side Burner Check your local building codes for the proper method of installation. In the absence of local codes, this unit should be installed in accordance with the National Fuel Gas Code No. Z223.1-1998 USA or CAN/CGA-B149.1/.2 Natural Gas/Propane Code (Canada) latest edition or the National Electrical Code ANSI/NFPA No. - Page 11 The two top illustrations demonstrate how the slide-in type unit is designed to fit into open- front enclosures, and supported at the Countertop. The top illustrations demonstrate how the drop-in type unit is designed to fit into opening through countertop into enclosures. Do not install this unit under unprotected flammable surfaces.
- Page 12 For Built-in Installations A side burner is designed for easy installation into masonry enclosures. For non-combustible applications, the side burner drops into the opening (as shown in cut-out detail drawing - Fig. A) above or below depending on space, and hangs from its counter top trim. A deck is not required to support it from the bottom.
-
Page 13: Pre Operation Leak Testing
Pre Operation Leak Testing DANGER Do not insert any tool into the valve outlet or safety relief valve. You may damage the valve and cause a leak. Leaking propane may result in explosion, fire, severe personal injury, or death. If a leak is detected at any time or you cannot stop a gas leak, immediately close pipeline valve and call LP gas supplier or you fire department! Check all gas supply fittings before each use and each time the gas supply cylinder is connected to the regulator. -
Page 14: Parts List
gas tanks now come equipped with a leak detector mechanism internal to the tank; when gas is allowed Double Side Burner Parts List to escape rapidly, it shuts off the gas supply. A leak may significantly reduce the gas flow making the side burner difficult to light or causing low flames. - Page 15 Single Side Burner Parts List...
-
Page 16: Light The Grill
Sun2CSB LP/NG & 1SSB LP/NG PARTS LIST Name Part No. Name Part No. Hood Handle DBPHANDLE Igniter Cap - SB SB-IG-CAP Handle Fixing DBPFIXING Igniter Ring IG-RING 2CSB Hood DB-HOOD Impulse Igniter IG-BOX 1SSB Hood SB-HOOD 2CSB Gas Pipe DB-PIPE Hood Axle DB-AXLE 1SSB Gas Pipe... - Page 17 GENERAL RULES Do not leave the side burner unattended while cooking! Make sure the burner has been leak tested and is properly located. Light the burners using the instructions provided in this manual. Adjust heat settings to your desired cooking temperature. Allow burners to cool down, wipe off any splatters or grease.
-
Page 18: Lighting Instructions
Lighting Instructions OPEN LID ENSURING BURNER CONTROLS ARE IN THE “OFF” POSITION, TURN ON THE GAS SUPPLY VALVE. Main Burner Lighting If burner does not light, repeat previous steps, or follow the following instructions. 1. Push and turn the Right or Left knob to HIGH position 3-5 seconds to light burner. -
Page 19: Operation And Features
Operations and Features When initially bringing turning the burners on, burn the burners to get rid of any odors or debris by operating at “HIGH” setting Preparing Food for the side burner WARNING: Always observe safe food-handling and safe food-preparation practices when using this burner, to prevent food-borne illnesses. -
Page 20: Care & Maintenance
Care & Maintenance CAUTION: All cleaning and maintenance should be done only when side burner is cool & with the fuel supply turned off at the cylinder. If your side burner is set up for use with Natural Gas, turn off gas supply at the system manual shut off valve. - Page 21 ANNUAL CLEANING OF BURNER HOUSING Burn-off the barbeque after every cookout will keep it ready for instant use, however, once a year you should give the entire side burner a thorough cleaning to keep it in top operating condition. Shut off gas supply at source and disconnects fuel line. Protect fuel line fitting. Remove and clean the cooking grids and burners.
-
Page 22: Troubleshooting Your Burner
Troubleshooting Your Side Burner GENERAL TROUBLE SHOOTING You should inspect the burners at least once a year or immediately if any of the following conditions occur: • The smell of gas. • Flames appearing mostly yellow. (Some yellow at the tips is OK) •... - Page 23 Note: You will need to remove your cooking grates and flame tamers to see the electrodes. • • • • Flare-ups • Note: Some flare-ups may be inevitable if cooking greasy foods. • Yellow Flames • • Flame blows out on low setting or has uneven heat distribution.
-
Page 24: Limited Warranty
The cost of service calls to diagnose trouble; or Removal or re- installation cost. This warranty applies to the original purchaser with invoice or proof of purchase and covers Sun products intended for personal, family or household usage only. It does not apply to rust, corrosion, oxidation or discoloration, which may occur due to moisture or overheating.
Need help?
Do you have a question about the 2CSB-LP and is the answer not in the manual?
Questions and answers