Table of Contents
Advertisement
In use
CATEYE
VELO 9 / VELO 7
CYCLOCOMPUTER
CC-VL820 / CC-VL520
Before using the computer, please thoroughly read this
manual and keep it for future reference.
Warning / Caution
• Do not concentrate on the computer while riding.
Ride safely!
• Install the magnet, sensor, and bracket securely.
Check these periodically.
• If a child swallows a battery, consult a doctor immediately.
• Do not leave the computer in direct sunlight for a long period of time.
• Do not disassemble the computer.
• Do not drop the computer to avoid malfunction or damage.
• When cleaning the computer, bracket and sensor, do not use thinners,
benzene, or alcohol.
• Risk of explosion if battery is replaced by an incorrect type.
Dispose of used batteries according to local regulations.
• LCD screen may be distorted when viewed through polarized sunglass
lenses.
Maintenance
• To clean the computer or accessories, use diluted neutral detergent
on a soft cloth, and wipe it off with a dry cloth.
• If the gaps between the buttons and the unit get clogged with mud or
sand, wash them away with water.
Replacing the battery
When the display becomes dim, replace the
battery. Install a new lithium battery (CR2032)
with the (+) side facing upward.
* After replacing the battery, be sure to set the
unit again according to the procedure speci-
fied in "Preparing the computer" (page 3).
Troubleshooting
No display.
Is battery in the computer run down?
Replace with new batteries according to the procedure specified
in the section "Replacing the battery".
Incorrect data appear.
Follow the procedure described "Preparing the computer" (page 3).
Current speed does not appear.
(First, short-circuit the contact of the computer a few times with a piece
of metal. If current speed appears, the computer is working fine and the
cause should be attributed to the bracket or the sensor.)
Is the wire broken?
Even if the outside of the wire looks normal, there could be
damage. Replace the bracket sensor kit with a new one.
Is the clearance between the sensor and the magnet too large?
Are the magnet's center and the sensor's marking line aligned?
Re-adjust the positions of the magnet and the sensor.
(The clearance should be less than 5 mm.)
Is there anything sticking on the contact of the computer or the
bracket?
Clean the contact with a cloth.
Specification
Battery / Battery life Lithium battery (CR2032) x 1 / Approx. 3 year
* The factory-loaded battery life might be shorter than the above-mentioned specification.
Controller
Display
Sensor
Tire size to be
selected
Working
temperature
C O
I N
Close
Dimensions/weight 2-3/16" x 1-15/32" x 5/32" (55.5 x 37.5 x 18.5 mm) / 1.06 oz (30 g)
* The specifications and design are subject to change without notice.
Open
CR2032
Limited warranty
2-Year: Computer only
(Accessories/Bracket sensor and Battery Consumption excluded)
CatEye cycle computers are warranted to be free of defects from materials and workmanship
for a period of two years from original purchase. If the product fails to work during normal
use, CatEye will repair or replace the defect at no charge. Service must be performed by Cat-
Eye or an authorized retailer. To return the product, pack it carefully and enclose the warranty
certificate (proof of purchase) with instruction for repair. Please write or type your name and
address clearly on the warranty certificate. Insurance, handling and transportation charges to
CatEye shall be borne by person desiring service. For UK and REPUBLIC OF IRELAND con-
sumers, please return to the place of purchase. This does not affect your statutory rights.
2-8-25, Kuwazu, Higashi Sumiyoshi-ku, Osaka 546-0041 Japan
Attn: CATEYE Customer Service Section
Phone : (06)6719-6863
E-mail : support@cateye.co.jp
[For US Customers]
CATEYE AMERICA, INC.
2825 Wilderness Place Suite 1200, Boulder CO 80301-5494 USA
Phone : 303.443.4595
Fax
: 303.473.0006
Spare accessories
Standard accessories
1603390
Parts kit
Optional accessories
1603491
VELO 9 / VELO 7
ENG
4 bit, 1-chip microcomputer (Crystal controlled oscillator)
Liquid crystal display
No contact magnetic sensor
26", 700c, 27", 16", 18", 20", 22" and 24", or tire circumference of
100 cm - 299 cm (initial value: 26 inch)
32 °F - 104 °F (0 °C - 40 °C) (This product will not display appropri-
ately when exceeding the Working Temperature range. Slow response
or black LCD at lower or higher temperature may happen respectively.)
Please register your CatEye product on the website.
http://www.cateye.com/en/support/regist/
Fax
: (06)6719-6033
URL : http://www.cateye.com
Toll Free : 800.5.CATEYE
E-mail
: service@cateye.com
1603391
1699691N
Bracket
Wheel
sensor kit
magnet
Heavy duty bracket
sensor kit
1
1665150
CR2032
Lithium
battery
Advertisement
Table of Contents

Related Manuals for Cateye Velo 9


Summary of Contents for Cateye Velo 9
-
Page 1: Replacing The Battery
In use VELO 9 / VELO 7 CATEYE Maintenance Specification • To clean the computer or accessories, use diluted neutral detergent Battery / Battery life Lithium battery (CR2032) x 1 / Approx. 3 year VELO 9 / VELO 7 on a soft cloth, and wipe it off with a dry cloth. * The factory-loaded battery life might be shorter than the above-mentioned specification. Controller 4 bit, 1-chip microcomputer (Crystal controlled oscillator) • If the gaps between the buttons and the unit get clogged with mud or Display Liquid crystal display sand, wash them away with water. Sensor No contact magnetic sensor Tire size to be 26”, 700c, 27”, 16”, 18”, 20”, 22” and 24”, or tire circumference of Replacing the battery selected 100 cm - 299 cm (initial value: 26 inch) 32 °F - 104 °F (0 °C - 40 °C) (This product will not display appropri- Working ately when exceeding the Working Temperature range. Slow response... - Page 2 How to install the unit on your bicycle VELO 9 / VELO 7 Attach the bracket to the stem or handlebar Remove/Install Sensor the computer The FlexTight™ bracket can be attached to either the stem or the handlebar, depending on how the bracket fi ts into the Double-sided tape Magnet bracket band. When attaching the FlexTight™ bracket to the stem Stem Nylon ties Nylon ties Bracket Bracket Wire Click Nylon ties...
-
Page 3: Preparing The Computer
Preparing the computer VELO 9 / VELO 7 Perform the clear all data operation as shown below, when you use the Tire circumference unit for the fi rst time or restore the unit to the condition checked at the factory. You can fi nd the tire circumference (L) of your tire size in the chart be- low, or actually measure the tire circumference (L) of your bicycle. Clear all data (initialization) • How to measure the tire circumference (L) Press the AC button on the back of the computer. Battery case cover For the most accurate measurement, do a wheel roll out. With the tires under proper pressure, place the Contact valve stem at the bottom. Mark the spot on the fl oor L cm and with the rider’s weight on the bike, roll exactly one... -
Page 4: Operating The Computer [Measuring Screen]
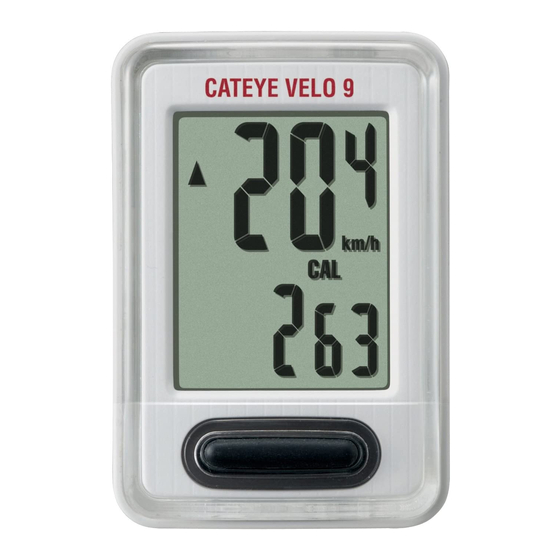
Operating the computer [Measuring screen] VELO 9 / VELO 7 Switching computer function Power-saving function Pace arrow Indicates if the current speed is faster or Pressing the MODE button switches the measurement data at the bottom If the computer has not received a signal for 10 minutes, power-saving slower than the average speed. in the order shown in the following fi gure. screen will activate and only the clock will be displayed. When the com- ( Faster, Slower) puter receives a sensor signal, the measuring screen reappears. VELO 7 VELO 9 Current speed Measuring screen Power-saving screen 0.0 (4.0) – 199.9 km/h 10 minutes [0.0 (3.0) – 124.9 mph]...
Need help?
Do you have a question about the Velo 9 and is the answer not in the manual?
Questions and answers