Table of Contents
Advertisement
Quick Links
INSTRUCTION MANUAL
Orion
®
SpaceProbe 130mm EQ
Equatorial Newtonian Reflector Telescope
#9027
C u s t o m e r S u p p or t (8 0 0) 6 7 6-1 3 4 3
E-m a il: s u p p or t@t e le s c o p e.c o m
Corporate Offices (831) 763-7000
P.O. Box 1815, Santa Cruz, CA 95061
Providing Exceptional Consumer Optical Products Since 1975
IN 147 Rev A 0700
Advertisement
Table of Contents

Related Manuals for Orion SpaceProbe 130mm EQ


Summary of Contents for Orion SpaceProbe 130mm EQ
- Page 1 INSTRUCTION MANUAL Orion ® SpaceProbe 130mm EQ Equatorial Newtonian Reflector Telescope #9027 C u s t o m e r S u p p or t (8 0 0) 6 7 6-1 3 4 3 E-m a il: s u p p or t@t e le s c o p e.c o m Corporate Offices (831) 763-7000 P.O.
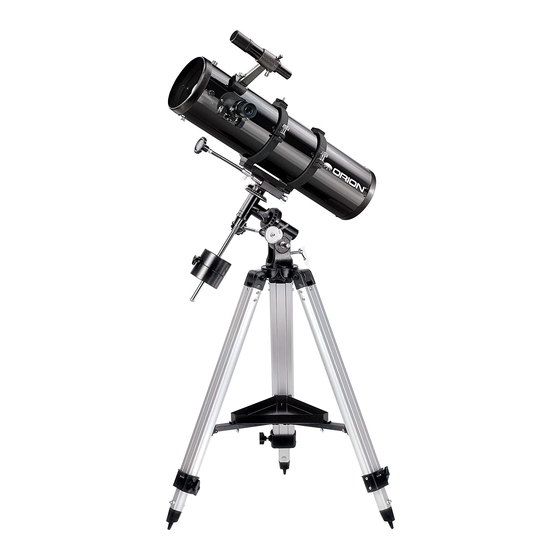
- Page 2 Alignment thumb screws(2) Finder scope Spring -loaded tensioner Dovetail slot Finder scope bracket Eyepiece Piggyback adapter Tube mounting rings Focuser Dec. slow-motion control cable Tube ring clamps Primary mirror cell Dec. setting circle R.A. lock knob Collimation screws(6) Counterweight Counterweight R.A.
-
Page 3: Table Of Contents
Orion telescope . Your new SpaceProbe 130mm EQ is designed for high-resolution viewing of astronomical objects. With its precision optics and equatorial mount, you’ll be able to locate and enjoy hundreds of fascinating celestial denizens, including the plan- ets, Moon, and a variety of deep-sky galaxies, nebulas, and star clusters. -
Page 4: Assembly
3. Assembly the other hand. When it is threaded as far in as it will go, position the counterweight about halfway up the shaft and tighten the counterweight lock knob. The retaining screw Assembling the telescope for the first time should take about and washer on the bottom of the shaft prevent the coun- 30 minutes. -
Page 5: Getting Started
Figure 3A, 3B, 3C, 3D. Proper operation of the equatorial mount requires that the telescope tube be balanced on both the R.A. and Dec. axes. (a) With the R.A. lock knob released, slide the counterweight along the counterweight shaft until it just counterbalances the tube. (b) When you let go with both hands, the tube should not drift up or down. -
Page 6: Focusing The Telescope
3. Retighten the counterweight lock knob. The telescope is retighten the R.A. and Dec. lock knobs. Use the slow-motion now balanced on the R.A. axis. control cables to center the object in the eyepiece. 4. To balance the telescope on the Dec. axis, first tighten the Now, look in the finder scope. -
Page 7: Setting Up And Using The Equatorial Mount
Focusing the Finder Scope first the R.A. axis of the mount must be aligned with the Earth’s rotational (polar) axis - a process called polar alignment. If, when looking through the finder scope, the images appear somewhat out of focus, you will need to refocus the Polar Alignment finder scope for your eyes. - Page 8 Once the object is visible in the telescope’s eyepiece, use the slow-motion controls to center it in the field of view. You can So, the coordinates for the Orion Nebula listed in a star atlas now switch to a higher magnification eyepiece, if you wish.
- Page 9 Figure 7. This illustration shows the telescope pointed in the four cardinal directions: (a) north, (b) south, (c) east, (d) west. Note that the tripod and mount have not been moved; only the telescope tube has been moved on the R.A. and Dec. axes. 1.
-
Page 10: Collimating The Optics
6. Collimating the Optics Similarly, to point the telescope directly south, the counter- weight shaft should again be horizontal. Then you simply rotate (Aligning the Mirrors) the scope on the Dec. axis until it points in the south direction. What if you need to aim the telescope directly north, but at Collimation is the process of adjusting the mirrors so they are an object that is nearer to the horizon than Polaris? You can’t precisely aligned with each other. - Page 11 Orion Collimating Eyepiece (#3640). We highly recommend that you purchase one. Aligning the Secondary Mirror With the eyepiece removed, look straight down the open focuser drawtube at the secondary (diagonal) mirror. Ignore the reflections for the time being.
-
Page 12: Using Your Telescope-Astronomical Observing
have two people for primary mirror collimation, one to look in through an open (or closed) window, because the tempera- the focuser while the other adjusts the collimation screws.) ture difference between the indoor and outdoor air will cause image blurring and distortion. The view down the focuser should now resemble Figure 8a. - Page 13 Eyepiece focal length With its rocky surface, the Moon is one of the easiest and most For example, the SpaceProbe 130mm EQ, which has a focal interesting targets to view with your telescope. Lunar craters, length of 900mm, used in combination with a 25mm eyepiece,...
- Page 14 each side of Saturn’s disk. A steady atmosphere (good see- Start by choosing bright objects to view. The brightness of an ing) is necessary for a good view. You will probably see a object is measured by its visual magnitude; the brighter an bright “star”...
-
Page 15: Astrophotography
There are several different types of astrophotography that can the illuminated reticle eyepiece’s crosshairs. Once the object is be successfully attempted with the SpaceProbe 130mm EQ. centered in the camera, and a guide star is centered in the reti- Moon Photography cle eyepiece, you’re ready to shoot. -
Page 16: Specifications
95076. If the product is not registered, proof of purchase (such as a copy of the original invoice) is required. This warranty does not apply if, in Orion’s judgment, the instrument has been abused, mishandled, or modified, nor does it apply to normal wear and tear. This warranty gives you specific legal rights, and you may also have other rights, which vary from state to state.
Need help?
Do you have a question about the SpaceProbe 130mm EQ and is the answer not in the manual?
Questions and answers