Table of Contents
Advertisement
Quick Links
inStruCtiOn MAnuAl
Orion SpaceProbe
™
130mm EQ
#9851 Equatorial Newtonian Reflector Telescope
Customer Support (800) 676-1343
E-mail: support@telescope.com
Corporate Offices (831) 763-7000
89 Hangar Way, Watsonville, CA 95076
Providing Exceptional Consumer Optical Products Since 1975
IN 186 Rev. B 02/09
Advertisement
Table of Contents

Related Manuals for Orion SPACEPROBE 130mm EQ


Summary of Contents for Orion SPACEPROBE 130mm EQ
- Page 1 MAnuAl Orion SpaceProbe ™ 130mm EQ #9851 Equatorial Newtonian Reflector Telescope Customer Support (800) 676-1343 E-mail: support@telescope.com Corporate Offices (831) 763-7000 89 Hangar Way, Watsonville, CA 95076 Providing Exceptional Consumer Optical Products Since 1975 IN 186 Rev. B 02/09...
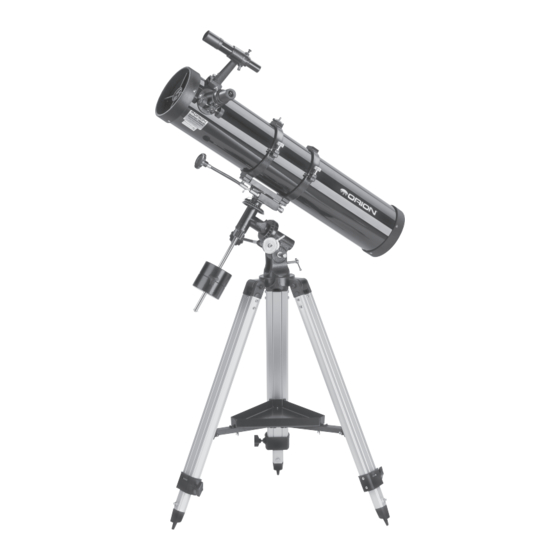
- Page 2 Alignment thumb screws(2) Finder scope Spring-loaded Dovetail slot tensioner Finder scope bracket Eyepiece Piggyback adapter Tube mounting rings Focuser Tube ring clamps Dec. slow-motion control cable Primary mirror cell Dec. setting circle R.A. lock knob Counterweight Collimation shaft screws(6) Counterweight lock knob R.A.
-
Page 3: Table Of Contents
Orion telescope. Your new SpaceProbe 130mm EQ is designed for high-resolution viewing of astronomical objects. With its precision optics and equatorial mount, you’ll be able to locate and enjoy hundreds of fascinating celestial denizens, including the plan- ets, Moon, and a variety of deep-sky galaxies, nebulas, and star clusters. -
Page 4: Latitude Scale
Dec. slow-motion control cable Dec. lock knob Dec. setting-circle R.A. setting circle R.A. setting-circle lock thumbscrew Latitude scale R.A. slow-motion control cable Latitude lock T-bolt Latitude adjustment T-bolt Figure 2. The SpaceProbe 130’s equatorial mount. faces have delicate coatings on them that can be damaged latitude scale (located directly above the latitude lock if touched inappropriately. -
Page 5: Getting Started
Finder scope Nylon bracket thumbscrews Finder scope Tensioner Focusing lock ring Figure 3a. Figure 3b. The 6x26 Correct-Image finder scope Pull-back on the tensioner and slide the finder scope into its bracket until the O-ring is seated in the bracket ring counterweight from falling off (and onto your foot!) if the 10. -
Page 6: Focusing The Telescope
Figure 4a, 4b, 4c, 4d. Proper operation of the equatorial mount requires that the telescope tube be balanced on both the R.A. and Dec. axes. (a) With the R.A. lock knob released, slide the counterweight along the counterweight shaft until it just counterbalances the tube. (b) When you let go with both hands, the tube should not drift up or down. -
Page 7: Setting Up And Using The Equatorial Mount
By loosening or tightening the alignment thumb screws, you change the line of sight of the finder scope. Continue making adjustments to the alignment thumb screws until the image in both the finder scope and the telescope’s eyepiece is exactly centered. -
Page 8: Polar Alignment
the Earth’s rotational (polar) axis—a process called polar alignment. Little Dipper (in Ursa Minor) Polar Alignment Big Dipper (in Ursa Major) For Northern hemisphere observers, approximate polar N.C.P. alignment is achieved by pointing the mount’s R.A. axis at Polaris the North Star, or Polaris. It lies within 1° of the north celes- tial pole (NCP), which is an extension of the Earth’s rota- tional axis out into space. - Page 9 Dec. = 0° mark are negative. telescope should be moved only on the R.A. and Dec. axes. So, the coordinates for the Orion Nebula listed in a star atlas To point the scope overhead, first loosen the R.A. lock knob will look like this: and rotate the telescope on the R.A.
-
Page 10: Collimating The Optics
R.A. and Dec., not in azimuth or such as Orion’s LaserMate Laser Collimator, obviating the latitude (altitude), and b) the counterweight and shaft will not need to remove the primary mirror and mark it yourself. - Page 11 Reflective surface Primary mirror of collimation center mark drawtube Reflection of primary mirror clip Figure 8. Collimating the optics. (a) When the mirrors are properly aligned, the view down the focuser drawtube should look like this. (b) With the collimation cap in place, if the optics are out of alignment, the view might look something like this. (c) here, the secondary mirror is centered under the focuser, but it needs to be adjusted (tilted) so that the entire primary mirror is visible.
-
Page 12: Using Your Telescope-Astronomical Observing
Figure 11. The back end of the optical tube (bottom of the primary mirror cell). The three pairs of collimation screws adjust the tilt of the primary mirror. Out of collimation Collimated Figure 12. A star test will determine if a telescope’s optics are properly collimated. - Page 13 Magnification = Eyepiece Focal Length (mm) sion must be made: what to look at? For example, the SpaceProbe 130mm EQ, which has a focal A. the Moon length of 900mm, used in combination with the included With its rocky surface, the Moon is one of the easiest and 25mm Explorer II eyepiece, yields a magnification of most interesting targets to view with your telescope.
- Page 14 The famous “Double-Double” in the constellation Lyra and the gorgeous two-color double star Albireo in Cygnus are the front opening of the SpaceProbe 130mm EQ. The prima- ry attraction is sunspots, which change shape, appearance, favorites. Defocusing a star slightly can help bring out its and location daily.
-
Page 15: Care And Maintenance
Your SpaceProbe 130mm EQ telescope requires very little mechanical maintenance. The optical tube is steel and has a smooth painted finish that is fairly scratch-resistant. If a scratch does appear on the tube, it will not harm the tele- scope. -
Page 16: Specifications
During this warranty period Orion Telescopes & Binoculars will repair or replace, at Orion’s option, any warranted instrument that proves to be defective, provided it is returned postage paid to: Orion Warranty Repair, 89 hangar Way, Watsonville, CA 95076. If -the product is not registered, proof of purchase (such as a copy of the original invoice) is required.
Need help?
Do you have a question about the SPACEPROBE 130mm EQ and is the answer not in the manual?
Questions and answers