Advertisement
Quick Links
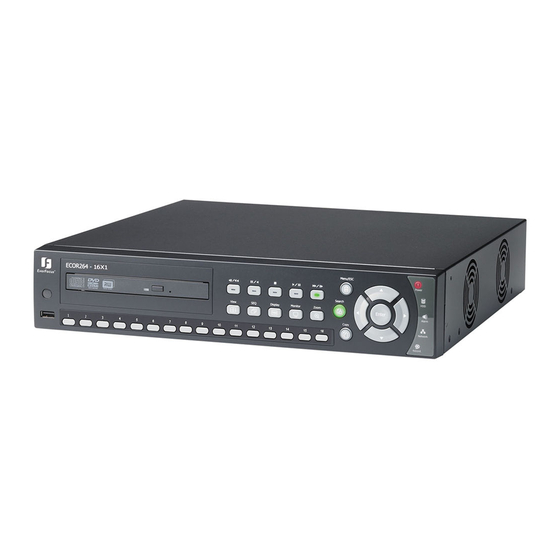
Operating elements
1
3
2
4
1)
IR Receiver:
Receiver for IR remote control.
2)
USB 2.0 (front):
For connecting USB-Flash-Drive to copy/archive video or for firmware upgrades.
3)
DVD+RW:
DVD+RW burner (D models only).
4)
Channel keys
1~16 (1~9, 1~4):
Press channel key (CH1~CH16) / (CH1~CH9) / (CH1~CH4) to display that channel
in full screen view.
5)
◄I /◄◄:
Fast reverse playback or step reverse playback depending on playback mode.
6)
I I / ◄:
Reverse playback or pause.
7)
Stop playback.
■
8)
►/ I I:
Forward playback or pause.
9)
►►/I►:
Fast forward playback or step forward playback depending on playback mode.
10)
View:
Press this key to switch between 4x, PiP (Picture in Picture),full screen, 9x, 10x, 13x and 16x.
Note: PIP display is not available in playback mode.
11)
SEQ:
Press this key to enter the auto sequential switching mode. The sequence dwell time
can be set in "Display Setting" tab of the menu. For further details on SEQ, please
refer to "Chapter 4.9 - Display Setting".
12)
Display:
Press this key to switch display of channels and status bar.
13)
Monitor:
Press key shortly:
Switch between main monitor and call monitor.
Hold key (>1 second): Switch main monitor display between VGA and BNC output.
The deactivated video output will show a message:
" The monitor is currently unavailable. Please hold "Monitor" key to switch."
14)
Zoom:
In full screen mode, 2x electronic zoom. Zoom screen can be moved through arrow keys.
Enter key changes the direction. Pressing the zoom key again switches the electronic zoom off.
15)
SEARCH:
Press this key to enter the Search Menu. For further details on the search function,
please refer to "Chapter 3.13 - Search ".
16)
Menu/ESC:
Press this key to enter/exit MAIN SETUP MENU.
17)
Copy:
Press this key to enter Copy Menu (video data export). For further details on the copy
function, please refer to "Chapter 3.14 - Copy".
18)
ENTER / arrow keys: Instead of or in combination with a mouse, use these keys to change the menu settings.
19)
Power LED:
LED ON indicates Power on.
20)
HDD LED:
LED ON indicates HDD active.
21)
Alarm LED:
LED ON indicates Alarm active.
22)
Network LED:
LED ON indicates Network active.
23)
Record LED:
LED ON indicated Record active.
ECOR264x1 series
18
5
6
7
8
9
16
19
12 13 14
10
11
15
17
23
Quick Reference Guide
Description of on-screen configuration menu (control bar)
20
21
22
4
2
1
3
Nr. Menu
Manual
1)
Express
Chapter 4.2
2)
Camera Setting
Chapter 4.3
3)
Record & Play Setting
Chapter 4.4
4)
Alarm & Event Setting
Chapter 4.5
5)
Schedule Setting
Chapter 4.6
6)
Network Setting
Chapter 4.7
7)
Disk Setting
Chapter 4.8
8)
Display Setting
Chapter 4.9
9)
System Setting
Chapter 4.10
10) Information Setting
Chapter 4.11
Description of the on-screen main menu (control bar)
5
1
2
3
4
Nr. Menu
Manual
1)
Playback
Chapter 3.5
2)
PTZ
Chapter 3.6
3)
Layout
Chapter 3.7
4)
Channel switching
Chapter 3.8
5)
Display
Chapter 3.9
6)
Sequence
Chapter 3.10
7)
Monitor
Chapter 3.11
8)
Zoom
Chapter 3.12
9)
Search
Chapter 3.13
10) Copy
Chapter 3.14
11) DVR configuration
Chapter 4
12) Logout
Chapter 3.15
9
5
6
7
8
8
9
11
6
7
10
12
Ecor264x1_qr_guide_en_rev1_01
10
Advertisement

Subscribe to Our Youtube Channel
Related Manuals for EverFocus ECOR264x1 series


Summary of Contents for EverFocus ECOR264x1 series
-
Page 1: Quick Reference Guide
ECOR264x1 series Quick Reference Guide Operating elements Description of on-screen configuration menu (control bar) 12 13 14 Nr. Menu Manual Express Chapter 4.2 IR Receiver: Receiver for IR remote control. Camera Setting Chapter 4.3 USB 2.0 (front): For connecting USB-Flash-Drive to copy/archive video or for firmware upgrades. - Page 2 Operation ECOR264x1 series Quick Reference Guide 1. MONITOR DISPLAY OPTIONS 6. PLAYBACK SEARCH Press the VIEW key (front key no. 10) to toggle the available multiscreen modes on the selected Press the SEARCH key to enter the playback search menu.
Need help?
Do you have a question about the ECOR264x1 series and is the answer not in the manual?
Questions and answers