Table of Contents
Advertisement
Advertisement
Table of Contents

Subscribe to Our Youtube Channel
Related Manuals for DATREND Systems Oxitest Plus 7

Summary of Contents for DATREND Systems Oxitest Plus 7
- Page 1 Oxitest Plus7 Pulse Oximeter Tester Operating Manual...
- Page 3 Oxitest Plus7 Pulse Oximeter Tester Operating Manual © 2003-2014 Datrend Systems Inc. Unit 130 - 4020 Viking Way Richmond, BC • CANADA • V6V 2L4 Tel: 800.667.6557 (North America Only) or 604.291.7747 • Fax 604.294.2355 e-mail customerservice@datrend.com...
- Page 5 2014-Dec-09 Copyright Datrend Systems Inc. (“DSI”) agrees to a limited copyright release that allows you to reproduce manuals and other printed materials for use in service training programs and other technical publications. If you would like other reproductions or distributions, submit a written request to Datrend Systems Inc.
- Page 6 Warranty Warranty and Product Support Datrend Systems Inc. ("DSI") warrants this instrument to be free from defects in materials and workmanship under normal use and service for one (1) year from the date of original purchase. This warranty will be automatically extended to a maximum of five (5) years from the date of original purchase provided that calibration is performed on an annual basis by a Datrend Authorized Service Center (refer to Section 6.2 of this manual).
- Page 7 (e.g., in the case of a customer-installed firmware upgrade), you must first contact Datrend Systems at 1-800-667-6557. You will be required to provide us with the serial number for your instrument as well as a valid reason for breaking the Quality Seal. You should break this seal only after you have received factory authorization.
- Page 8 ® Nellcor is a registered trademark of Tyco Healthcare QBasic™ and Visual Basic™ are trademarks of Microsoft Corp. ® MS-DOS is a registered trademark of Microsoft Corp.
-
Page 9: Table Of Contents
Powering Up, and Modifying the Oxitest Plus 7 Menu ....... - Page 10 OXITEST PLUS 7 OPERATING MANUAL 6. Routine Maintenance ............. 51 Probe Cleaning .
-
Page 11: Specifications
OXITEST PLUS 7 OPERATING MANUAL 1. Specifications Saturation (SpO Range of adjustment is according to pulse oximeter manufacturer and/or model. Masimo, Mindray, Nellcor, and Nellcor OEM's (e.g., Critikon; Protocol; Philips; etc.): Variable from 35% to 100% in steps of 1%... -
Page 12: Heart Rate
OXITEST PLUS 7 OPERATING MANUAL Datex and Invivo oximeters: ±1% at 97, 93% SpO ±2% at 90, 80, 70% SpO Heart Rate Variable from 20 to 250 beats per minute (BPM) in 1 BPM steps Presets: 30, 60, 90, 120, 180, 240 BPM Accuracy: ±... - Page 13 OXITEST PLUS 7 OPERATING MANUAL Alarm Tests Five automated test sequences for determining oximeter alarm response time to Low SpO Low Heart Rate; High Heart Rate; Low Perfusion; and Motion Artifact conditions. Also determines time required for oximeter alarm to self-clear after test conditions are returned to normal.
- Page 14 OXITEST PLUS 7 OPERATING MANUAL 1.12 Serial / Printer Interface Mechanical: 5 Pin Mini-DIN Electrical: Bi-directional RS-232. 9600 baud, 8 bits, no parity, 1 stop. 1.13 Power Supply Battery: 7.2V rechargeable. Capacity: 1.4 Ah Battery life: 40 hours continuous 1.14...
-
Page 15: Overview
OXITEST PLUS 7 OPERATING MANUAL 2. Overview General Description Oxitest Plus 7 Pulse Oximeter Tester is a portable, battery operated device designed to test the operation of pulse oximeters and their optical sensors. In use, a pulse oximeter sensor is placed on the probe. -
Page 16: Detailed Description
OXITEST PLUS 7 OPERATING MANUAL Detailed Description Pulse oximeters commonly utilized in hospitals are based on the principle of the absorption of light by blood, at two separate wavelengths, 660 nm and 940 nm. Specifically, the relationship between the absorption of light for Oxygenated Haemoglobin (HbO... - Page 17 OXITEST PLUS 7 OPERATING MANUAL Figure 1 - Block Diagram A photodiode in the Oxitest Plus 7 probe intercepts the oximeter's red and infrared light signals, and generates an electrical signal which is analysed by the microprocessor. The Oxitest Plus 7...
- Page 18 OXITEST PLUS 7 OPERATING MANUAL Overview/Chapter 2 # Page 8...
-
Page 19: Operation
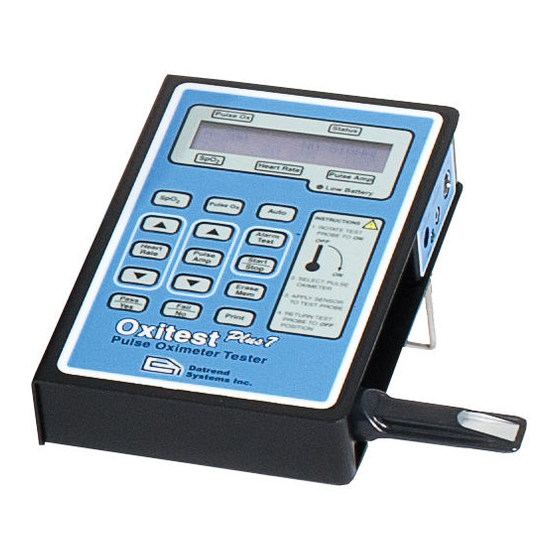
OXITEST PLUS 7 OPERATING MANUAL 3. Operation General Description Oxitest Plus 7 provides a quick and efficient method of testing the overall operation of a pulse oximeter, its cable and sensor. A test is performed by applying the oximeter sensor to the... - Page 20 OXITEST PLUS 7 OPERATING MANUAL Figure 2 - Oxitest Plus 7 Side Panel Figure 3 - Oxitest Plus 7 Front Panel Operation/Chapter 3 # Page 10...
-
Page 21: Powering Up, And Modifying The Oxitest Plus 7 Menu
OXITEST PLUS 7 OPERATING MANUAL Powering Up, and Modifying the Oxitest Plus 7 Menu To turn on the rotate the test probe, which is visible from the right hand side of the Oxitest Plus 7 , 90 degrees clockwise from its storage compartment. -
Page 22: Setting Display Contrast
Pulse Ox’s will be those that have been ENAbled. This process may be repeated at any time to ENAble or DISable other oximeters. In the event of a loss of battery power, Oxitest Plus 7 will revert to the factory default settings (all oximeters ENABLED; Pulse Ox = Nellcor N-200; SpO = 97%;... -
Page 23: Choosing An Oximeter
OXITEST PLUS 7 OPERATING MANUAL Choosing an Oximeter The oximeter currently selected is displayed on the standard operating mode screen, as shown below. N-200 NO SIGNAL 60 BPM 100% To change oximeters, press the Pulse Ox key. The current oximeter/sensor selection appearing in the previous display will then be displayed in full detail across the LCD as follows. -
Page 24: Selecting An Spo 2 Level
OXITEST PLUS 7 OPERATING MANUAL Selecting an SpO level simulates five (5) preset levels of oxygen saturation - 97, 93, 90, 80 and 70%. Oxitest Plus 7 Additional preset levels of 55% and 35% may also be provided, according to pulse oximeter manufacturer, model number, and sensor (see Section 1.1). -
Page 25: Selecting A Heart Rate
OXITEST PLUS 7 OPERATING MANUAL Selecting a Heart Rate provides a pulse repetition rate of 20 to 250 beats per minute (bpm), with six preset Oxitest Plus 7 values of 30, 60, 90, 120, 180 and 240 bpm. To select a new preset value, press the key labelled Heart Rate on the front panel. -
Page 26: Status Indicator
Oxitest Plus 7 probe. Testing... Oxitest Plus 7 has detected an optical signal and is testing the signal to see if it is consistent with the selected oximeter. An optical signal has been detected, but there is no signal which corresponds to NO RED the output of the RED LED. -
Page 27: Selecting Motion Artifact Simulation
OXITEST PLUS 7 OPERATING MANUAL oximeter can be powered up after applying the sensor to . Positioning the sensor Oxitest Plus 7 properly may be more difficult for short, stubby sensors. Section 5.1.2 offers some advice on how to position some specific types of sensors. -
Page 28: Selecting Auto Presets
The Alarm Test Mode works by switching Oxitest Plus 7 from a "normal patient" simulation to an "abnormal patient" simulation, and allowing the user to measure the time the oximeter takes to produce an audio-visual alarm. - Page 29 OXITEST PLUS 7 OPERATING MANUAL Pressing the Alarm Test key produces the following LCD display: LOW SAT ALM T: 00.0 72 BPM 100% As shown above, the LCD displays the name of the alarm test at the upper left, a timer counter at the upper right, and the test settings corresponding to the "normal patient"...
- Page 30 OXITEST PLUS 7 OPERATING MANUAL The effect of the Start/Stop key on the tester depends on the Alarm Test selected by the user, as follows: Prior to pushing Start/Stop: Alarm Test Hrt. Rate P. Amp Artifact All Tests 72 BPM...
- Page 31 6. When the oximeter alarm shuts off, the user presses Start/Stop for the third time. This stops the timer, and records the alarm OFF TIME in the Oxitest Plus 7 memory. The LCD automatically displays the final test results as follows: ALARM ON: 15.8 sec...
-
Page 32: Saving And Printing Test Results
OXITEST PLUS 7 OPERATING MANUAL 3.12 Saving and Printing Test Results Up to 20 PASS/FAIL results from manually-conducted tests may be saved in the memory of for later printout or downloading to a personal computer (PC). In addition to the 20... - Page 33 OXITEST PLUS 7 OPERATING MANUAL Oxitest PLUS 7 Pulse Oximeter Tester PULSE OX TEST REPORT Time/Date: _________________________ Control No.: _________________________ Serial No.: _________________________ Location: _________________________ Department: _________________________ Technician: _________________________ Oxitest settings: PULSE OX: Nellcor N-200, N-100C SENSOR: Nellcor W. SELECTED R-CURVE --------Oxitest-------- --Status-- Rec.
-
Page 34: Using The Nellcor Sensor Port
OXITEST PLUS 7 OPERATING MANUAL ERASE last record? Press YES or NO... Pressing the Yes key erases the last test record, while pressing the No key leaves the saved information unchanged. In both cases, the following display results. ERASE all records? Press YES or NO... - Page 35 RCAL OK! Now connect sensor to pulse ox. Disconnect the sensor from the Oxitest Plus 7’s Nellcor Port and reconnected to the oximeter. The display returns to the Manual Mode, with the alternate "R-Curve" being indicated by a "R" on the LCD as shown below:...
-
Page 36: Ecg Trigger Output
OXITEST PLUS 7 OPERATING MANUAL detection of a resistance at the Nellcor Port when a Nellcor-compatible oximeter selected from the menu does not make use of the Nellcor "R-Curves"; or the signal STATUS is something other than "NO SIGNAL" For any of the above conditions, the following message is displayed for as long as the sensor... -
Page 37: Recharging The Battery
OXITEST PLUS 7 OPERATING MANUAL 3.15 Recharging the Battery is powered by an internal NiCad battery with sufficient capacity to provide Oxitest Plus 7 approximately 40 hours of operation. When the Oxitest Plus 7 is OFF, the battery powers a non- volatile memory which retains the test settings, the ENAable/DISable status of the pulse oximeter menu, and any Pass/Fail test results which may have been saved in memory. - Page 38 OXITEST PLUS 7 OPERATING MANUAL Newer units feature battery monitoring and protection circuitry. In the event the Oxitest Plus 7 Oxitest Plus 7 battery becomes deeply discharged, the protection circuit will disconnect the battery internally when the battery voltage falls below a set threshold voltage. This typically occurs when a unit with an older battery is left on the shelf for a prolonged period of time.
-
Page 39: Computer Control And Rs-232
OXITEST PLUS 7 OPERATING MANUAL 4. Computer Control and RS-232 The operating parameters of can be controlled by an external device, through an Oxitest Plus 7 RS-232 serial communications port. This allows to be interfaced to an automated Oxitest Plus 7 tester or PC for automated oximeter testing. -
Page 40: Mechanical Interface
OXITEST PLUS 7 OPERATING MANUAL Mechanical Interface RS-232 port located on the right side of the unit is a 5-pin mini-DIN female Oxitest Plus 7 connector. The R-103 DB9 RS-232 accessory cable (P/N 7100-248) is available to connect to the 5- pin mini-DIN female connector. -
Page 41: Command Definitions
"NO SIGNAL". Note: As oximeters are added to the Oxitest Plus 7 menu by firmware upgrade, the number mmm may change. Be sure to check the number of any oximeter following a new software release, and update any software programs, as necessary. The numbers given above are for example only, and may not be representative of the current software version. -
Page 42: Set Spo Command
OXITEST PLUS 7 OPERATING MANUAL 4.4.2 Set SpO Command Format: where 1 for 97% SpO 2 for 93% SpO 3 for 90% SpO 4 for 80% SpO 5 for 70% SpO 6 for 55% SpO 7 for 35% SpO * Selected models only; see Section 1.1... -
Page 43: Activate Artifact Simulation
OXITEST PLUS 7 OPERATING MANUAL 4.4.5 Activate Artifact Simulation Format: activate artifact simulation n, where n = Ø for OFF 1 for movement 2 for spike 3 for tremor Examples: AFØ sets the Artifact Simulation off sets the Tremor Artifact simulation on 4.4.6... -
Page 44: Download Manual Record
OXITEST PLUS 7 OPERATING MANUAL 4.4.8 Download Manual Record Format: GMNrr download Manual record rr, where Ø1 < rr <2Ø Example: GMN12 downloads the 12 Manual test record (40 characters) 4.4.9 Download Auto Preset Test Record Format: GAUx download Auto Preset test record x, where 1 <... -
Page 45: Erase All Test Records
OXITEST PLUS 7 OPERATING MANUAL 4.4.11 Erase All Test Records Format: EALL erase all test records (manual, Auto Preset and Alarm Tests) 4.4.12 Command Summary Command Function Activate artifact signal n, where: n = Ø for OFF n = 1 for movement... -
Page 46: Programming Example
OXITEST PLUS 7 OPERATING MANUAL Programming Example Microsoft QBasic is an easy-to-use BASIC interpreter which is supplied as part of Microsoft DOS versions 5 and later. Using QBasic, you can write simple programs on your IBM PC or compatible to control automatically via a COM port. - Page 47 OXITEST PLUS 7 OPERATING MANUAL Program Example PRINT "NELLCOR pulse oximeter SpO2/Heart Rate sweep" PRINT "Press <ESC> to quit": PRINT PRINT " SpO2 (%) Heart Rate (BPM)" VIEW PRINT 5 TO 6 ' Open COM1 for serial communications at 96ØØ baud OPEN "COM1: 96ØØ,N,8,1,CDØ,CSØ,DSØ,OPØ,RB32,TB32"...
- Page 48 OXITEST PLUS 7 OPERATING MANUAL CASE 3: O2sat% = 9Ø CASE 4: O2sat% = 8Ø CASE 5: O2sat% = 7Ø CASE ELSE O2sat% = 97 END SELECT PRINT " "; O2sat%; " "; HeartRate% ' Delay 20 sec before next heart rate increment...
-
Page 49: Test Usage Guidelines
The R-Curve is well-defined in the oximeter's electronics. An oximeter tester such as Oxitest Plus 7 is microprocessor controlled, and as a result outputs a precisely regulated, calibrated optical signal. Therefore, although there may be some uncertainty introduced by the sensor and the sensor/tester interface, the response from an electro-optical simulation should be within the tester's specification limits of ±1%. -
Page 50: Probe/Sensor Interface
OXITEST PLUS 7 OPERATING MANUAL When using , the primary consideration is to first choose the correct make, model Oxitest Plus 7 and sensor type for the device under test. Many manufacturers of oximeters use another company’s technology, for instance, Tyco provides Nellcor technology on an OEM basis to a large number of physiological monitor manufacturers. - Page 51 OXITEST PLUS 7 OPERATING MANUAL Figure 6 - Nellcor DS-100A finger clip sensor With the oximeter turned ON, hold the sensor in the open position, with the LEDs (they should be glowing red) shining toward you - the photo detector will be closest to you, hidden by the hard sensor shell.
- Page 52 As with the Nellcor-style sensor, a stiff sensor cable or long strain relief can be pre-formed before the sensor is applied to the Oxitest Plus 7, and the cable routed via the probe compartment before leading off to the oximeter under test.
- Page 53 3) Hewlett-Packard (Agilent / Philips) M1190A and M1191A sensors The Hewlett-Packard M1190A and M1191A sensors are made from a pliable rubber compound, with a slit opening at the distal end of the sensor. Slide the sensor onto the Oxitest Plus 7 probe with the LEDs shining toward you.
- Page 54 OXITEST PLUS 7 OPERATING MANUAL Correct placement of typical flexible sensors is shown in Figure 9 through Figure 11. Figure 9 - Nellcor N-25 neonatal disposable Figure 10 - Nellcor Oxi-A/N sensor Test Useage/Chapter 5 # Page 44...
- Page 55 OXITEST PLUS 7 OPERATING MANUAL Figure 11 - Ohmeda Flex II sensor 5) Application of Criticare Sensors Although the Criticare 511 and 934 sensors are generally compatible with the Oxitest Plus 7 probe (i.e. the Oxitest "finger"), the fit is less than ideal. Despite this, fairly good results can be obtained when testing Criticare pulse oximeters by following these rules (note in all cases the sensor LEDs are on the "bottom", and the sensor's photodiode is on "top"):...
- Page 56 OXITEST PLUS 7 OPERATING MANUAL Position #1 is achieved by simply sliding the 511 sensor onto the tip of the Oxitest Plus 7 probe, until the sensor just comes to a "stop". Position #1 is a good "starting position", but it is...
- Page 57 OXITEST PLUS 7 OPERATING MANUAL b) Criticare 934 Sensor Generally, a good position for the 934 sensor appears as follows when viewed from the top: Figure 15 A simple way to apply the 934 sensor is to slide it over the end of the...
-
Page 58: Diagnosing Sensor Faults
OXITEST PLUS 7 OPERATING MANUAL Diagnosing Sensor Faults Use the following table when troubleshooting pulse oximeter sensor and cable problems, with the help of the ’s STATUS display. Oxitest Plus 7 STATUS PROBABLE FAULT(S) DISPLAY NO RED - RED LED is defective. This is normally evident if RED LED is not... -
Page 59: Cross-Manufacturer Compatibility
OXITEST PLUS 7 OPERATING MANUAL Cross-Manufacturer Compatibility Nellcor and Ohmeda are examples of two leading pulse oximeter manufacturers which license the use of their technology to other medical device companies, primarily manufacturers of patient monitoring systems. Pulse oximeters which employ licensed technology can sometimes (but not... - Page 60 OXITEST PLUS 7 OPERATING MANUAL Test Useage/Chapter 5 # Page 50...
-
Page 61: Routine Maintenance
OXITEST PLUS 7 OPERATING MANUAL 6. Routine Maintenance Probe Cleaning Over a period of time, a build-up of residue may be noticed on the optical windows at the probe tip. This is normal and is due to contact with dirty sensors and disposable sensors which rely on adhesive application. -
Page 62: Calibration
OXITEST PLUS 7 OPERATING MANUAL Calibration Calibration of by a Datrend Authorized Service facility is recommended on an Oxitest Plus 7 annual required basis, and is to extend the product warranty. The basic one (1) year warranty can be extended to a maximum of five (5) years provided that annual calibration is performed by a...
Need help?
Do you have a question about the Oxitest Plus 7 and is the answer not in the manual?
Questions and answers