Table of Contents
Advertisement
by
M
M A A N N U U E E L L D D ' ' U U T T I I L L I I S S A A T T I I O O N N
Sierra Eléctrica Profesional de 460mm
M
M A A N N U U A A L L D D E E O O P P E E R R A A C C I I Ó Ó N N
CAUTION!
Read and follow all safety
and operating instructions
before using this saw.
ATTENTION!
Lire et suivre toutes les directives
de sécurité et d'opération avant
d'utiliser cette scie.
¡AVISO!
Lea y siga todas las instrucciones de
funcionamiento y seguridad antes de
usar esta sierra.
18" Professional Tile Saw
O O W
W N N E E R R ' ' S S M
Scie à Carreaux de 460mm
STK# 60010
M A A N N U U A A L L
LIMITED WARRANTY
Refer to warranty card.
GARANTIE LIMITÉE
Faire référence à la carte de guarantie.
GARANTIA LIMITADA
Referirse a la tarjeta de guarantia.
Advertisement
Table of Contents

Related Manuals for Brutus 60010


Summary of Contents for Brutus 60010
- Page 1 STK# 60010 18" Professional Tile Saw O O W W N N E E R R ’ ’ S S M M A A N N U U A A L L Scie à Carreaux de 460mm M A A N N U U E E L L D D ’ ’ U U T T I I L L I I S S A A T T I I O O N N Sierra Eléctrica Profesional de 460mm...
-
Page 2: Table Of Contents
STK# 60010 18" Professional Tile Saw Scie à Carreaux de 460mm Sierra Eléctrica Profesional de 460mm TABLE OF CONTENTS TABLE DES MATIÈRES CONTENIDO General Safety Instructions ........4 Directives Générales de Sécurité ......17 Instrucciones de Seguridad General ....30 Electrical Requirements ..........5 Installations Électriques..........18... -
Page 3: General Safety Instructions
GENERAL SAFETY INSTRUCTIONS Read this owner's manual completely and make sure you understand all of it's safety guidelines. KEEP GUARDS IN PLACE and in working order. 15. MAINTAIN TOOLS WITH CARE . Keep tools clean and in good working condition for maximum safety . -
Page 4: Electrical Requirements
GENERAL SAFETY (Cont.) 29. POSITIONING OF TILE SAW To avoid the possibility of the appliance plug NOTE: This tool is intended for use on a circuit that has an or receptacle getting wet, position the tile saw to one outlet that looks like the one illustrated in Fig 2 (B). The tool side of a wall-mounted receptacle to prevent water from has a grounding plug that looks like the plug illustrated in dripping onto the receptacle or plug. -
Page 5: Specific Safety Instructions
ELECTRICAL REQUIREMENTS (Cont.) • IMPROPER USE OF EXTENSION CORDS MAY CAUSE NOTE: When using an extension cord, ensure all cords are INEFFICIENT OPERATION OF YOUR TOOL , which can no smaller than #12 gauge, rated at a 20-amp minimum, result in overheating. Be sure your extension cord is and equipped with 3-prong plugs. -
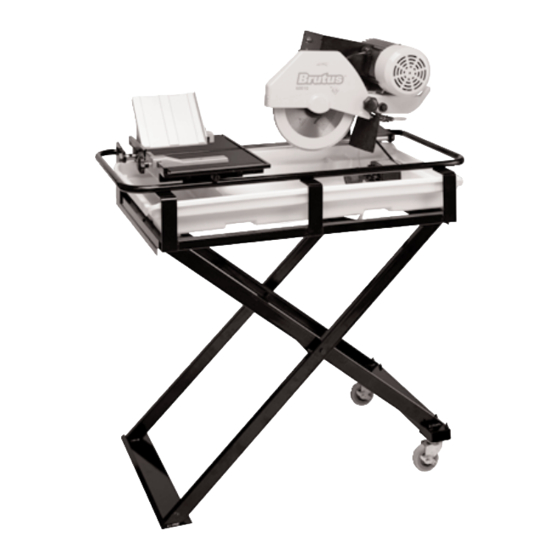
Page 6: Saw Features
INTRODUCTION We at Q.E.P. would like to congratulate you on selecting the 60010 Tile Saw. We are certain that you will be pleased with your purchase. QEP is the world’s largest supplier of flooring installation tools and accessories, and we takes pride in producing the finest tile saws in the industry. -
Page 7: Set Up And Operation
The 60010 requires minimal assembly, and as been factory inspected before shipping. Carefully open the container and remove all saw components and packing materials. Ensure that you have each item before discarding the container or packing materials. -
Page 8: Stand Assembly
STAND ASSEMBLY ATTACHING FRAME TO STAND If you are not using the folding stand, set the saw frame on a solid, flat workbench or table. Fig E1 Fig E2 To attach the Saw Frame to the Stand use the assembly Fig D1 Fig D2 hardware (Fig. -
Page 9: Cutting Head Assembly
CUTTING HEAD ASSEMBLY Support Post Fig G4 Fig G3 Fig F1 Fig F2 Slide the Blade Guard over the support post on the motor assembly (Fig G3). Secure by tightening the provided To attach the Cutting Head (Fig F1), find the Motor adjustment knob (Fig G4). -
Page 10: Diamond Blade Installation
BL DE INST LL TION (cont.) WATER PUMP INSTALLATION Blade Shaft Lock Fig H5 Fig H6 Fig K1 Fig K2 With one hand, press the Blade Shaft Lock. With the other, tighten the blade shaft nut (Fig H5). Release the Remove the water pump from its box and ensure that it is Blade Shaft Lock after the nut is tightened (Fig H6). -
Page 11: Water Pump Safety
WATER PUMP SAFETY 1. The pump is equipped with a grounding-type attachment plug. Be sure to connect the plug to a proper grounding-type receptacle to reduce the risk of electric shock. 2. Never handle the pump by the cord, with wet hands or when standing on a wet surface. -
Page 12: Cutting Depth
CUTTING DEPTH CUTTING OPERATION WARNING! Do not attempt to cut pieces too small. Avoid awkward hand positions where sudden slip could cause your hand or finger to come in contact with the diamond blade. When cutting any material, make sure that it is fully supported. -
Page 13: 45 O Angle Cuts With Angle Guide
CUTTING OPER TION (cont.) SAW MAINTENANCE ANGLE CUTS WITH RIP GUIDE WARNING! Do not service, clean or maintain the saw without first turning off the motor and unplugging the saw from it's power source. Failure to do so may result in serious injury to the operator. -
Page 14: Blade Dressing
S W M INTEN NCE (cont.) TROUBLESHOOTING BLADE DRESSING OVERHEATING OF SAW: After several uses, diamonds on the outer edge of the A. Turn saw off and let it rest until motor is cool to blade may become smoothed or “glazed” over. This will the touch. -
Page 15: Parts List
PARTS LIST PARTS DIAGRAM - 16 -...
Need help?
Do you have a question about the 60010 and is the answer not in the manual?
Questions and answers