Advertisement
Quick Links
Advertisement

Related Manuals for Sharper Image YW631


Summary of Contents for Sharper Image YW631
- Page 1 Emergency Radio & Spotlight YW631 Instructions Read and save these instructions.
- Page 2 We offer generous return privileges and excellent warranties on all our products. For more than 25 years, The Sharper Image has shared the fun of discovering innovative products that make life easier and more enjoy- able.
- Page 3 Caution •Do not open the unit or take it apart. It contains no user- serviceable parts. •Do not expose the unit to rain, high temperatures or other harsh environments. •Disconnect power and remove battery before cleaning. Wipe the unit with a damp cloth. Do not use detergents or organic solvents.
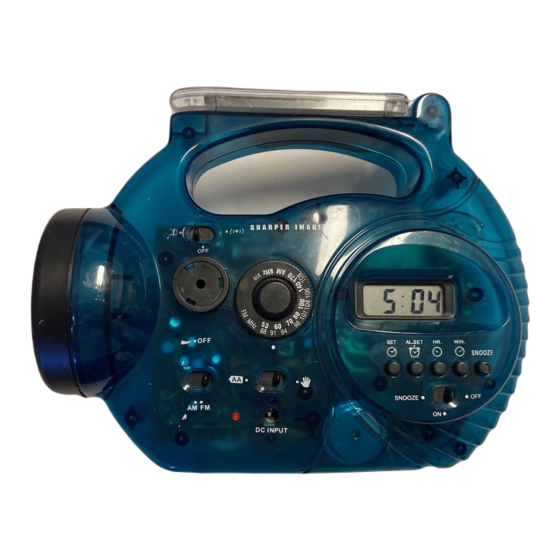
- Page 4 Spotlight & Blinking Solar Panel Switch Tuning Control Volume Control Digital Clock Spotlight Buttons Cover for Settings Snooze Switch AM/FM Selector Power-Selection DC Input Switch Because of continuing improvements, actual product may differ slightly from picture.
-
Page 5: Installing Batteries
Important •Before using the Emergency Radio & Spotlight for the first time, charge the NiCad batteries with the included car adapter for five hours. Insert the appropriate end of the adapter into the DC input jack on the front of the unit. Plug the other end into your vehicle’s power socket. - Page 6 Installing Batteries 5. Slide the battery case lids closed. 6. To replace rechargeable batteries, remove battery case lid and unscrew battery compartment cover underneath. Remove and replace with new batteries. Recharging Spotlight, Blinking Light, Emergency Siren with Blinking Light and Radio Solar Cell Collection Panel Position the built-in, pivoting solar cell collection panels toward the sun to recharge the two included NiCad AA batteries.
- Page 7 Recharging Spotlight, Blinking Light, Emergency Siren with Blinking Light and Radio Blinking Light: Charge Time Service Time 40 hours hours 20 hours hours 10 hours minutes 5 hours approx. 19 minutes hours approx. 10 minutes Emergency Siren with Blinking Light: Charge Time Service Time 40 hours...
- Page 8 Recharging Spotlight, Blinking Light, Emergency Siren with Blinking Light and Radio Radio: (The time will vary depending on the volume of the radio.) Charge Time Service Time 40 hours 6 hours 20 hours 3 hours 10 hours hours 5 hours 45 minutes hours approx.
- Page 9 Recharging Spotlight, Blinking Light, Emergency Siren with Blinking Light and Radio Blinking Light: Charge Time Service Time 3 hours hours hours hours 45 minutes approx. 38 minutes approx. 23 minutes approx. 19 minutes Emergency Siren with Blinking Light: Charge Time Service Time 3 hours hours...
- Page 10 Operating the Spotlight, Blinking Light and Emergency Siren with Blinking Light 1. To turn on the spotlight, slide the SPOTLIGHT/BLINKER switch to “ ” position. 2. To turn on the blinker, slide the SPOTLIGHT/BLINKER switch to “(•)” position. 3. To activate the siren, slide the SPOTLIGHT/BLINKER switch to “(•)”...
-
Page 11: Operating The Radio
Operating the Radio The frequency range is 525 - 1705 kHz for AM; 88V - 108 MHz for FM. 1. To listen to the radio, set the BAND SELECTOR to AM or FM. 2. Turn the VOLUME control clockwise to turn on and to select the desired level. - Page 12 Clock Waking Up to the Alarm 1. Set the desired alarm time as described above. 2. Set the alarm mode to the ON position. Alarm activates when the alarm time has been reached and stops after one minute. 3. To stop the alarm, press the SNOOZE button or set the alarm mode switch to the OFF position.
-
Page 13: Warranty
The Sharper Image will repair any defects in materials or workmanship. In the event repair is not possible, The Sharper Image will either replace this product with one of similar features and price, or refund the full purchase price of the product, whichever you prefer.
Need help?
Do you have a question about the YW631 and is the answer not in the manual?
Questions and answers