Table of Contents
Advertisement
Quick Links
Advertisement
Table of Contents

Related Manuals for Sharper Image 205404


Summary of Contents for Sharper Image 205404
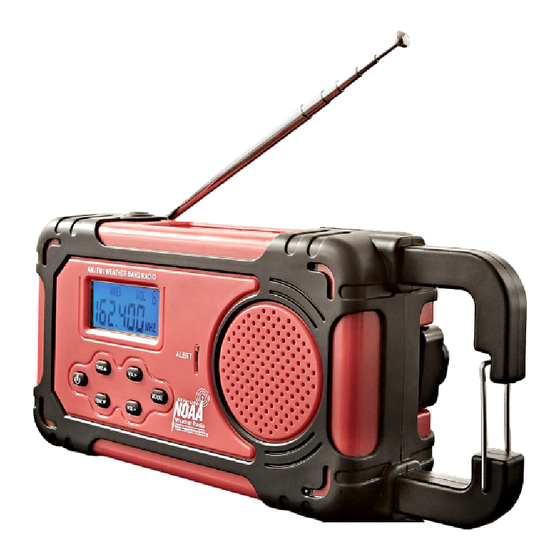
- Page 1 Emergency Solar Hand Crank Radio Item No. 205404 User’s Guide...
- Page 2 1. Controls Description Description 1 Flashlight ON/OFF button 7 Clock/Radio Tune Down ( ) button 8 Volume Down (-) button Clock/Radio Tune Up ( ) button 9 Radio Mode Select and Clock Set button LCD Display 4 Volume Up (+) button 10 Weather Alert Indicator 5 Solar Panel 11 Speaker...
-
Page 3: Important Notes And Warnings
Description Description 12 Telescopic Antenna 18 USB Charging Port (under the Rubber Dust Cover) 13 Metal Clasp 19 Headphone Jack (under the Rubber Dust Cover) 14 Battery Compartment 20 Solar /Cranking Charging Indicator 15 Rubber Dust Cover 21 Reset button (under the Rubber Dust Cover) 16 Mini USB DC Input Port (under the 22 Crank Handle Rubber Dust Cover) - Page 4 1.2. Warnings When used in the directed manner, this unit has been designed and manufactured to ensure your personal safety. However, improper use can result in potential electrical shock or fire hazards. Please read all safety and operating instructions carefully before use, and keep these instructions handy for future reference.
-
Page 5: Solar Power
Hand Crank Warning To prevent overheating of the dynamo hand crank and permanent damage, do not crank faster than approximately two revolutions per second. Do not crank continuously for more than two minutes. After two minutes, allow two minutes of rest before cranking again. 3. -
Page 6: Hand Crank Power
facing upwards. The green battery charging light may illuminate when charging, as shown in reference 20 in Figure 2. NOTE: There is not enough solar energy to turn on the red charging light. Thus, no light or a faint green light (which consumes less energy) may be present during solar charging. NOTE: If the display heats up outside the operational range, the display will fade. -
Page 7: Power Consumption
1. Open the Battery Door on the back of the radio. 2. Insert 3 x AAA (UM-4) batteries (not included) and close the battery door (Figure 2, reference 14) NOTE: For optimum performance, alkaline-type batteries are recommended. 3. Follow the polarity diagrams shown in the battery compartment. NOTE: Make certain the batteries are installed correctly. -
Page 8: Radio Band Mode
• : Adjusts the radio frequency up • : Adjusts the radio frequency down • VOL+: Adjusts the radio volume up • VOL-: Adjusts the radio volume down NOTE: The backlight will automatically turn off if no buttons are pressed for 20 seconds. Figure 7 5.3 Time When first powered up, the time will default to 12:00 AM. -
Page 9: Am/Fm Radio Tuning
5.4.1 AM/FM Radio Tuning When the radio is turned on, press the TUN button to increase the frequency and press the TUN button to decrease the frequency. To auto scan, press and hold the TUN ( ) key for at least one second and the radio will automatically tune to next radio station with sufficient reception. -
Page 10: Low Battery Indication
To charge the smartphone or PDA: 1. Turn off the radio and flashlight to conserve power. 2. Lift the rubber tab on the back of the Emergency Solar Hand Crank Radio to expose the connectors, as shown in Figure 2. 3. -
Page 11: Battery Maintenance
Figure 9 6. Care and Maintenance 6.1 Battery Maintenance To maintain the battery: • Periodically charge the battery to extend battery life. • Switch off power after radio use to extend battery life. • Remove the battery or reinsert the plastic battery pull tab for extended storage. •... -
Page 12: Troubleshooting Guide
8. Troubleshooting Guide Problem Solution Make sure batteries are installed with the proper polarity. The unit will not power up. The unit will not power up Replace the batteries if low battery voltage. Press reset button, if the display does not turn on after Press the RESET button. - Page 13 Problem Solution The Emergency Solar Hand Crank Charging a smartphone through the Phone Charger Jack Radio will not fully charge my is intended for emergency purpose only. It is not intended smartphone. for recharging fully a discharged battery. Smartphone battery capacity significantly exceeds the battery capacity of the Emergency Solar Hand Crank Radio.
- Page 14 Warranty / Customer Service Sharper Image branded items purchased from SharperImage.com include a 1-year limited replacement warranty. For Customer Service, please call 1 (877) 210-3449. The SHARPER IMAGE® name and logo are registered trademarks.
Need help?
Do you have a question about the 205404 and is the answer not in the manual?
Questions and answers