Table of Contents
Advertisement
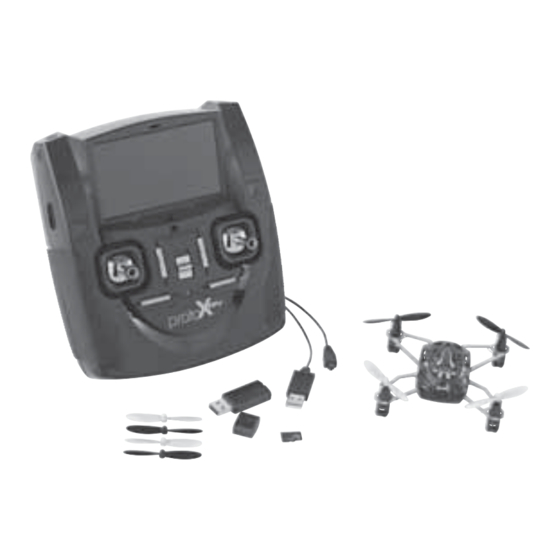
CONTENT
CONTENTS
TS
2.4GHz Controller w/ 4.5 Inch Video Screen
GHz Controller w/ 4.5
5 Inch Video Screen
Proto-X FPV HD Quadcopter
oto-X FPV HD Quadc
dcopter
LiPo Flight Battery
Po Flight Battery
USB Charge Cord
B Charge Cord
Spare Rotor Blades (2 Gray, 2 Black)
are Rotor Blades
s (2 Gray 2 Black)
Memory Card
USB Memory Card Reader
Sun Shield
Rotor Blade Replacement Wrench
™
™
SPECIFICATIONS
SPECIFICA
C C TIONS
A A
4.53" [115 mm] (distance between diagonal motors)
4.53" [115 mm] (distance between diagonal motors)
Size:
Size:
2.2" [55 mm]
2.2" [55 mm]
Blade Length:
Blade Length:
2oz [58g]
2oz [58g]
Flying Weight:
Flying Weight:
4 Channel 2.4GHz w/4.5" video screen
4 Channel 2.4GHz w/4.5" video screen
Radio:
Radio:
3 Axis Gyro & 3 Axis Accelerometer
3 Axis Gyro & 3 Axis Accelerometer
G
Gyro:
1280 x 720P HD, 30 FPS, 120 FOV (field of view)
Camera:
650 mAh 1S LiPo
Battery:
USB Charge Cord
Charger:
PLEASE READ THROUGH THIS MANUAL BEFORE OPERATING.
REQUIRES
REQUIRES
Four AA 1.5V alkaline batteries
Four AA 1.5V alkaline batteries
USB Output Jack
USB Output Jack
Advertisement
Table of Contents

Subscribe to Our Youtube Channel
Related Manuals for Estes Proto-X FPV


Summary of Contents for Estes Proto-X FPV
- Page 1 4.53" [115 mm] (distance between diagonal motors) 4.53" [115 mm] (distance between diagonal motors) Four AA 1.5V alkaline batteries Four AA 1.5V alkaline batteries Size: Size: Proto-X FPV HD Quadcopter oto-X FPV HD Quadc dcopter 2.2" [55 mm] 2.2" [55 mm] Blade Length:...
-
Page 2: Safety Precautions
• television, please turn the device off and then turn it on to adjust. Below are some If you do not plan on flying your Proto-X FPV for a week or more, store the resolutions for your reference: battery approximately 50% charged (one and one half hour charge time from •... -
Page 3: Installing The Flight Battery
Radio Interference Regulations of Industry Canada. BATTERY PRECAUTIONS This Proto-X FPV uses a lithium polymer (LiPo) battery. Follow Install the flight battery from the back of the quad. Plug the battery in, paying these precautions to ensure safe and trouble-free operation. - Page 4 TRANSMITTER MAIN MENU MODE/ CONTROL INPUT KEY FUNCTION Move the stick forward or backward to make the quadcopter THROTTLE/RUDDER STICK ascend or descend. Move the stick left or right to rotate the MODE 2 quadcopter’s fuselage left or right. Move the stick forward or backward to make the quadcopter ELEVATOR/AILERON STICK move forward or backward.
-
Page 5: Transmitter Stick Calibration
TRANSMITTER STICK CALIBRATION FREQUENCY SELECT (VIDEO) Your transmitter will automatically find the best frequency to ensure the best quality live video feed. If there is any interference in your area you can change frequency from 5.725 to 5.945 GHz to get better video transmission. To enter this menu press down on the right stick for 1 second. -
Page 6: Format Memory Card
Micro memory card. Press one time to start (the LED near the button will flash). Press once again to stop recording. The transmitter and the Proto-X FPV HD’s video recordings are two separate recording systems. Both require memory... - Page 7 NOTE: Your Proto-X FPV is designed with a Power-On safety feature. This ensures that the motors will not start unless it detects a suitable control signal when the battery is connected. Make sure the throttle stick is in the full down position.
-
Page 8: Sun Shield
SUN SHIELD ADVANCED PERFORMANCE SETUP SERVO REVERSING: If you would like to reverse any control function due to personal preference, then follow the instructions below. To assemble and install the sun shield, start by laying the parts out as shown: Snap each side panel together one at a time. - Page 9 Aileron/Rudder trim to set the sensitivity. Push the stick to the right to exit. Press the elevator stick down for 2 seconds to exit. The Proto-X FPV rotor blades are not identical. Each blade is marked with an A or FLIP MODE: B.
-
Page 10: Troubleshooting
This calibration will reduce excessive drifting when performing level yaw turns. If the Proto-X FPV HD Quadcopter still drifts to one side add a few sheets of paper (the number of sheets will vary depending on the amount of drift) to the side of the Proto-X FPV HD Quadcopter that drifts. -
Page 11: Replacement Parts
PROBLEM: The video not being saved to the memory card. REPLACEMENT PARTS SOLUTION: (1) Always stop the video recording function and power off the battery first. After this you can take out the memory card. (2) Always turn off the ESTE4556 BODY SET power to the Transmitter before inserting or removing the memory card. - Page 12 ESTE4716 Mnl © 2014 Estes-Cox Corp. A subsidiary of Hobbico, Inc.
Need help?
Do you have a question about the Proto-X FPV and is the answer not in the manual?
Questions and answers