Table of Contents
Advertisement
A
B
4x
4x
H
I
1x
4x
Crib and drawer parts list
1 mattress base (K)
1 dropside (L)
1 stationary side (M)
2 ends (N)
2 rails (P)
1 drawer front (R)
1 drawer center partition (S)
2 drawer ends (T)
2 drawer bottoms (U)
1 drawer back (V)
PALI spa
via Palmarina 115
33048 San Giovanni al Natisone
Udine Italy
tel. +39.432.756074
fax +39.432.757623
e-mail info@paliitaly.com
www.paliitaly.com
C
D
4x
4x
J
Z
4x
2x
(left + right)
INSTRUCTION
LEAFLET
Important, keep
for future reference.
Read carefully
IMPORTANT: In order to properly assemble the cot, carry out the operations in
the order specified. Failure to assemble the crib in the manner recommended
could make the crib hazardous.
Carefully remove and lay out all parts. Familiarize yourself with all diagrams to
facilitate the assembly of your crib. Check parts enclosed in hardware bag with
the HARDWARE PARTS LIST to be sure all are included and quantities are correct.
Assembly
instructions
ref: stationary side
This crib has been designed for your child's
comfort and your convenience. Quality
material and workmanship have gone into
this crib which will provide a sound and
comfortable bed for your baby if properly
assembled and maintained. For the security of
your child and your own peace of mind be
sure to follow the assembly instructions
exactly. A periodic check should be made of
all bolts and screws, which should be
tightened if needed. Moisture and heat are
harmful to the finish; for this reason use
extreme caution when a vaporizer is in use.
The vapor steam should always be aimed
away from the crib as well as away from any
other wood furniture. Some types of soft
plastic toys could damage the finish when
placed against it.
E
F
4x
4x
Tools needed
for assembly
Version 2004
G
(not available
on Renee crib)
4x
Advertisement
Table of Contents

Related Manuals for PALI Crib


Summary of Contents for PALI Crib
- Page 1 Carefully remove and lay out all parts. Familiarize yourself with all diagrams to 2 drawer ends (T) facilitate the assembly of your crib. Check parts enclosed in hardware bag with 2 drawer bottoms (U) the HARDWARE PARTS LIST to be sure all are included and quantities are correct.
-
Page 2: Applying Metal Tracks To Ends
"L" must be placed on left side. Make sure the small wheel located on the track is closest to the front of the crib. Be very careful to the correct positioning: the track must ALWAYS be positioned with the small wheel towards the drawer front and downwards. -
Page 3: Positioning Of Mattress Base
Assembling crib and positioning of mattress base IMPORTANT: follow carefully the illustrations below. Correct positioning of the plastic Correct positioning of the plastic caps to the mattress support frame caps to the mattress support frame in cribs with headboard/footboard in cribs with headboard/footboard... - Page 4 Mattress base higher position Applying the stationary side Drawer assembly When assembling drawers with roller glides, assemble the sides of the drawer so the small wheels are toward the back of the drawer. The wheels drop into the openings in the rail mounted at the inside of the headboard and footboard. Attach the drawer ends and the center partition to the drawer back as shown on Diagram 5;...
-
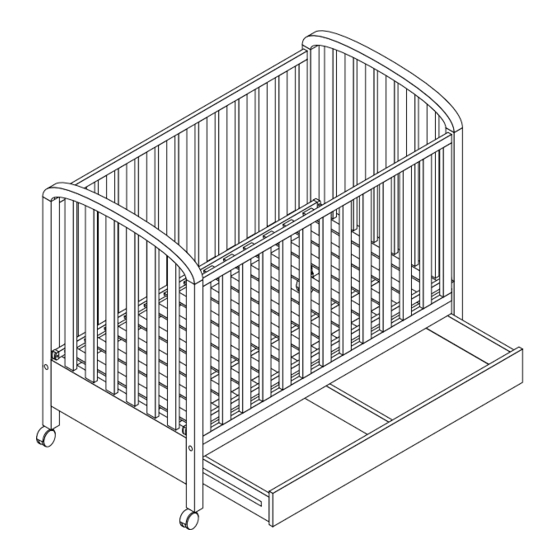
Page 5: Applying The Dropside
Applying the dropside 20-30 cm 20-30 cm Inserting the drawer Stationary side M Dropside L Assembled drawer... - Page 6 Remove all bumper pads, large toys and other objects that could serve as steps for climbing out. When child is able to climb out or reaches the height of 35 inches, the crib must no longer be used. The child should then be transferred to a youth or regular bed.
Need help?
Do you have a question about the Crib and is the answer not in the manual?
Questions and answers