
Related Manuals for Paladin Tools 1112 AM

Summary of Contents for Paladin Tools 1112 AM
- Page 1 Tool Operation and Use Guide Support: 1.800.272.8665 Int’l Phone: 001.804.550.1121 E-Mail: paladin@paladin-tools.com Web: www.paladin-tools.com...
- Page 2 1112 AM 12 Twisted Pair Cable Stripper Strip/cut up to 12 AWG (0.1” diameter) Strip/cut up to 0.5” diameter Blade depth Strip/cut up to adjustment screw 0.2” diameter Stripping length gauge Cutting cable Stripping cable To cut cable: 1. Install the wire or cable into the circular hole closest to the finger loop.
- Page 3 1116 Data SureStrip™ Twisted Pair Cable Stripper Perfect for 25-Pair! Blade Depth Adjustment Screw Flat Cable Stripper Cable Cutter Round Cable Stripper To cut wire & cable: 1. Install the wire or cable into the cable cutter section. 2. Grip the tool & squeeze the top handle down until the article is cut.
- Page 4 4. Squeeze the handles to close the jaws & engage the stripping blades. Note: Not for use on Teflon or Kapton insulated wire Paladin Tools ®...
- Page 5 1820 Series Cable Strippers/Slitters Retaining clamp system Paladin Tools ® Spring- loaded blade direction trigger 1820 1822 1821 Operating instructions: 1. Rotate the silver blade head in clockwise or counter- clockwise directions to decrease or increase the blade cutting depth respectively. (For 1822, rotate bottom knob to set cable diameter) 2.
- Page 6 5. Spare blade is in handle. Remove cap from bottom corner to access. (For 1822, spare blades on side of handle) 6. Replace cap. 7. Slip washer over blade. 8. Install new blade/washer & then replace spring. 9. Screw silver head back on. Paladin Tools ®...
- Page 7 1240 Series CST (Coax) Strippers Adjustment screws Memory cassette Y-block To strip coaxial cable: 1. Make sure the blade cassette is installed in the back section of the tool. 2. Fully retract the rollers by moving the cam switch lever to the full, back position. 3.
- Page 8 Notes: 1. The 1257 is preset for standard RG6 CATV “F” cable. See step 2 above to adjust blades for RG59 cable. 2. Do not hold jaws down during stripping; jaws adjust automatically. Paladin Tools ®...
- Page 9 1300 Series Crimpers Ratchet strength adjustment Safety release Thumb screws Operating Instructions: 1. Install the required die set in the crimp tool by removing the thumb screws located in the jaws. Install the die set with the text facing outward when crimper is in position shown above.
- Page 10 & the tool needs to be reopened, flip the safety release forward in the direction of the jaws to engage the release mechanism. Ratchet strength adjustment: See page 11 for optimum ratchet gear settings & adjustments. Paladin Tools ®...
- Page 11 1600 Series Crimpers Ratchet strength adjustment Safety release Die screws To crimp a cable assembly: 1. For interchangeable-die crimp tools, install the required die set in the crimp tool by removing the screws located in the jaws. Install the die set in the jaws &...
- Page 12 Ratchet Gear Settings Paladin Tools ®...
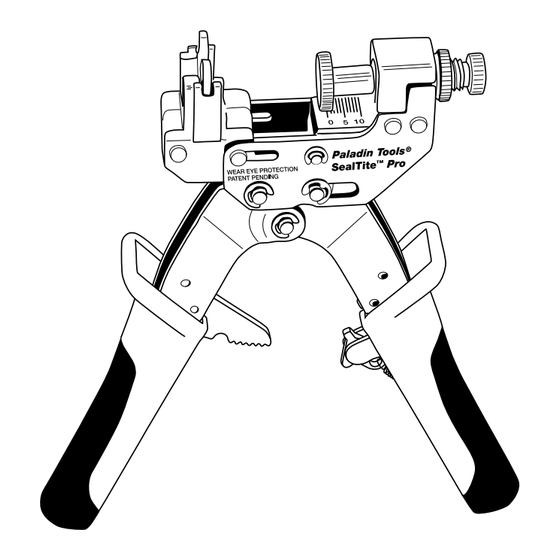
- Page 13 1555 SealTite® Pro Universal Linear Compression Crimper Adjustable head Adjustable screw Cable holding jaws Locking unit Numbered setting guide Figure 1 CATV “F” Head Ratchet release Position Ratchet Figure 2 Universal Head Position 1. Determine if the tool is set for the type of connector you are crimping.
- Page 14 3. Insert the cable into the “grips” at the top of the tool. 4. Close the handles through a complete ratchet cycle to seal the connectors. Safety Crimp is complete. release Notes: Terminates connectors with finished crimp length of 19.5 - 21.5 mm only. Paladin Tools ®...
- Page 15 1530R & 1540 All-in-One Pro Data/Phone Tools Safety release To cut & strip telephone cable: 1. To cut & strip 4- & 6-conductor flat cable, insert the cable into the slot labeled 6 mm. Squeeze the handles to close the blades & cut the cable. 2.
- Page 16 2. Insert the cable to be cut into the cable cutter on the back side of the tool. 3. Fully close the tool through a complete ratchet cycle to cut the cable. 4. Ratchet the tool into the open position and remove the cut cable. Paladin Tools ®...
- Page 17 To strip flat satin cable: 1. Open the tool completely by squeezing handles together through a complete ratchet cycle. 2. For 6-conductor cable, insert it into the flat cable cutter/stripper cavity and rest the front of the cable on the small ridge located inside the handle under the blades.
- Page 18 (see chart below) Connector Crimp Cavity Type Cavity Location RJ45 Front of tool RJ11 & RJ12 Front of tool RJ22 handset Back of tool 4. Close the handles through a complete ratchet cycle until handles open. Crimp is complete. Paladin Tools ®...
- Page 19 901014 & 901016 All-in-One Ultra Data/Phone Tools Safety release To cut & strip telephone cable: 1. To cut & strip 4- & 6-conductor flat cable, insert the cable into the slot labeled 6 mm. Squeeze the handles to close the blades & cut the cable. 2.
- Page 20 3. Press down on the lock clip to lock the light onto the mount. 4. To remove light, push the lock clip in the up position. 5. Slide the light forward. (cont’d on page 20) Paladin Tools ®...
- Page 21 Installing or replacing the batteries in the light: 1. The light must be removed from the PDT handle. 2. Rotate the back of the light module counter- clockwise. Pull the back off the module. 3. Install the 3 batteries in the module. 4.
- Page 22 & press down. The wire will be pressed into the IDC slot of the terminals. Blade storage: 1. To open latch, push forward following the direction of the arrow. 2. To close latch, push cover down & push in opposite direction of arrow. Latch locks in place. Paladin Tools ®...
- Page 23 3526 Series Impact Punchdown Tools Operating instructions: 1. If it is not already installed, insert the required blade in the top of the tool by pulling down the spring-loaded locking mechanism, inserting blade & releasing mechanism. 2. Place the un-stripped telephone wire in the termination panel contact at the IDC...
- Page 24 5. Install connector/cable into .324” crimp cavity for RG6 and .360” profile for RG6 Quad so that the bottom 1/4" of the connector will be crimped. 6. Squeeze handles together firmly to crimp connector onto cable. Terminated Hex Crimp Paladin Tools ®...
- Page 25 SealTite® Cable TV “F” Compression Connectors 1. Strip .25” through shield braid & dielectric to the Strip center conductor & then strip another .25” back without piercing the braid. 2. Flare the shield braid away Flare from the dielectric. Note: If using Quad Shield cable, peel &...
- Page 26 Using a firm twisting motion, insert the cable into the connector until the mark on the cable jacket is flush with the connector. 6. Install the cable/connector into the SealTite® PRO crimper. The flat front edge of the head should be set on #10. Paladin Tools ®...
- Page 27 SealTite® RCA Compression Connectors 1. If using the color code bands, slip onto the cable and pull back out of your way while you are preparing the cable. 2. Strip .25” through shield braid & dielectric to the Strip center conductor & then strip another .25”...
- Page 28 Make sure that none of the braid makes contact with the pin. 6. Slide the sleeve over the bayonet & braided shield. 7. Crimp the cylindrical ferrule to ensure the cable & connector are held firmly together. Paladin Tools ®...
- Page 29 Telephone Cable Assembly To assemble telephone cable: 1. For 4- & 6-pin connectors, strip approximately 1/4” of the outer insulation off the cable. For 8- & 10-pin connec- tors, strip approx- imately 1/2” of the outer insulation off the cable. 2.
-
Page 30: Assembly Instructions
2. Untwist the paired wires. 3. Configure the wire scheme by the color code for the network type you are installing. See the network wiring chart 4. Make sure all the wires are straight in line & not staggered. Paladin Tools ®... - Page 31 5. Use scissors to trim the wires to .5 inches. Make sure all wires are of the same length & in a straight line. 6. Grip the wires & jacket joint between thumb & fore- finger to hold steadily together. Gently slide the wires into the RJ45 plug until they begin to “track”...
- Page 32 Data Network Wiring Chart Paladin Tools ®...
- Page 33 Index Product Number Page Number 1112 AM 12 Twisted Pair Cable Stripper 1113 & 1114 stripax® Pro Wire Strippers 1116 Data SureStrip™ Twisted Pair Cable Stripper 1240 Series CST (Coax) Strippers 1255, 1256, 1257 & 1258 LC CST Coax Strippers 1300 Series Crimpers 1530R &...
- Page 34 I00001 04/07...
Need help?
Do you have a question about the 1112 AM and is the answer not in the manual?
Questions and answers