OHAUS AV53 Instruction Manual
Ohaus adventurer pro balances instruction manual
Hide thumbs
Also See for AV53:
- Instruction manual (44 pages) ,
- Instruction manual (56 pages) ,
- Service manual (108 pages)
Table of Contents
Advertisement
Advertisement
Table of Contents

Related Manuals for OHAUS AV53


Summary of Contents for OHAUS AV53
- Page 1 Adventurer Pro Balances Instruction Manua...
- Page 3 Ohaus Corporation, 19A Chapin Road, P.O. Box 2033 Pine Brook, New Jersey, 07058, USA Declaration of Conformity We, Ohaus Corporation, declare under our sole responsibility that the balance models listed below marked with “CE” - are in conformity with the directives and standards mentioned.
- Page 4 Cet appareil numérique de la classe A est conforme à la norme NMB-003 du Canada. ISO 9001 Registration In 1994, Ohaus Corporation, USA, was awarded a certificate of registration to ISO 9001 by Bureau Veritus Quality International (BVQI), confirming that the Ohaus quality management system is compliant with the ISO 9001 standard’s requirements.
-
Page 5: Table Of Contents
Initial Calibration ..................EN-10 3. OPERATION ....................EN-12 Overview of Controls & Display Functions ............ EN-12 3.1.1 Models AV53, AV212, AV412, AV812, AV1502, AV2101, AV4101, AV8101 ..................EN-12 3.1.2 Models AV64, AV64C, AV114, AV114C, AV212C, AV213, AV213C, AV313C, AV264, AV264C, AV412C, AV413, AV413C, AV812C, AV2101C, AV2102, AV2102C, AV3101C, AV3102, V4101C, AV4102, .. - Page 6 EN-2 Adventurer Pro TABLE OF CONTENTS (Cont.) Application Modes ................... EN-18 3.5.1 Weighing ................... EN-18 3.5.2 Parts Counting ................EN-18 3.5.3 Percent Weighing ................ EN-19 3.5.4 Check Weighing ................. EN-20 3.5.5 Animal Weighing ................. EN-21 3.5.6 Display Hold ................EN-22 3.5.7 Totalize ..................
-
Page 7: Introduction
Adventurer Pro EN-3 1 INTRODUCTION This manual contains installation, operation and maintenance instructions for the Ohaus Adventurer Pro balances. Please read the manual completely before using the balance. 1.1 Description The Adventurer Pro balances are precision weighing instruments that will provide you with years of service if properly cared for. -
Page 8: Installation
EN-4 Adventurer Pro 2 INSTALLATION 2.1 Unpacking Carefully remove your Adventurer Pro balance and each of its components from the package. Save the packaging to ensure safe storage and transport. 2.2 Installing Components Use the illustrations and instructions below to identify and assemble your Adventurer Pro model with its components. -
Page 9: Assembly Of Models Av64, Av114, Av213, Av264, Av313, Av413
Adventurer Pro EN-5 2.2.2 Assembly of Models AV64, AV114, AV213, AV264, AV313, AV413 Note: Assembly instructions also apply to models with the suffix C, CR, CU, R or U. 1. Insert the Platform Assembly on the Mounting Cone in the center of the balance. 2. - Page 10 EN-6 Adventurer Pro 2.2.2 Assembly of Models AV64, AV114, AV213, AV264, AV313, AV413 (Cont.) 4. Install the glass doors in the sides of the Draft Shield framework. Note: The glass doors must be inserted in the Draft Shield framework before inserting the top door; likewise, you must remove the top door before you remove the side doors.
- Page 11 Adventurer Pro EN-7 2.2.2 Assembly of Models AV64, AV114, AV213, AV264, AV313, AV413 (Cont.) 6. Install the top door panel. • Insert the top door in the Draft Shield by holding the door vertically over the top of the Draft Shield framework, as shown. •...
-
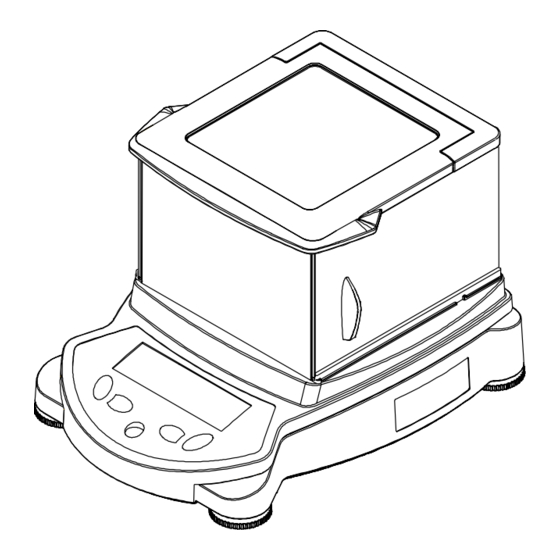
Page 12: Assembly Of Model Av53
EN-8 Adventurer Pro 2.2.3 Assembly of Model AV53 Note: Assembly instructions also apply to models with the suffix C, CR, CU, R or U. 1. Insert the Sub-platform on the mounting cone in the center of the balance. 2. Place the Weighing Pan on the Sub-platform. -
Page 13: Assembly Of Models Av212
Adventurer Pro EN-9 2.2.4 Assembly of Models AV212 Note: Assembly instructions also apply to models with the suffix C, CR, CU, R or U. 1. Insert the Sub-platform on the Mounting Cone located in the center of the balance. 2. Place the Weighing Pan on the Sub-platform. 3. -
Page 14: Connecting Power
EN-10 Adventurer Pro 2.5 Connecting Power 2.5.1 AC Adapter Connect the AC Adapter to the wall outlet. Connect the plug into the receptacle on the rear of the balance. For use with CSA Certified (or equivalent approved) power source, which must have a limited circuit output. - Page 15 Adventurer Pro EN-11...
-
Page 16: Operation
EN-12 Adventurer Pro 3 OPERATION 3.1 Overview of Controls & Display Functions 3.1.1 Models AV53, AV212, AV412, AV812, AV2101, AV4101, AV8101 2 3 4 Top Views Bottom View Rear View 3.1.2 Models AV64, AV64C, AV114, AV114C, AV212C, AV213, AV213C, AV313, AV313C, AV264, AV264C, AV412C, AV413, AV413C,... - Page 17 Adventurer Pro EN-13 3.1 Overview of Controls and Display Functions (Cont.) Digital Display Window TABLE 3.1-1 ADVENTURER PRO CONTROLS AND DISPLAY FUNCTIONS. No. Description No. Description 1 On / Zero / Off / Yes Button 18 Lock Switch 2 Print Unit / No Button 19 Primary (7 segment) display 3 Level Bubble 20 Brackets...
-
Page 18: Button Control Functions
EN-14 Adventurer Pro 3.2 Button Control Functions Four multifunction buttons are used to to operate the balance and navigate the menus. The function of each button is shown below. Press and Release Press and Hold Menu Function Back Exit Tare Print Function On/Zero... -
Page 19: Using The Button Control Functions
Adventurer Pro EN-15 3.3 Using the Button Control Functions 3.3.1 Setting the Balance to Zero Remove the load from the pan and press the Zero button to set the display to zero. When the weighing pan or platform is empty, The Center of Zero indicator turns on when the measurement is within + 1/4 d of the zero setting. -
Page 20: Menu
EN-16 Adventurer Pro 3.4 MENU 3.4.1 Menu Structure The Adventurer Pro balance menu structure is illustrated below. SETUP (3.7.3) CALIBRATION (3.7.1) READOUT (3.7.4) Legal Trade Auto Zero Internal Calibration (InCal) Auto Tare Filter Span Auto Off Gross Ind. Linearity Back Light * End Read Calibration test (CalTest) End Setup... -
Page 21: Menu Navigation
Adventurer Pro EN-17 3.4.2 Menu Navigation The Adventurer Pro menu structure consists of three levels. The top level is the main menu which consists of a number of sub-menus. Enter TOP LEVEL CALIBRATION SETUP READOUT MODE UNIT PRINT-1 PRINT-2 LOCKOUT RESET GLP PRINT GLP DATA... -
Page 22: Application Modes
EN-18 Adventurer Pro 3.5 Application Modes The Adventurer Pro balance incorporates Weighing, Parts Counting, Percent Weighing, Check Weighing, Animal Weighing, Display Hold and Totalize application modes. The default setting has the weighing mode turned on and all other application modes turned off. Note: Before using any application modes, they must be turned on in the Mode menu (See Section 3.3.4). -
Page 23: Parts Counting
Adventurer Pro EN-19 3.5.2 Parts Counting (Cont.) Place the specified number of parts on the pan. Press the Function button to accept. The primary display will now indicate the number of parts. The weight is shown on the secondary display. Pressing the Function button momentarily displays the APW on the secondary display. -
Page 24: Check Weighing
EN-20 Adventurer Pro 3.5.3 Percent Weighing (Cont.) Place the sample on the pan and press the Function button. This example illustrates 50 grams as the reference weight. Remove the reference weight and place the item to be compared on the pan. The balance indicates the actual percentage on the primary display. -
Page 25: Animal Weighing
Adventurer Pro EN-21 3.5.4 Check Weighing (Cont.) Editing Limits The limits are edited one digit at a time. The digit being edited is blinking. Its value can be incremented by pressing the No button or decremented by pressing the Back button. When the desired value is displayed, press the Yes button to accept the value and proceed to the next digit. -
Page 26: Display Hold
EN-22 Adventurer Pro 3.5.5 Animal Weighing (Cont.) Completed Animal Cycle The primary display shows the weight of the animal and the secondary display alternates between ANIMAL and HOLD. Automatic Mode The balance returns to the Ready condition when the animal is removed from the pan. If the Function button is pressed before the animal is removed from the pan, the primary display shows the actual weight and the secondary display alternates between ANIMAL and CLEAR PAN until the animal is removed from the pan. -
Page 27: Totalize
Adventurer Pro EN-23 3.5.7 Totalize Totalize measures the cumulative weight of items. Refer to Section 3.4.3 to enable totalizing. Press Mode , then release the button when Totalize is displayed. The primary display shows the current weight. The secondary display alternates between TOTALIZE and the current totalized weight. -
Page 28: Battery Operation
EN-24 Adventurer Pro 3.6.2 Battery Operation Refer to Section 5.2 to determine if your Adventurer Pro model operates on battery power when AC power is not supplied. Models with the battery operation feature will display the battery change indicator, as shown below. If batteries are installed and AC power is not present, the balance operation is affected as follows: •... -
Page 29: Balance Settings
Adventurer Pro EN-25 3.7 Balance Settings Refer to Section 3.4.2 to enter and navigate the menus. 3.7.1 Calibration Adventurer Pro balances offer a choice of five calibration methods: Internal Calibration (InCAL Span Calibration, Linearity Calibration, Calibration Test and Calibration Adjust. •... - Page 30 EN-26 Adventurer Pro Internal Calibration (InCal models) Models equipped with the internal calibration can be calibrated without using an external weight. With the balance on, press and hold the Menu-Cal button until MENU CALIBRATE is displayed, then release the button. Press Yes to initiate the internal calibration process.
- Page 31 Adventurer Pro EN-27 Linearity Calibration NOTICE: Linearity Calibration is required only if the linearity error exceeds tolerance in specification table. With the balance on, press and hold the Menu-Cal button until MENU CALIBRATE is displayed, then release the button. CALIBRATE (blinking). Press the Yes button to enter calibration.
-
Page 32: Calibration
EN-28 Adventurer Pro Calibration Test (InCal models) Calibration test allows a check of a known calibration mass against the last stored calibration information in the balance. Press and hold the Menu-Cal button until MENU CALIBRATE is displayed. Press Yes to enter calibration. Press No until CAL TEST is displayed. - Page 33 Adventurer Pro EN-29 Calibration Adjust (InCal models) Calibration Adjust may be used to adjust the result of the internal calibration by ±100 divisions. Note: : : : : Before making a calibration adjustment, perform an internal calibration. To verify whether an adjustment is needed, place a test mass on the platform and note the difference (in divisions) between the nominal mass value and the actual reading.
-
Page 34: Calibration Masses
3.7.2 Calibration Masses Model Linearity Calibration Points Span Calibration Points (1) Weight Class ASTM OIML AV53 25g / 50g 30g, 40g, 50g AV64 20g / 50g 40g, 50g, 60g AV114 50g / 100g 50g / 100g AV212 100g / 200g... -
Page 35: Setup
Adventurer Pro EN-31 3.7.3 Setup Gross Ind. Allows setting the gross indicator to G (gross), SETUP B (brutto) or Off. Legal Trade On/Off Auto Tare On/Off Auto Off Off, 1, 2, 5 min End Read Back Light On/Off End Setup Press the Yes button to advance to the Mode submenu. -
Page 36: Unit
EN-32 Adventurer Pro Enter the Factor, following the instructions for Display Hold Editing Limits in Section 3.5.4. Enter the Use to set the Display Hold Mode to Auto, Semi- Exponent and LSD using the Yes No buttons. automatic or Manual. Totalize Use to set the Totalize Mode to Auto, Manual or Factor... - Page 37 Adventurer Pro EN-33 3.7.7 Print-1 and Print-2 (Cont.) Layout Determines the format of data output to a printer PRINT-1 or computer. If Line Format is set to Multi, a Output When Stable On/Off multi-line printout is generated. If it is set to GLP Tare On/Off Single, a single line printout is generated.
-
Page 38: Rs232-1 And Rs232-2
EN-34 Adventurer Pro Entering a User ID or Project ID 3.7.8 RS232-1 and RS232-2 (Cont.) Enter the user or Project ID one character at a When the balance is operated from batteries, time. The character to be entered is highlighted the menu item is available and the default setting by a blinking cursor (underscore). -
Page 39: Glp Print
Adventurer Pro EN-35 3.7.10 GLP Print Unit Select GLP items to be printed by setting them to Select Yes to return all Unit menu items to their factory settings. GLP PRINT Time On/Off Print-1 Balance ID On/Off User ID On/Off Select Yes to return all Print-1 menu items to Project ID On/Off... -
Page 40: Lockout
OIML, EEC, NTEP and Setup Measurement Canada weights and measures Set On to lock the Setup Menu. regulations. Contact Ohaus for further details about availability. Readout Set On to lock the Readout Menu. When the LEGAL TRADE menu item setting is... -
Page 41: Sealing Access To The Balance Settings
To regain access to the locked balance settings, break the seal and press the recessed Lock switch momentarily while OHAUS is displayed during power up. Sealing the Balance Wire Seal Paper Seal... -
Page 42: Maintenance
Do not use harsh chemicals to clean the balance, as the finish may be damaged. 4.3 Troubleshooting The following table lists common problems, possible causes and remedies. If the problem persists, contact Ohaus or your authorized Ohaus dealer. Symptom Possible Cause Remedy Balance will not turn on •... -
Page 43: Service Information
If the Troubleshooting section does not resolve or describe your problem, contact your authorized Ohaus Service Agent. For Service assistance or technical support in the United States, call toll-free 1-800-526-0659 between 8:00 AM and 5:00 PM EST. An Ohaus product service specialist will be available to provide assistance. -
Page 44: Accessories
EN-40 Adventurer Pro 4.5 Parts (Cont.) Description Ohaus Part Number In-Use Cover Kit (10 x 7.6 in. / 25.4 x 19.3 cm housing) 12103980 In-Use Cover Kit (11.8 x 8.7 in. / 30 x 22 cm housing) 12103857 Top Door Kit 12103873 Glass Door Kit (8.7 in. -
Page 45: Technical Data
Adventurer Pro EN-41 5. TECHNICAL DATA Ambient conditions The technical data are valid under the following ambient conditions: • Ambient temperature: 10 °C to 30 °C • Relative humidity: 15 % to 80 % at 31 °C non-condensing, decreasing linearly to 50 % at 40 °C •... -
Page 46: Drawings
EN-42 Adventurer Pro 5.1 Drawings Figure 5-2 Figure 5-1 Figure 5-3 Figure 5-4 Note: See table on next page for model designations and dimensions. - Page 47 11.8 in. AV213, AV213C, AV313, 19 cm 22 cm 30 cm AV313C, AV413, AV413C 7.5 in. 8.7 in. 11.8 in. AV53 14.5 cm 19.3 cm 25.4 cm 5.7 in. 7.6 in. 10 in. AV212, AV412, AV812, 7.2 cm 19.3 cm 25.4 cm...
- Page 48 5. TECHNICAL DATA 5.2 Specifications Item Number AV53* AV 64 AV114 AV264 AV213 AV313 AV413 AV212* AV412* AV 64C** AV114C** AV264C** AV213C** AV313C** AV413C** Capacity (g) Readability (g) 0.001 0.0001 0.001 0.01 Repeatability (Std.dev.)(g) 0.001 0.0001 0.001 0.01 Linearity (g ±...
- Page 49 5. TECHNICAL DATA (Cont.) Specifications (Cont.) Item Number AV812* AV212C** AV412C** AV812C** AV2102 AV3102 AV4102 AV2101* AV4101* AV2102C** AV3102C** AV4102C** Capacity (g) 2100 3100 4100 2100 4100 Readability (g) 0.01 Repeatability (Std.dev.)(g) 0.01 Linearity (g ± 0.02 ± 0.2 Weighing Units Milligram, Gram, Kilogram, Ounce, Pound, Carat, Pennyweight, Ounce Troy, Grain, Newton, Hong Kong Tael, Singapore Tael, Taiwan Tael, Momme, Tical, Baht, Mesghal, Tola, Custom Application Modes...
-
Page 50: Specifications
5. TECHNICAL DATA (Cont.) Specifications (Cont.) Item Number AV8101* AV2101C** AV4101C** AV8101C** Capacity (g) 8100 2100 4100 8100 Readability (g) Repeatability (Std.dev.)(g) Linearity (g ± 0.2 Weighing Units Milligram, Gram, Kilogram, Ounce, Pound, Carat, Pennyweight, Ounce Troy, Grain, Newton, Hong Kong Tael, Singapore Tael, Taiwan Tael,Momme, Tical, Baht, Mesghal, Tola, Custom Application Modes Weighing, Parts Counting, Percent Weighing, Check Weighing,... -
Page 52: Capacity X Readability
Capacity x Readability (Cont.) Unit AV413 AV212 AV412 AV812 AV2102 AV3102 AV413C AV212C AV412C AV812C AV2102C AV3102C baht 26.9737 x 0.0001 26.974 x 0.001 138.158 x 0.001 203.947 x 0.001 13.816 x 0.001 53.289 x 0.001 carat 2050.000 x 0.005 2050.00 x 0.05 10500.00 x 0.05 15500.00 x 0.05... - Page 53 Capacity x Readability (Cont.) Unit AV4102 AV2101 AV4101 AV8101 AV4102C AV2101C AV4101C AV8101 baht 269.737 x 0.001 138.16 x 0.01 269.74 x 0.01 532.89 x 0.01 carat 20500.00 x 0.05 10500.0 x 0.5 20500.0 x 0.5 40500.0 x 0.5 grain 63272.8 x 0.2 32408 x 2 63274 x 2...
-
Page 54: Communication
EN-50 Adventurer Pro 5.4 Communication The balance is equipped with an RS232 interface (COM1). Some models are also equipped with a second RS232 interface (COM2). Connecting the balance to a computer enables you to operate the balance from the computer, as well as receive data such as displayed weight. 5.4.1 Commands Commands listed in the following table will be acknowledged by the balance. -
Page 55: Connections
* External PRINT and/or TARE switches may be installed as shown in the diagram. Momentary contact switches must be used. To enable this feature, contact Ohaus Aftermarket. A 6-pin Mini DIN connector is provided when the optional second RS232 interface is installed. -
Page 56: Limited Warranty
Ohaus. In lieu of a properly returned warranty registration card, the warranty period shall begin on the date of shipment to the authorized dealer. - Page 60 Ohaus Corporation 19A Chapin Road P.O. Box 2033 Pine Brook, NJ 07058, USA Tel: (973) 377-9000 Fax: (973) 593-0359 With offices worldwide www.ohaus.com © Ohaus Corporation 2005, all rights reserved *80251161* P/N 80251161 Printed in China...
Need help?
Do you have a question about the AV53 and is the answer not in the manual?
Questions and answers