
Related Manuals for Sartorius BP 301S

Summary of Contents for Sartorius BP 301S
- Page 1 98648-006-98 Sartorius Basic plus Electronic Semi-micro-, Analytical and Precision Balances Installation and Operating Instructions...
-
Page 3: Table Of Contents
Contents Page Page General Views of the Balances Troubleshooting Guide Warranty Care and Maintenance Storage and Shipping Conditions 12 Balance Operating Menu Installation Instructions Changing Menu Code Settings Ambient Conditions Accessing the Menu Undoing All Menu Code Getting Started Changes – Reset Function Preparing the Weighing Chamber/Balance Balance Operating Parameters... - Page 4 Page Page Application Programs ISO/GLP-compliant Printout Tare Memory or Record Practical Example: Printout/Record for Tare – Net – Gross Weights Adjustment or Calibration and Practical Example: Net Total Linearization Functions Weighing in Percent Data Printout/Record Practical Example: Determination (ISO/GLP-compliant) of the Residual Weight in Percent Data Printout/Record for Counting Application Programs...
- Page 5 BP 211D, BP 211D-0CE No. Designation Order no. for No. Designation Order no. for replacement replacement 1 Weighing pan 69 B20116 12 Weight display 2 Shield disk 69 B20117 13 DC jack 3 Metrological ID label 14 Verification ID label with metrological for verified balances approved data for verified balances approved for use as legal measuring instruments...
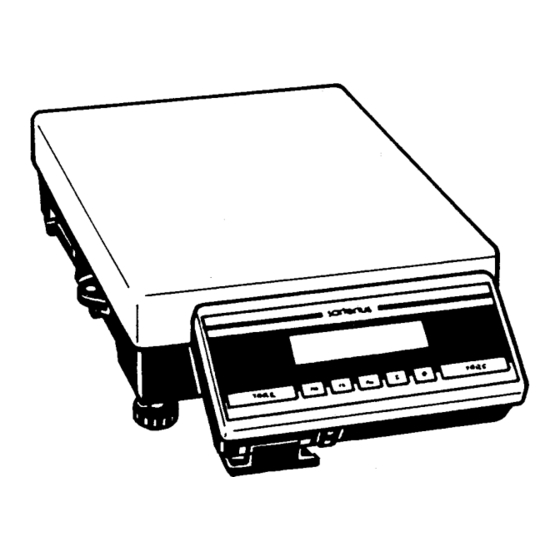
- Page 6 BP 301S, BP 221S, BP161P , BP121S, BP 61S, BP 301S-0CE, BP 221S-0CE, BP161P-0CE, BP121S-0CE, BP 61S-0CE No. Designation Order no. for No. Designation Order no. for replacement replacement 1 Weighing pan 69 B20116 12 Weight display 2 Shield ring...
- Page 7 BP 410 S, BP 310 S, BP 310 P , BP150, BP 410 S-0CE, BP 310 S-0CE, BP 310 P-0CE, BP150-0CE, BP 110-0CE No. Designation Order no. for No. Designation Order no. for replacement replacement 1 Weighing pan 69 B20002 13 Verification ID label with metrological 2 Shield ring 69 B20015...
- Page 8 BP 610, BP410, BP 610-0CE No. Designation Order no. for No. Designation Order no. for replacement replacement 1 Weighing pan 69 B20002 13 Verification ID label with metrological 2 Shield ring 69 B20015 data for verified balances approved 3 Metrological ID label for use as legal measuring instruments for verified balances approved 14 DC jack...
- Page 9 BP 4100 S, BP 3100 S, BP 3100 P , BP 2100 S, BP1200, BP 3100 S-0CE, BP 4100 S-0CE, BP 3100 P-0CE, BP 2100 S-0CE, BP 2100-0CE, BP1200-0CE No. Designation Order no. for No. Designation Order no. for replacement replacement 1 Weighing pan 69 B20003...
- Page 10 BP 8100, BP 6100, BP4100, BP 2100, BP 8, BP 8100-0CE, BP 6100-0CE, BP 8-0CE No. Designation Order no. for No. Designation Order no. for replacement replacement 1 Weighing pan 69 B20004 13 Verification ID label with metrological 3 Metrological ID label data for verified balances approved for verified balances approved for use as legal measuring instruments...
- Page 11 BP16000 S, BP12000 S, BP 34000 P , BP 34 No. Designation Order no. for No. Designation Order no. for replacement replacement 1 Weighing pan 69 LC0107 12 Weight display 4 Menu access switch 14 DC jack 5 Leveling foot 69 LC0092 15 Manufacturer’s label with 6 Zero-setting and tare keys t...
-
Page 12: Warranty
Do not miss out on the benefits of our full warranty. Please complete the warranty registration card, indicating the date of installation, and return the card to your Sartorius office or dealer. Storage and Shipping Conditions Allowable storage temperature: +5°C …+40°C +41°F…+104°F... -
Page 13: Installation Instructions
Installation Instructions Ambient Conditions When choosing a location to set up your balance, observe the following: – Set up the balance on a stable, even surface (benchtop or floor), or place it on a wall console (see “Accessories”) – Avoid placing the balance in close proximity to a heater or otherwise exposing the balance to extreme heat or to direct sunlight –... - Page 14 Using Verified Balances as Legal Measuring Instruments in the EU* You must calibrate the balance at the place of installation before using it as a legal measuring instrument (see the section entitled “Adjustment/ Calibration” starting on page 22). This balance is not allowed to be used for weighing goods intended for direct sale to the public.
-
Page 15: Getting Started
Legal regulations require the verified balance to be sealed. This control seal consists of an adhesive label with the name “Sartorius” on it. This seal will be irreparably damaged if you attempt to remove it. In this case, the validity of the seal becomes void and you must have your balance re-verified. -
Page 16: Connecting The Balance To Ac Power
Preparing Balances with a Round Weighing Pan – Place the shield disk (2) on the balance. Turn the disk counterclockwise until it stops and is secured. Place the components listed below on the balance in the order given: – Pan support (21) –... -
Page 17: Voltage Selection
Operation of this equipment in a residential area is likely to cause harmful interference, in which case the user will be required to correct the interference at his own expense. Changes or modifications not expressly approved by Sartorius AG could void the user’s authority to operate the equipment. -
Page 18: Connecting Electronic Peripheral Devices
Connecting Electronic Peripheral Devices Make absolutely sure to unplug the balance from AC power before you connect or disconnect a peripheral device (printer or PC) to or from the interface port. Adjusting the Display Unit on Balances with a Weighing Capacity of ≥10 kg Adjust the display unit to the position desired. -
Page 19: Leveling The Balance Using The Level Indicator
Leveling the Balance Using the Level Indicator At the place of installation, level the balance using the leveling feet (5) so that the air bubble is centered within the circle of the level indicator (17). For balances with a rectangular pan and a weighing capacity of <10 kg: Retract the two auxiliary feet located at the back of the balance. -
Page 20: Operating The Balance
Operating the Balance Warmup Time To deliver exact results, the balance must warm up for at least 30 minutes after connection to AC power or after a power outage. Only after this time will the balance have reached the required operating temperature. Turning the Display On and Off (Standby Mode) Press the e key (11) to turn the display on and off. -
Page 21: Taring
Taring A weight can be determined accurately only from a defined zero point. Press one of the t keys (6) to zero the weight display. You can tare within the entire weighing range of the balance. Important Note Concerning Verified Balances Approved for Use as Legal Measuring Instruments in the EU*: The symbol n in the weight display (on the left) -
Page 22: Calibration/Adjustment
Calibration/Adjustment During calibration ), the span of the balance is adjusted to the changes in ambient conditions. You must adjust or calibrate your new balance at the place of installation after each warmup period and before the first measurement. You must also re-adjust or recalibrate your balance each time you set it up in a different area or when ambient conditions change (especially the temperature). -
Page 23: External Calibration
The built-in calibration weight is internally applied by servomotor and removed at the end of adjustment or calibration. If any interference affects the calibration procedure, you may obtain a brief display of the error code “Err 02.” In this case, tare and press the q key again. Important Note During calibration, the weighing pan must be unloaded. -
Page 24: Calibration Test
Center the calibration weight on the weighing pan. The balance then calibrates automatically. At the end of calibration, the calibration weight readout and the stability symbol “g” are displayed. Calibration Test for Balances with a Built-in Calibration Weight Menu code selection: 1 9 4 When a zero readout is displayed, press the q key (9). -
Page 25: Below-Balance Weighing
Below-Balance Weighing A port for a below-balance weighing hanger is located on the bottom of the balance (for balances with a weighing capacity of ≥10 kg, see “Accessories”). For Balances with an Analytical Draft Shield Chamber: To hook a sample on the hanger, open the below- balance port by turning the cover plate. -
Page 26: Troubleshooting Guide
Troubleshooting Guide Problem Causes Solution No segments – No AC power – Check the AC power appear on the is available supply weight display (13) – The AC adapter is not – Plug in the AC adapter plugged in No segments –... -
Page 27: Care And Maintenance
In this case, notify your nearest Sartorius Service Center Unit. Only service technicians who are authorized by Sartorius and who have access to the required maintenance manuals are allowed to perform maintenance and repairwork on the equipment. -
Page 28: Balance Operating Menu
Balance Operating Menu In the operating menu, you can define how your balance will adapt to ambient conditions and also how it will work to meet your special requirements. Changing Menu Code Settings To select specific functions, you will need to set the respective menu codes. -
Page 29: Accessing The Menu
Accessing the Menu (Example: Code 8 5 4) – Press e to turn off the balance. – Turn the balance back on. While all segments are displayed, briefly hold down t. ▼ – For standard balances, if “-” is displayed next to the left-hand number, proceed as follows to unlock the menu: –... -
Page 30: Undoing All Menu Code
The current code setting in the balance operating menu is identified by a small, superscript “ ” after the last number. When you access the operating menu, the previously set code will be displayed after you have selected the right-hand number, which means the entire menu code setting will be displayed. -
Page 31: Balance Operating Parameters
Balance Operating Parameters Adapting the Balance to Ambient Conditions The balance can be adapted to the prevailing ambient conditions at the place of installation. Code Very stable conditions Stable conditions Unstable conditions Very unstable conditions Standard Weighing Mode – Manual Filling Mode You can optimally adapt your balance to meet either of these requirements. -
Page 32: Tare Parameter
Tare Parameter You can define when the balance will perform the taring operation: Code** At any time Not until the readout is stable Auto Zero Function When this zero-tracking function is activated, any slight changes off the zero readout are automatically tared. Code Auto Zero on Auto Zero off... -
Page 33: Weighing Using Two Weighing Units
Weighing Using Two Weighing Units The v key (8) lets you toggle back and forth between two weight units. The 2nd unit is identified by the display symbol “R1.” Code v key blocked Mass unit conversion by toggling General View – Weight Units Symbol/Conversion factor Code 1 g =... -
Page 34: Display Modes
Display Modes You can select the display mode that best meets your individual accuracy requirements (last numeral). The display increments possible are as follows: 1, 2, 5, 10, 20, 50, etc. Starting with the basic increments of a weight unit, the display accuracy can be reduced by as many as three levels so that you will obtain a faster readout with a reduced display accuracy. -
Page 35: Interface Parameter Settings
Interface Parameter Settings Baud Rate Code 150 baud 300 baud 600 baud 1,200 baud 2,400 baud 4,800 baud 9,600 baud 19,200 baud Parity Code Mark Space Even Number of Stop Bits Code 1 stop bit 2 stop bits Handshake Mode Code Software handshake Hardware handshake with 2 characters after CTS... -
Page 36: Utilities For Printouts Or Data Transfer
Utilities for Printouts or Data Transfer Sartorius balances come standard with an interface. You can plug a Sartorius printer or a computer into this interface port. In addition, you can choose to have data output from your balance to this on-line device either automatically or by pressing the p key. -
Page 37: Data Id Codes
Automatic Taring after Data Output (Print on Request) This convenient setting lets you checkweigh a series of samples or products without having to unload the balance after each weighing operation. – the sample remains on the pan after the weight readout has been printed or transferred to an on-line computer –... -
Page 38: Additional Functions
Automatic Output of the Tare Memory Data If you have selected the application program “tare memory” (2 1 6), you can have your choice of values output by pressing the v key: Code Last net value (individual value N1) Tare memory data (total T1) Additional Functions Menu Access Switch Function on Standard Balances You can define the function of the menu access switch by setting the code for the... -
Page 39: Universal Switch For Remote Control
Universal Switch for Remote Control You can connect an external universal switch to the interface port of your balance for remote control of the functions listed below. Functions Code Print p Tare t Adjust/calibrate/linearize (using q) v key c key Power-On Mode Depending on your requirements, you can change the power-on mode of your balance. -
Page 40: Application Programs
Application Programs In addition to the functions implemented for weighing, Sartorius Basic balances plus offer you a variety of application programs. To select an application program or a specific function, set the appropriate code in the menu. The procedure for setting menu codes is described in detail starting on page 28. -
Page 41: Practical Example: Net Total
Application: Obtaining printouts of tare, net and gross weights or outputting these data to a computer Step/Key Readout Data Output/Printout c, t 0.00 g Place container on pan 22.65 g 0.00 g NET T1 22.65 g Fill container with sample; press p 250.24 g NET N1 250.24 g... -
Page 42: Weighing In Percent
Application: Simple compounding and formulating of several components with additive storage, automatic taring and outputting of the component weights Step/Key Readout Data Output/Printout Place container on pan 22.65 g c, t 0.00 g Weigh in 1st component; 4.61 g store: v 0.00 g NET N1 4.61 g Weigh in 2nd component;... - Page 43 Changing the Reference Percentage You can change the reference percentage in cycles. Choose from the following settings: 5, 10, 20, 50 and 100. Hold down v (8) for more than 2 seconds until To activate the change function: “rEF 100 %” appears on the display To change the setting: Briefly press v Hold down v for more than 2 seconds to store...
-
Page 44: Practical Example: Determination Of The Residual Weight In Percent
Practical Example: Determination of the Residual Weight in Percent Menu code settings used in the example: Function Code Weighing in percent 2 1 5 Ref. % and weight 7 1 2 With data ID code 7 2 2 Application: Quick determination of the dry weight of a sample Step/Key Readout Data Output/Printout... -
Page 45: Counting
Counting Counting Code 2 1 4 Symbol displayed: The counting program allows automatic conversion of weights into piece counts based on a reference sample weight. A weight readout is stored as a reference sample quantity (factory setting: 10 pcs = pieces). When you turn on the balance, the reference sample quantity will be displayed as “rEF 10 pcs”... -
Page 46: Practical Example: Counting Small Parts
Practical Example: Counting Small Parts Menu code settings used in the example: Function Code Counting 2 1 4 Ref. qty. and ref. weight 7 1 2 With data ID code 7 2 2 Application: Counting bulk quantities of items with the same weight Step/Key Readout Data Output/Printout... -
Page 47: Animal Weighing/Averaging
Animal Weighing/Averaging Animal Weighing/Averaging Code 2 1 7 Symbol displayed: Use this program to determine the weights of live animals or weights under unstable ambient conditions. In this program, the balance calculates the weight as the average of a selectable number of individual weighing operations. During averaging, the number of remaining individual subweighing operations is shown on the application display in a “countdown”... - Page 48 Delayed Start Mode A rule of thumb to go by for selecting the right setting to weigh animals is: the more active an animal is, the greater the difference must be between two successive subweights measured. Depending on individual requirements, starting the averaging operation can be delayed either in the automatic or manual mode until the animal you are weighing has calmed down to a certain degree.
-
Page 49: Automatic Start Mode
Storage Threshold for the Automatic Start Mode To obtain an added measure of reliability in the automatic mode, in order to avoid an “incorrect start,” a weight value must correspond to a minimum load of 100 display increments. Practical Example: Animal Weighing in the Automatic Start Mode Menu code settings used in the example: As an alternative, you can select Function... -
Page 50: Iso/Glp-Compliant Printout
You can connect a special Sartorius Data Printer to Basic balances for generating plus ISO/GLP-compliant printouts (order no. YDP03-0CE). To generate ISO/GLP-compliant records with a computer, you will need special software. For information on writing this software, please ask Sartorius for a detailed description. * = factory setting... -
Page 51: Printout/Record For
– all calibration, adjustment and linearization procedures – calibration test The printout can have the following lines: -------------------- : Balance family and manufacturer MC1 - Sartorius : Balance model Model BP211D : Serial number of the balance 040500048 : Space for entering the workstation or operator ID... -
Page 52: Data Printout/Record
Generation of an ISO/GLP-compliant printout or record is also ended when an adjustment or calibration operation is started. The printout can have the following lines: -------------------- : Balance family and manufacturer MC1 - Sartorius : Balance model Model BP211D : Serial number of the balance 040500048... -
Page 53: Data Printout/Record For Application Programs
– Then press c to clear the reference data for the application programs The printout can have the following lines: -------------------- : Balance family and manufacturer MC1 - Sartorius : Balance model Model BP211D : Serial number of the balance... -
Page 54: Interface Description
If you interface an original Sartorius accessory device, such as a Sartorius Data Printer or a similar unit, with a balance that has the factory-set menu codes, you do not need to change any settings. -
Page 55: General Specifications
General Specifications Type of interface Serial point-to-point connector Operating mode Asynchronous, full-duplex Standard V28, RS-232C specification Handshake*) 2-wire interface: via software (XON/XOFF) 4-wire interface: via hardware handshake lines with Clear To Send (CTS) and Data Terminal Ready (DTR) Transmission rates*) 150;... -
Page 56: Data Output Formats
Data Output Formats Depending on the menu code setting: 7 2 1 = without data ID code or 7 2 2 = with data ID code data will be output with either 16 (code 7 2 1) or 22 characters (code 7 2 2). For data output of 22 characters, a 6-character ID precedes the 16 characters reserved for the weight or other value. - Page 57 When data are output without decimals, the decimal point is suppressed (except when a certain display mode is selected). 10 11 12 13 14 15 16 – – – – – – – – – – – – – – – – – – – – – * 10 –...
- Page 58 Special Codes Special codes are output only if the balance operating menu code 611, 614 or 615 is set (see the section entitled “Data Ouput Parameters”). Special status-dependent codes 10 11 12 13 14 15 16 The following status codes are output for “A B”: * * : Tare H * : Overload C * : Calibrate*)
- Page 59 Data Output with ID Code When data with an ID code are output, the ID code consisting of 6 characters precedes the data with the 16-character format. During data output, all characters are shifted to the right by 6 places. 22nd character C C C C C C S * x x x x x x x x * U U U CR * * * * * *...
-
Page 60: Data Input Formats
Data Input Formats Commands can be input via the balance interface port to control the balance functions. Control commands are distinguished according to those with upper-case letters, or special characters, and those with lower-case letters. Format for Control Commands Control commands can include up to 13 characters. Each character must be transmitted with a start bit, a 7-bit ASCII-coded character, a parity bit and one or two stop bits. - Page 61 Control Commands with Upper-Case Letters or Special Characters p (print; activate/block auto print) Restart/self-test Tare Internal calibration (adjustment)* The “P,” “T” and “Z” commands do not affect the menu code settings of the balance to reinitialize (turns the scale off and back on again). The “S” command causes the processor to reintialize (turns the scale off and back on again).
- Page 62 Control Commands with Lower-Case Letters All functions that can be selected by pressing the respective keys on the balance can also be activated by commands. v function key q function key c clear function Perform calibration test* Output scale model Output serial number Each control command with the lower-case letters “f,”...
- Page 63 In this case, data will be output but not received. Handshake The balance interface (Sartorius Balance Interface = SBI) has a 23-byte transmit buffer and a 40-byte receive buffer. You can access the balance operating menu to define various handshake...
- Page 64 For data communication with a software handshake, “XON” must be sent by a device when it is turned on in order to enable another on-line device to exchange data. Sequence: Balance Receiving device – – – – – byte – – – – → –...
- Page 65 If you select the auto print setting, data will be transmitted immediately the moment you turn on the balance. This data output function is described under “Utilities...” on page 36. Higher Data Output Rates If you require an output rate higher than 10 Hz, ask Sartorius for this information.
-
Page 66: Pin Assignment Chart
Warning When Using Pre-wired RS-232 Connecting Cables! RS-232 cables purchased from other manufacturers often have incorrect pin assignments for use with Sartorius balances. Be sure to check the pin assignment against the chart below before connecting the cable, and disconnect any lines marked “Internally Connected” (e.g., pin 6). -
Page 67: Cabling Diagram
Cabling Diagram Diagram for interfacing a computer or a different peripheral device to the balance using the RS-232C/V24 standard and interface cables up to 15 m (50 ft.) long. Balance Peripheral Device (PC) 25 pol. 9 pol. Type of cable: AWG 24 specification... -
Page 68: Specifications
Specifications Basic plus Model BP 211 D BP 301 S Weighing range structure DualRange SuperRange Weighing capacity 40/80/210 Readability 0.01/0.01/0.1 Tare range (by subtraction) –210 –303 Reproducibility (standard deviation)* ≤0.02/≤0.05/≤0.1 ≤0.2 Linearity ≤±0.03/≤±0.1/≤±0.2 ≤±0.3 Response time (average) ≤12/3 ≤3 Allowable ambient operating temperature °C +5 …... - Page 69 Model BP 221 S BP 161 P BP 121 S BP 61 S Weighing range structure SuperRange PolyRange SuperRange SuperRange Weighing capacity 30/60/ 110/160 Readability 0.0001 0.0001/ 0.0001 0.0001 0.0002/ 0.0005/ 0.001 Tare range (by subtraction) –220 –160 –120 –61 Reproducibility (standard deviation)* ≤±0.0001 ≤±0.0001/...
- Page 70 Model BP 410 S BP 310 S BP 310 P BP 150 Weighing range structure SuperRange SuperRange PolyRange Weighing capacity 60/120/310 Readability 0.001 0.001 0.001/0.002/ 0.001 0.005 Tare range (by subtraction) –410 –310 –310 –150 Reproducibility (standard deviation)* ≤±0.001 ≤±0.001 ≤±0.001/ ≤±0.001 0.001/...
- Page 71 Model BP 610 BP 410 Weighing capacity Readability 0.01 0.01 Tare range (by subtraction) – 610 – 410 Reproducibility (standard deviation)* ≤±0.01 ≤±0.01 Linearity ≤±0.01 ≤±0.01 Response time (average) ≤1 Allowable ambient operating temperature °C 0 ... +40 Operating temperature range °C +10 ...
- Page 72 Model BP 4100 S BP 3100 S BP 3100 P Weighing range structure SuperRange SuperRange PolyRange Weighing capacity 4,100 3,100 600/1,200/ 3,100 Readability 0.01 0.01 0.01/0.02/ 0.05 Tare range (by subtraction) –4,100 –3,100 –3,100 Reproducibility (standard deviation)* ≤±0.01 ≤±0.01 ≤±0.01/ 0.01/0.03 Linearity ≤±0.02...
- Page 73 Model BP 2100 S BP 1200 Weighing range structure SuperRange Weighing capacity 2,100 1,200 Readability 0.01 0.01 Tare range (by subtraction) –2,100 –1,200 Reproducibility (standard deviation)* ≤±0.01 ≤±0.01 Linearity ≤±0.02 ≤±0.02 Response time (average) ≤1.5 Allowable ambient operating temperature °C 0 ...
- Page 74 Model BP 8100 BP 6100 BP 4100 BP 2100 Weighing capacity 8,100 6,100 4,100 2,100 Readability Tare range (by subtraction) – 8,100 – 6,100 – 4,100 – 2,100 Reproducibility (standard deviation)* ≤±0.05 ≤±0.1 ≤±0.1 ≤±0.1 Linearity ≤±0.1 ≤±0.1 ≤±0.1 ≤±0.1 Response time (average) ≤1 Allowable ambient operating temperature...
- Page 75 Model BP 16000 S BP 12000 S BP 34000 P BP 34 BP 8 Weighing range structure SuperRange SuperRange PolyRange Weighing capacity 8/16/34 Readability 0.1/0.2/0.5 Tare range (by subtraction) – 16 – 12 – 34 – 34 –8.1 Reproducibility ≤±0.1 ≤±0.1 ≤±0.1/0.2/ ≤±0.5...
- Page 76 Specifications for Basic plus Verified Balances with an EC Type Approval Model BP 211 D-0CE BP 301 S-0CE Type BC BC 100 BC BC 100 Accuracy class* Weighing range structure DualRange SuperRange Maximum capacity Max* 80/210 Scale interval d* 0.01/0.1 Verification scale interval e* 0.001 0.001...
- Page 77 Model BP 221 S-0CE BP 161 P-0CE BP 121 S-0CE BP 61S-0CE Type BC BC 100 BC BC 100 BC BC 100 BC BC 100 Accuracy class Weighing range structure SuperRange PolyRange SuperRange SuperRange Maximum capacity Max* 30/60/ 110/160 Scale interval d* 0.1/0.2/ 0.5/1.0 Verification scale interval e*...
- Page 78 Model BP 410 S-0CE BP 310 S-0CE BP 310 P-0CE Type BA BC 200, BA BC 200, BD BC 200 BD BC 200 BD BC 200 Accuracy class Weighing range structure SuperRange SuperRange PolyRange Maximum capacity Max* 60/120/310 Scale interval d* 0.001 0.001 0.001/...
- Page 79 Model BP 150-0CE BP 110-0CE BP 610-0CE Type BA BC 200, BA BC 200, BD BC 200 BD BC 200 BD BC 200 Accuracy class Weighing range structure SuperRange SuperRange PolyRange Maximum capacity Max* Scale interval d* 0.001 0.001 0.01 Verification scale interval e* 0.01 0.01...
- Page 80 Model BP 4100 S-0CE BP 3100 S-0CE BP 3100 P-0CE Type BD BC 200 BA BC 200, BA BC 200, BD BC 200 BD BC 200 Accuracy class Weighing range structure SuperRange SuperRange PolyRange Maximum capacity Max* 4,100 3,100 600/1,200/ 3,100 Scale interval d* 0.01...
- Page 81 Model BP 2100 S-0CE BP 1200-0CE Type BA BC 200, BA BC 200, BD BC 200 BD BC 200 Accuracy class Weighing range structure SuperRange Maximum capacity Max* 2,100 1,200 3,100 Scale interval d* 0.01 0.01 0.05 Verification scale interval e* Minimum capacity Min* Tare range (by subtraction) –2,100...
- Page 82 Model BP 8100-0CE BP 6100-0CE BP 2100-0CE BP 8-0CE Type BA BC 200, BA BC 200, BA BC 200, BA BC 200, BD BC 200 BD BC 200 BD BC 200 BD BC 200 Accuracy class Maximum capacity Max* 8,100 6,100 2,100 8,100...
-
Page 84: Accessories (Options)
Accessories (Options) Product Order No. Data printer YDP 03-0CE with date/time, statistical evaluation data, transaction counter functions and LCD Remote display (can be connected via the interface port) – LCD, reflective YRD 12 Z – LCD, for overhead projectors, transmissive YRD 13 Z External rechargeable battery pack –... - Page 85 – manual “BalanceReader” software YAK 10 PC-0002 for collecting data that are transmitted by your Sartorius balance to a commercially available personal computer. These data are read into spreadsheets and stored. The stored spreadsheets can be further processed using commercially available standard software (Excel, Lotus 1-2-3, etc.).
- Page 86 Product Order No. Industrial-grade power supply, ING1, IP 65-protected in accordance with DIN VDE 0470/IEC 529 69 71476 – for 230 V – for 120 V 69 71480 Density determination set YDK 01 – for the BP 211 D, BP 301 S, BP 221 S, BP 161 P and BP 121 S –...
-
Page 87: Declaration Of Conformity
EC Directives has been extended to the Member States of the European Union and the Signatories of the Agreement on the European Economic Area. Sartorius complies with the EC Directives and European Standards in order to supply its customers with weighing instruments that feature the latest advanced technology and provide many years of trouble-free service. - Page 88 The operator shall be responsible for any modifications to Sartorius equipment and for any connections of cables or equipment not supplied by Sartorius and must check and, if necessary, correct these modifications and connections. On request, Sartorius will provide information on the...
- Page 89 Notified Body registered at the Commission of the European Community for performing such verification. The legal basis allowing Sartorius to perform EC verification is constituted by the EC Council Directive No. 90/384/EEC on non-automatic weighing...
- Page 91 Sartorius office, dealer or service center. * in accordance with the accreditation certificate issued to Sartorius AG...
- Page 92 For information on verification and legal regulations currently applicable in your country, and to obtain the names of the persons to contact, please contact your local Sartorius office, dealer or service center as indicated on the following page.
- Page 93 All rights reserved. No part of this publication may be reprinted or translated in any form or by any means without the prior written permission of Sartorius AG. The status of the information, specifications and illustrations in this manual is indicated by the date given below.
Need help?
Do you have a question about the BP 301S and is the answer not in the manual?
Questions and answers
I used the Keyence IL-65 sensor to measure the distance on top of the balance, both with and without an object (an aluminum piece weighing 270g). The sensor recorded different values in each case. However, I could not find any information in the documentation about how much the height decreases per gram of weight. If you have this information, please provide it to me.