Table of Contents
Advertisement
Quick Links
Advertisement
Table of Contents

Related Manuals for Williams Sound ic-2

Summary of Contents for Williams Sound ic-2
- Page 1 USER MANUAL ///////...
-
Page 4: Table Of Contents
Index Side Panel Controls Important Safety Instructions Safety Cautions Switches Safety Warnings Adjustments Recycling Instructions Inputs System Includes Outputs Overview Signal Schematics 12-13 Configurations 14-20 Controls and I/O’s 6-11 Top Panel Controls Single Unit Setup 14-17 Mode Selection Controls Multilingual System Setup 18-20 Microphone Controls Limited Warranty... -
Page 5: Important Safety Instructions
Important Safety Instructions Read these instructions. Keep these instructions. Heed all warnings. Follow all instructions. S A f E t y C A U t I O N S This product is designed to amplify sounds to a high volume level which could potentially cause hearing damage if used improperly. To protect your hearing and the hearing of others: 1. - Page 6 Se R vI CI n g OR ATTe M P T In g T O S e R v I Ce T H I S D ev I Ce W I L L v O I D T He WA R RA nT y Refer servicing to qualified personnel. Servicing is required when the console has been damaged in any way; if liquid has been spilled or objects have fallen into the console, it has been exposed to rain or moisture, does not operate normally, or has been dropped.
-
Page 7: Recycling Instructions
R E C y C L I N G I N S t R U C t I O N S Help Williams Sound protect the environment! Please take the time to dispose of your equipment properly. Product Recycling for Customers in the european Union: Please do NOT dispose of your Williams Sound equipment in the household trash. Please take the equipment to a electronics recycling center; OR... -
Page 8: System Includes
System Includes Figure 1: Packing List a · IC-2 Interpreters Console b · (1) 25 foot (7.6 meter) CAT5 patch cable, WCA 091 c · 18vDC international desktop style power supply, TFP 044 Operates on 100-240VAC, 50-60Hz d · Power supply line cord, WLC 004 (US), WLC 005 (eU), WLC 006 (UK), or WLC 007 (AU) e ·... -
Page 9: Overview
· Selectable feedthrough ( automatic routing ) of the Floor signal onto unoccupied channels. The IC-2 can be used with Williams Sound FM, IR and Digi-Wave transmitters for portable installations. It is designed to meet international stan- dards for interpretation consoles and is backed by a 5-year warranty. If you need assistance with this product, contact Williams Sound Customer Service at 1.800.843.3544 or 952.943.2252. -
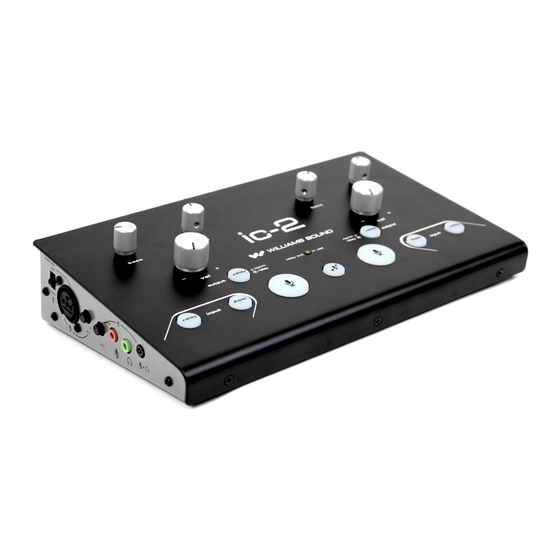
Page 10: Controls And I/O's
Top Panel Controls treble “relay in use” LED bass treble Figure 2: Top Panel bass volume volume relay output relay output relay input relay input floor input mic on floor input mic on mute... -
Page 11: Mode Selection Controls
M O d E S E L E C t I O N C O N t R O L S I n P U T S · Floor – headphone monitors Floor · Relay – headphone monitors Relay O U T P U T S ·... -
Page 12: Back Panel Controls
Back Panel Controls Figure 3: Back Panel norm out RCA jack norm feedthrough IC-2 bus in relay out RCA jack relay feedthrough XLR floor in ground lift power jack peak level indicator floor in level control XLR norm out XLR relay out... -
Page 13: Power
· Relay Feedthrough –routes the audio from the Floor onto Relay when Relay Output is not in use. See figures 5 and 6 and note on page 19 for more info. · ground Lift –safely breaks the connection between chassis and audio grounds internal to the IC-2 to help technicians debug tricky ground-loops that cause hum. Use only if needed for best audio performance. The default position is down or “gnD”. -
Page 14: Side Panel Controls
Side Panel Controls Figure 4: Side Panel XLR mic jack phantom power XLR mic level electret mic level electret mic jack headphone jack electret mic + headphone jack... -
Page 15: Switches
S W I t C h E S · Phantom Power ( Simplex ) – enables 12vDC “simplex” power to XLR Microphone Input. A d j U S t M E N t S · XLR Microphone Level Control – allows the technician to set the input level. ·... -
Page 16: Signal Schematics
Signal Schematics Signal Distribution FLOOR FLOOR FLOOR IC-2 IC-2 IC-2 RELAY RELAY Input Selection FLOOR SELECTED FLOOR IN IC-2 INTERPRETER RELAY SELECTED... - Page 17 Input Selection FLOOR SELECTED FLOOR IN IC-2 INTERPRETER RELAY SELECTED IC-2 INTERPRETER RELAY BUS IN Output Selection RELAY ON MIC IN IC-2 RELAY OUT RELAY OFF MIC IN NORM OUT IC-2 /////////////////////////////////////////////////////////////////////////////// ///////////////////////////////////// /////////////////////////////////...
-
Page 18: Configurations
Figure 5: Bilingual configuration... -
Page 19: Single Unit Setup
S I M p L E C O N f I G U R A t I O N I N S t R U C t I O N S 1. Plug the line cord into the TFP 044 power supply that comes with your IC-2. Connect the plug on the power supply to the DC power jack on the rear panel of the IC-2. - Page 20 Figure 6: Feedthrough / no live microphone / floor audio automatically routed onto both channels...
- Page 21 8. Plug your microphone in. 9. Turn the microphone on by pushing its Mic On button. 10. Have the interpreter speak into the microphone at a comfortable level and seating position. Turn the level control for this microphone clockwise until the peak indicator on the back panel blinks at natural peaks in the interpreter’s speech. 11. Ensure the audio indicator on the transmitter is flashing and you are able to hear the signal with a receiver. Adjust the transmitter input level control if necessary.
- Page 22 floor CAT5 detail relay Figure 7: Multilingual configuration...
-
Page 23: Multilingual System Setup
1. Connect the audio signal from the PA system or mixer to the first unit in the system. 2. Connect the IC-2 Bus Out on this unit to the IC-2 Bus In on the second unit using the CAT-5 cable included with your system. Connect the IC-2 Bus Out on the second unit to the IC-2 Bus In on the third unit, and so forth. - Page 24 3. Follow the Single Unit Setup instructions for each unit in the chain, plugging them in to power only after the bus connections have been made. 4. If Relay will be used, connect a transmitter for the Relay channel to any Relay Out XLR jack in the chain. Turn on the transmitter and set it up ac- cording to its directions.
-
Page 25: Limited Warranty
ReSPeCT TO THe InTeRPReTeR COnSOLe, InCLUDIng BUT nOT LIMITeD TO, Any IMPLIeD WARRAnTy OF MeRCHAnTABILITy OR FITneSS FOR A PARTICU- Williams Sound Corp. LAR PURPOSe. WILLIAMS SOUnD SHALL nOT Be LIABLe TO Any PeRSOn Attn: Repair Dept. OR enTITy FOR Any MeDICAL eXPenSeS OR Any DIReCT, InCIDenTAL OR... -
Page 26: Specifications
+19dBu IC-2 Bus In / Out CAT5 8p8c RJ45 female receptacle, distributes balanced line level Floor and Relay audio to another IC-2 XLR Microphone Inputs 3-pin XLR female jack, balanced (or unbalanced) input. Switchable 12vDC simplex power. variable gain of 58 dB, 2.4k Ω balanced input impedance, maximum balanced input is +19 dBu... - Page 27 Mic On Push button, backlit bright red, activates microphone. Right and left Mic On buttons are interlocked; mic can only be turned on if the other is off. Floor Input, Relay Input Push buttons, backlit blue, select listening language group. Listening modes are either/or: turning one on disables the other. Relay Output Push button, backlit yellow, selects microphone output language group: light on = Relay Out, light off = norm Out. gain Adjust Rotary gain pots control level of microphone and Floor audio.
-
Page 28: Frequently Asked Questions
IC-2. The peak level indicator will blink more often the higher the output amplitude. - Page 29 “daisy chain” for it to be correctly transferred to all units. you can identify this unit by the fact that there is nothing plugged into its IC-2 Bus In jack Q: The speaker at the podium’s voice is not coming out on the relay language transmitter when he is speaking the relay lan- guage.
-
Page 30: Contact Us
Contact us 800.843.3544 (U.S.A.) +1.952.943.2252 williamssound.com info@williamssound.com Williams Sound Corp. 10300 valley view Rd. eden Prairie, Mn 55344... - Page 32 © 2010, Williams Sound Corp. Man 152 B...
Need help?
Do you have a question about the ic-2 and is the answer not in the manual?
Questions and answers