Table of Contents
Advertisement
Available languages
Available languages
Quick Links
Download this manual
See also:
Manual
Advertisement
Chapters
Table of Contents

Related Manuals for Bpt Mitho PL KNX


Summary of Contents for Bpt Mitho PL KNX
- Page 1 Pannelli di comando e visualizzazione MITHO Command and display panels MITHO Mitho PL KNX Mitho HA KNX Manuale per l’Utente User’s Manual MithoKNX_Ute IT 24807970 13-01-14...
- Page 2 Mitho...
-
Page 3: Table Of Contents
Mitho PL KNX: caratteristiche tecniche . . . . . . . . . . . . . . . . . . -
Page 4: Indice
(SOLO PER PANNELLI MITHO PL KNX) . . . . . . . . . . . . . . . . . - Page 5 Risposta segreteria (solo su pannelli MITHO PL KNX) . . . . . . . . . . . . . . . .
-
Page 6: Informazioni Generali
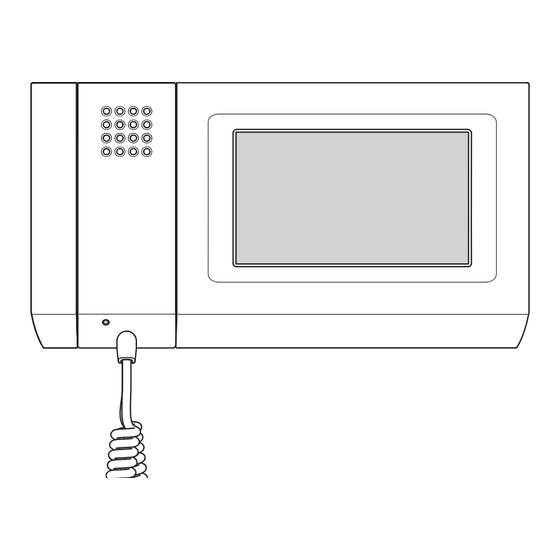
Mitho INFORMAZIONI GENERALI Mitho PL KNX: caratteristiche tecniche 1 – Altoparlante (vivavoce) 2 – Cornetta 3 – Microfono 4 – Display 16:9 touch screen 4,3” 5 – Alloggiamento penna per touch screen Manutenzione ed utilizzo del Pannello • Utilizzare il Pannello solo con la penna in dotazione; non utilizzare utensili, penne o altri strumenti appuntiti che potrebbero danneggiare il display e comprometterne il funzionamento . -
Page 7: Principali Funzioni Associate Alle Icone Della Schermata Principale
Mitho INFORMAZIONI GENERALI Principali funzioni associate alle icone della schermata principale La schermata principale permette di accedere rapidamente ed in maniera intuitiva a tutte le funzioni gestibili dal pannello e di avere un immediato feedback degli eventi che interessano il sistema . Menù... -
Page 8: Mitho Ha Knx: Caratteristiche Tecniche
INFORMAZIONI GENERALI Mitho Mitho HA KNX: caratteristiche tecniche Mitho HA KNX è l’innovativo pannello multifunzione a colori touch screen, pensato per la gestione e il controllo dell’impianto domotico . 1 – Display 16:9 touch screen 4,3” 2 – Alloggiamento penna per touch screen Manutenzione ed utilizzo del Pannello •... -
Page 9: Principali Funzioni Associate Alle Icone Della Schermata Principale
INFORMAZIONI GENERALI Mitho Principali funzioni associate alle icone della schermata principale La schermata principale permette di accedere rapidamente ed in maniera intuitiva a tutte le funzioni gestibili dal pannello e di avere un immediato feedback degli eventi che interessano il sistema . Blocco touch screen per Attivazione sveglia pulizia schermo (30 s) -
Page 10: Il Menù Ambienti
IL MENÙ AMBIENTI Mitho Navigazione all’interno del menù “Ambienti” Dalla pagina principale selezionando il pulsante “Am- bienti” si accede alla schermata che permette di vi- sualizzare le “Zone” e gli “Ambienti” che compongono l’impianto domotico . Ambienti Citofonia Funzioni Preferiti Programmi Setup Zona:... - Page 11 IL MENÙ AMBIENTI Mitho Selezionando uno degli “Ambienti” disponibili senza Piano Terra alcun filtro attivo, viene visualizzato l’elenco dei dispo- sitivi controllabili contenuti all’interno dell’”Ambiente” . Ingresso Salotto Bagno Cucina Lavanderia Veranda I pulsanti permettono di scorrere l’elenco dei Piano Terra dispositivi .
-
Page 12: Inviare Comandi A Tutti I Dispositivi Di Uno O Più "Ambienti" Di Una "Zona
IL MENÙ AMBIENTI Mitho Inviare comandi a tutti i dispositivi di uno o più “Ambienti” di una “Zona” Dalla pagina principale selezionare il pulsante “Am- bienti” . Ambienti Citofonia Funzioni Preferiti Programmi Setup Selezionare uno dei filtri che consentono di visualiz- Piano Terra zare i dispositivi ai quali è... -
Page 13: Comandi Generali Con Filtro "Termoregolazione" Attivo
IL MENÙ AMBIENTI Mitho Premere il pulsante (selezione multipla) e selezio- Piano Terra nare il/gli ambienti all’interno dei quali si trovano i dispositivi che si intende comandare . Premere il pulsante per accendere o il pulsante Bagno Cucina spegnere tutte le luci all’interno del/degli “Ambienti” selezionati . -
Page 14: Comandi Generali Con Filtro "Attuatori On/Off" Attivo
IL MENÙ AMBIENTI Mitho Con filtro “Termoregolazione” attivo, premere il pul- Zona Notte sante (selezione multipla) e selezionare gli ambienti all’interno dei quali si trovano i dispositivi che si intende comandare . 2 Premere il pulsante per poter cambiare il tipo di Bagno Camera Matrimoniale... -
Page 15: Controllo "Tapparelle" / "Veneziane
IL MENÙ AMBIENTI Mitho Controllo “Tapparelle” / “Veneziane” Selezionare “Zona” e ”Ambiente” all’interno del quale Zona Notte è contenuto il dispositivo che si desidera controllare Camera Matrimoniale (vedi :”Navigazione all’interno del menù “Ambienti”” a Camera Camera pagina 10). Matrimoniale 1 Matrimoniale 2 30 % Una breve pressione sul pulsante, aziona immediata-... -
Page 16: Forzatura Di Una Tapparella O Veneziana
IL MENÙ AMBIENTI Mitho Forzatura di una tapparella o veneziana Camera Matrimoniale 1 Se necessario è possibile forzare la tapparella/vene- ziana in posizione sempre aperta o sempre chiusa: in questo caso i comandi provenienti da altri dispositivi, timer, scenari vengono ignorati fino alla rimozione della forzatura . -
Page 17: Controllo "Illuminazione
IL MENÙ AMBIENTI Mitho Controllo “Illuminazione” Selezionare “Zona” e ”Ambiente” all’interno del quale Zona Giorno è contenuto il dispositivo che si desidera controllare Sala da Pranzo (vedi :”Navigazione all’interno del menù “Ambienti”” a Dimmer pagina 10). Living room Living room Una breve pressione sul pulsante, accende o spegne Luce Disimpegno... -
Page 18: Blocco Di Un Punto Luce
IL MENÙ AMBIENTI Mitho Blocco di un punto luce In fase di programmazione dell’impianto è possibile stabilire una particolare configurazione di blocco per un punto luce; quando la funzione “Blocco” viene attivata, il punto luce raggiunge la configurazione programmata e i coman- di provenienti da altri dispositivi, timer, scenari vengono ignorati fino alla rimozione del “Blocco”... -
Page 19: Controllo "Termoregolazione
IL MENÙ AMBIENTI Mitho Controllo “Termoregolazione” Selezionare “Zona” e ”Ambiente” all’interno del quale Zona Notte è contenuto il dispositivo che si desidera controllare (vedi :”Navigazione all’interno del menù “Ambienti”” a pagina 10). Bagno Camera Nessun termostato all’interno dell’”Ambiente” è Matrimoniale attivo Almeno un termostato all’interno dell’”Ambiente”... -
Page 20: Profilo Orario Per Cronotermostato (Funzione Svolta Dal Pannello)
IL MENÙ AMBIENTI Mitho Profilo orario per cronotermostato (funzione svolta dal pannello) Giorni della settimana. In giallo il giorno della settimana del quale si sta visualizzando il profilo Termostato Cameretta Giorno corrente Fasce di temperatura pre- Asse delle ore del giorno programmate (modi): Comf Comfort - Stand-by - Eco... -
Page 21: Profilo Orario Per Hvac Master Con Controllo Attraverso Modalità
IL MENÙ AMBIENTI Mitho Profilo orario per HVAC Master con controllo attraverso modalità I termostati HVAC Master con profilo modalità HVAC prevedono 3 “Modi” di funzionamento: Comfort, Standby, Economy . Il comando delle valvole e degli attuatori è demandato al termostato locale . Giorni della settimana. -
Page 22: Creare Un Profilo Di Temperature Giornaliero (Valido Per Tutti I Tipi Di Controllo)
IL MENÙ AMBIENTI Mitho Creare un profilo di temperature giornaliero Termostato Cameretta (valido per tutti i tipi di controllo) Se il termostato ha un profilo attivo, il profilo non è modificabile . Premere il pulsante per disattivare il profilo . Premere il pulsante per accedere alla schermata di modifica profilo . -
Page 23: Cronotermostato Con Profilo Non Attivo
IL MENÙ AMBIENTI Mitho Cronotermostato con profilo non attivo Termostato Cameretta Premere il pulsante per disattivare il profilo auto- matico . Scegliere una delle modalità di funzionamento dispo- nibili . “Comfort” - “Stand-by” “Economy” - “Off” Nota: Da questa schermata è possibile forzare temporanea- mente il setpoint di temperatura associato alla modalità... -
Page 24: Set Parametri (Cronotermostato)
IL MENÙ AMBIENTI Mitho HVAC Master con controllo set-point e profilo Termostato Cameretta non attivo Premere il pulsante per disattivare il profilo auto- matico . Impostare il set point del termostato controllato me- diante il cursore che appare . Le frecce laterali permet- tono di affinare il valore della temperatura impostata in decimi di grado . -
Page 25: Altre Voci Di Setup Termico In Impianti Con Controllo A Due Punti Con Ventilconvettori
IL MENÙ AMBIENTI Mitho Altre voci di setup termico in impianti con Termostato Cameretta controllo a due punti con ventilconvettori 1 . Pulsante per variare il tipo di funzionamento (raffre- scamento/riscaldamento) 2 . Pulsanti per la modifica del tempo di inerzia delle ventole dei ventilconvettori DIFF DIFF1... -
Page 26: Set Parametri (Hvac Master Con Controllo Modalità)
Mitho IL MENÙ AMBIENTI Set parametri (HVAC Master con controllo modalità) Regolazione parametri di funzionamento e Termostato Cameretta unità di misura temperatura Per variare i parametri di funzionamento premere il pulsante Comf Stby 1 . Pulsante per variare il tipo di funzionamento (raffre- Termostato Cameretta scamento / riscaldamento) 2 . -
Page 27: Controllo "Attuatori On/Off
IL MENÙ AMBIENTI Mitho 3 . Pulsante per l’impostazione del periodo di ripeti- zione ciclica del valore del profilo orario . Premendo l’icona si attiva la tastiera . Nota: Il valore assegnabile ad ogni fascia di temperatura è limitato dai valori della fascia immediatamente superiore e inferiore;... -
Page 28: Visualizzazione Stato Degli "Ingressi
IL MENÙ AMBIENTI Mitho Visualizzazione stato degli “Ingressi” Selezionare “Zona” e ”Ambiente” all’interno del quale Esterno è contenuto il dispositivo che si desidera controllare Terrazza (vedi :”Navigazione all’interno del menù “Ambienti”” a Velocità vento Sensore pagina 10). pioggia 10 Km/h Tenda Sensore oscurante... - Page 29 IL MENÙ AMBIENTI Mitho Uscite analogiche Colore luci piscina I pulsanti che comandano le uscite analogiche, una volta premuti, provocano l’apertura di una finestra nella quale è possibile imputare un valore all’uscita . I valori inseriti saranno leggibili sulla parte inferiore del pulsante .
-
Page 30: Il Menù Funzioni
IL MENÙ FUNZIONI Mitho Eseguire e memorizzare “Scenari KNX” Dalla pagina principale selezionando il pulsante “Fun- zioni” si accede alla schermata che permette di visua- lizzare le “Funzioni”: Scenari KNX, Antifurto, Irrigazione, Dati energia, Con- Ambienti Citofonia trollo carichi, Allarmi . Funzioni Preferiti Programmi... -
Page 31: Gestione Antifurto
IL MENÙ FUNZIONI Mitho Gestione Antifurto Dalla pagina principale del menù “Funzioni” selezionare Funzioni il pulsante “Antifurto” per accedere all’elenco delle “Aree” disponibili . Dati Scenari KNX energia Nota: L’icona “Antifurto” lampeggia in caso si verifichi almeno un allarme “Area”. In caso di allarme lampeggia Controllo Antifurto l’icona “Funzioni”... -
Page 32: Gestione Dell'impianto Di Irrigazione
IL MENÙ FUNZIONI Mitho Gestione dell’impianto di irrigazione Dalla pagina principale del menù “Funzioni” selezionare Funzioni il pulsante “Irrigazione” per accedere all’elenco dei cicli di irrigazione programmati . Il ciclo di irrigazione è una sequenza temporizzata di Scenari KNX Dati energia attivazioni dei singoli irrigatori, eseguita ciclicamente . -
Page 33: Impostare L'ora E I Giorni Di Attivazione Di Uno Scenario Irrigazione
IL MENÙ FUNZIONI Mitho Impostare l’ora e i giorni di attivazione di uno Irrigazione scenario irrigazione Siepe Premere il pulsante 1; impostare l’ora in cui si desidera venga attivato il ciclo di irrigazione e confermare con Attivare mediante il pennino in dotazione i giorni della settimana nei quali il ciclo di irrigazione dovrà... - Page 34 IL MENÙ FUNZIONI Mitho Per programmare o modificare la programmazione di Siepe uno degli irrigatori in elenco, premere il pulsante Lista irrigatori selezionare l’irrigatore desiderato . Irrigatore Irrigatore Blocco 1A Blocco 1B 03’ x 5 02’ x 5 Premendo il pulsante 5 si attiva la tastiera per l’impo- stazione del tempo continuo d’irrigazione senza pause, ossia la durata di funzionamento dell’irrigatore ogni volta che viene attivato dal ciclo di irrigazione .
-
Page 35: Dati Energia
IL MENÙ FUNZIONI Mitho Dati Energia Dalla pagina principale del menù “Funzioni” selezionare Funzioni il pulsante “Dati energia” . Se l’impianto è dotato dei dispositivi di rilevamento Scenari KNX Dati energia necessari, nella pagina principale è possibile visualiz- zare una serie di dati informativi su consumi di energia Controllo Antifurto elettrica, gas e acqua . -
Page 36: Setup Dati Energia Elettrica
IL MENÙ FUNZIONI Mitho 9 Visualizza il valore istantaneo relativo alla potenza Dati energia elettrica (prodotta o consumata) . Energia elettrica consumata A seconda del tipo di visualizzazione selezionata Anno 2013 (vedi punti 6 7 e 8) vengono mostrati i dati relativi Settimana 42 all’energia elettrica (prodotta o consumata): (g) Valore giornaliero... -
Page 37: Consultazione Statistiche Consumi Gas
IL MENÙ FUNZIONI Mitho Consultazione statistiche consumi gas Dati energia Premere il pulsante per visualizzare dati statistici Potenza Energia Energia relativi ai consumi di gas domestici . istantanea consumata prodotta 2,3kW 22.350 kWh 1,8 kWh Sull’asse orizzontale sono rappresentati i giorni della Consumo cumulativo settimana o i mesi dell’... -
Page 38: Consultazione Statistiche Consumi Acqua
IL MENÙ FUNZIONI Mitho Consultazione statistiche consumi acqua Dati energia Premere il pulsante per visualizzare dati statistici Potenza Energia Energia relativi ai consumi domestici di acqua . istantanea consumata prodotta 2,3kW 22.350 kWh 1,8 kWh Sull’asse orizzontale sono rappresentati i giorni della Consumo cumulativo settimana o i mesi dell’... -
Page 39: Controllo Carichi
IL MENÙ FUNZIONI Mitho Controllo carichi Dalla pagina principale del menù “Funzioni” selezionare Funzioni il pulsante “Controllo carichi” . Scenari KNX Dati energia Controllo Antifurto carichi Irrigazione Allarmi Vengono visualizzate due sotto categorie: “Profilo po- tenza” e “Gestione carichi” . Se la funzione controllo carichi è... -
Page 40: Impostazione Parametri "Profilo Potenza
IL MENÙ FUNZIONI Mitho Per copiare un “Profilo potenza” in altri giorni della set- Controllo carichi timana, selezionare il giorno della settimana del quale Profilo potenza si vuole copiare il profilo e successivamente selezionare il pulsante Selezionare il o i giorni della settimana nei quali si vuole copiare il profilo e premere per eseguire la copia . - Page 41 IL MENÙ FUNZIONI Mitho Giorno al quale le fasce orarie Controllo carichi visualizzate fanno riferimento Gestione carichi Giorno corrente Fascia oraria di controllo abilitata Fascia oraria di controllo non abilitata Pulsante per l’attivazione del controllo carichi programmato Nota: Quando il controllo carichi è attivo non è consentita alcuna modifica alla “Gestione carichi”.
- Page 42 IL MENÙ FUNZIONI Mitho Premendo l’icona 9 si attiva una schermata attraverso Lunedì -> Fascia 1 la quale è possibile scegliere i carichi disponibili da Priorità Carico Assorbimento assoggettare alla fascia di controllo selezionata . Presa forno 1.20kW Nella parte centrale della pagina compare la lista dei carichi che sono controllati nella fascia oraria sele- zionata .
-
Page 43: Malfunzionamenti/Allarmi
IL MENÙ FUNZIONI Mitho “Malfunzionamenti/Allarmi” Dalla pagina principale del menù “Funzioni” selezionare Funzioni il pulsante “Allarmi” . Mediante questa funzione è possibile ricevere se- gnalazioni di allarme visivo e sonoro al verificarsi di Scenari KNX Dati energia determinati eventi legati al risultato (Vero) di operazioni logiche . -
Page 44: Il Menù Programmi
IL MENÙ PROGRAMMI Mitho Creare e gestire “Timer” Dalla pagina principale selezionando il pulsante “Pro- grammi” si accede alla schermata che permette di visualizzare l’elenco delle funzioni che possono essere programmate . Ambienti Citofonia Funzioni Preferiti Programmi Setup Selezionare il pulsante “Timer” per accedere all’elenco Programmi delle temporizzazioni disponibili . - Page 45 IL MENÙ PROGRAMMI Mitho Si accede alla pagina mediante la quale è possibile Timer luci piscina selezionare il dispositivo da temporizzare . Seleziona oggetto La finestra di selezione presenta sui lati le icone che permettono di filtrare la visualizzazione delle tipologie Luce Viale Luce Ingresso di dispositivi temporizzabili .
-
Page 46: Setup Parametri "Timer
IL MENÙ PROGRAMMI Mitho Setup parametri “Timer” Timer luci piscina Luce piscina 1 Premere il pulsante per accedere alle opzioni di setup del “Timer” . Premendo su ognuno dei pulsanti 1 si attiva la tastiera per l’impostazione dei 5 valori che compongono il profilo del valore visualizzato nel diagramma (valori possibili quando il comando può... -
Page 47: Creare E Gestire "Scenari Sequenza
IL MENÙ PROGRAMMI Mitho Creare e gestire “Scenari sequenza” Dalla pagina principale del menù “Programmi” selezio- Programmi nare il pulsante “Scenari sequenza” . Mediante questa funzione è possibile programmare l’attivazione sequenziale di dispositivi componenti il Timer Sveglia sistema domotico . Scenari Salva sequenza... - Page 48 IL MENÙ PROGRAMMI Mitho - Antifurto (Inserimento/Disinserimento totale, Inseri- Accendi luci atrio mento/Disinserimento settori) Luce viale - Logica (Attiva/Disattiva) ON/OFF Dimmer Una volta selezionato il dispositivo si accede alla fine- stra mediante la quale è possibile scegliere l’azione che deve svolgere . Ripetendo questa procedura è...
-
Page 49: Logiche
IL MENÙ PROGRAMMI Mitho Ogni elemento della lista degli Ingressi è composto da Accendi luci atrio due parti: il nome dell’oggetto e l’azione che il valore Azioni per apriporta che esso assume comporta . Premere il pulsante e selezionare uno degli “Ingressi” per eliminarlo dall’elenco . -
Page 50: Programmare La "Sveglia
IL MENÙ PROGRAMMI Mitho Programmare la “Sveglia” Dalla pagina principale del menù “Programmi” selezio- Programmi nare il pulsante “Sveglia” . Per impostare l’ora di sveglia selezionare il pulsante Timer Sveglia 1 . Impostare ora e minuti nella pagina che appare e confermare con il tasto Scenari Salva... -
Page 51: Registrare E Ascoltare "Messaggi Audio" (Solo Mitho Pl Knx)
IL MENÙ PROGRAMMI Mitho Registrare e ascoltare “Messaggi audio” (Solo Mitho PL KNX) La funzione “Messaggi audio” permette di registrare Programmi nella memoria del dispositivo un massimo di 6 messag- gi audio della durata di 10” ciascuno . La presenza di messaggi non ascoltati é segnalata nella... -
Page 52: Il Menù Citofonia
IL MENÙ CITOFONIA Mitho (SOLO PER PANNELLI MITHO PL KNX) Funzioni base Rispondere ad una chiamata In caso di chiamata, la schermata principale viene au- tomaticamente sostituita dalla schermata che mostra Comfort Citofonia l’immagine del chiamante ripreso dal posto videocito- fonico esterno . -
Page 53: Trasferire Una Chiamata Verso Altri Interni
IL MENÙ CITOFONIA Mitho (SOLO PER PANNELLI MITHO PL KNX) Trasferire una chiamata verso altri interni Premendo il pulsante (fig . 4) apparirà un elenco de- gli interni verso i quali è possibile deviare la chiamata; selezionare l’interno desiderato, attendere risposta e chiudere la comunicazione per trasferire la chiamata . -
Page 54: Assegnare Un Nome Ad Un Interno
IL MENÙ CITOFONIA Mitho (SOLO PER PANNELLI MITHO PL KNX) Selezionare uno degli interni in elenco per avviare immediatamente la chiamata . Interno 1 Interno 2 Interno 3 Interno 4 Interno 5 Interno 6 Torna alla schermata precedente ... -
Page 55: Elenco Chiamate Da Portiere
IL MENÙ CITOFONIA Mitho (SOLO PER PANNELLI MITHO PL KNX) Elenco chiamate da portiere Qualora l’impianto videocitofonico preveda la presenza Chiamata Inclusione di un centralino di portineria, sarà possibile consultare interni video una lista delle chiamate senza risposta effettuate dalla portineria verso il nostro interno . -
Page 56: La Segreteria Videocitofonica
(SOLO PER PANNELLI MITHO PL KNX) La segreteria videocitofonica Mitho PL KNX consente di registrare delle videochiamate dal posto esterno in caso di assenza o di impossibilità alla risposta . Quando la funzione segreteria è attiva, in caso di chiamata, sul posto esterno può essere riprodotto un messaggio, preregistrato dall’utente, che avvisa il chiamante della possibilità... -
Page 57: Consultare La Segreteria Videocitofonica
IL MENÙ CITOFONIA Mitho (SOLO PER PANNELLI MITHO PL KNX) Per attivare la segreteria videocitofonica (con o senza Setup riproduzione del messaggio) premere l’icona 2 sulla schermata principale (fig . 17 ) . Icona gialla Segreteria Attiva Icona grigia Segreteria NON attiva Consultare la segreteria videocitofonica Dalla schermata principale selezionare l’icona “Ci-... -
Page 58: Funzione Ufficio
IL MENÙ CITOFONIA Mitho (SOLO PER PANNELLI MITHO PL KNX) Il pulsante 5 cancella il messaggio che si sta visua- lizzando . Nota: La presenza di messaggi videocitofonici non letti in segre- teria è rivelata dall’icona “segreteria” in giallo lampeggian- te sulla schermata principale. -
Page 59: Il Menù Setup
IL MENÙ SETUP Mitho Dalla pagina principale selezionando il pulsante “Se- tup” si accede alla schermata che raggruppa tutte le impostazioni che riguardano il funzionamento globale del pannello . Ambienti Citofonia Funzioni Preferiti Programmi Setup Melodie Premendo sul pulsante “Melodie” si accede alla scher- Setup mata che presenta un elenco delle tipologie di chia- mata alle quali è... -
Page 60: Data/Ora
. Il pulsante 5 (attivo) abilita l’adattamento automa- tico del pannello all’ora legale (l’ultima domenica di marzo) . Risposta segreteria (solo su pannelli MITHO PL KNX) Vedi: “Registrare un messaggio di segreteria” a pag . 56... -
Page 61: Generale
IL MENÙ SETUP Mitho Generale Premendo sul pulsante “Generale” si accede ad una Setup schermata che raggruppa tutte quelle impostazioni generali che riguardano il funzionamento globale del pannello . Melodie Generale Data/Ora Display Risposta Citofonia segreteria Scelta lingua pannello Setup Selezionare il pulsante 1 e utilizzare la schermata Generale che appare per scegliere la lingua dell’interfaccia del... -
Page 62: Salvataggio/Recupero Copia Impianto
IL MENÙ SETUP Mitho Setup Salvataggio/recupero copia impianto Generale Selezionare il pulsante 6 per salvare all’interno della scheda micro SD i dati di impianto impostati local- mente nel pannello (timer, funzioni, etc . ) . Selezionare il pulsante 7 per recuperare dalla scheda micro SD i dati dell’impianto salvato . -
Page 63: Display
. Stand-by Premere il pulsante per tornare alla schermata precedente . Citofonia (Solo su pannelli Mitho PL KNX) Premendo sul pulsante “citofonia” si accede ad una Setup schermata che permette di esegure il setup delle fun- Citofonia zioni relative alla videocitofonia . -
Page 64: Info Pannello
. In particolare è possibile visualizzare l’indirizzo KNX del pannello 8 . Mitho PL KNX Mitho HA KNX Reset Reset Reset dispositivo Ogni volta che anomalie di funzionamento, interventi e altre ragioni tecniche richiedono il reset dell’apparecchio,... - Page 65 Mitho PL KNX: technical characteristics . . . . . . . . . . . . . . . . . .
-
Page 66: Contents
(ONLY FOR MITHO PL KNX PANELS) . . . . . . . . . . . . . . . . . - Page 67 Entry phone system (Only on Mitho PL KNX panels) . . . . . . . . . . . . . . . .
-
Page 68: General Information
Mitho GENERAL INFORMATION Mitho PL KNX: technical characteristics 1 – Loudspeaker (hands-free) 2 – Receiver 3 – Microphone 4 – 4 . 3 ” touch screen 16:9 display 5 – Touchscreen pen housing Maintenance and Use of the Panel • Only use the pen provided with the Panel; do not use utensils, pens or other sharp instruments that could damage the display and prejudice its operation . -
Page 69: Main Functions Associated With The Icons On The Main Screen
Mitho GENERAL INFORMATION Main functions associated with the icons on the main screen The main screen provides fast, intuitive access to the functions managed by the control panel . It also provides immediate feedback on events involving the system . Main menu for systems without Porter Switchboard Touchscreen lock for screen Alarm clock activation... -
Page 70: Mitho Ha Knx: Technical Characteristics
GENERAL INFORMATION Mitho Mitho HA KNX: technical characteristics Mitho HA KNX is the innovative multifunctional touchscreen colour panel, designed to manage and control a home automation system . 1 – 4 . 3 ” touch screen 16:9 display 2 – Touchscreen pen housing Maintenance and Use of the Panel •... -
Page 71: Main Functions Associated With The Icons On The Main Screen
GENERAL INFORMATION Mitho Main functions associated with the icons on the main screen The main screen provides fast, intuitive access to the functions managed by the control panel . It also provides immediate feedback on events involving the system . Touchscreen lock for screen Alarm clock activation cleaning (30 s) -
Page 72: The Rooms Menu
THE ROOMS MENU Mitho Navigation in the "Rooms" menu By pressing the "Rooms" button on the main page you access the screen that enables you to see the "Zones" and "Rooms" that make up the home automation system . Rooms Door entry Functions Favourites... - Page 73 THE ROOMS MENU Mitho By selecting one of the "Rooms" available without any Ground Floor active filter, the list of controllable devices contained within the "Room" is displayed . Entrance Living room Bathroom Kitchen Laundry room Veranda The buttons allow you to scroll through the list Ground Floor of devices .
-
Page 74: Send Commands To All The Devices In One Or More "Room" Of A "Zone
THE ROOMS MENU Mitho Send commands to all the devices in one or more "Room" of a "Zone" On the main page select the "Rooms" button . Rooms Door entry Functions Favourites Programs Setup Select one of the filters that allow the display of devices Ground Floor that general commands can be sent to . -
Page 75: General Commands With "Temperature Regulation" Filter Active
THE ROOMS MENU Mitho Press button (multiple selection) and select the Ground Floor room(s) in which the devices to be commanded are . Press button to turn on or button to turn off all the lights in the "Rooms" selected . Bathroom Kitchen Laundry room... -
Page 76: General Commands With "Actuators On/Off" Filter Active
THE ROOMS MENU Mitho With the "Temperature regulation" filter active, press Night zone button (multiple selection) and select the rooms in which the devices to be commanded are . 2 Press button in order to be able to change the type of operation of all the devices selected: Bathroom Double... -
Page 77: Rolling Shutters" / "Venetian Blinds" Control
THE ROOMS MENU Mitho "Rolling shutters" / "Venetian Blinds" control Select the "Zone" and "Room" inside which the device Night zone to be controlled is contained (see: “Navigation in the Double bedroom “Rooms” menu” on page 72). Double Double bedroom 1 bedroom 2 Brief pressure on the button immediately activates the 30 %... -
Page 78: Priority/Over-Riding A Rolling Shutter Or Venetian Blind
THE ROOMS MENU Mitho Priority/Over-riding a rolling shutter or Double bedroom 1 Venetian blind If necessary it is possible to force the rolling shutter/ Venetian blind into an always open or always closed position: in this case the commands from other devic- es, timers, scenarios are ignored until removal of the over-ride . -
Page 79: Lighting" Control
THE ROOMS MENU Mitho "Lighting" Control Select the "Zone" and "Room" inside which the device Living Area to be controlled is contained (see: “Navigation in the Dining Room “Rooms” menu” on page 72). Dimmer Living room Living room Brief pressure on the button turns the light point on or off . -
Page 80: Blocking A Light Point
THE ROOMS MENU Mitho Blocking a light point In the system programming phase it is possible to set a particular blocking configuration for a light point; when the "Block" function is activated, the light point reaches the programmed configuration and the commands arriving from other devices, timers, scenarios are ignored until the "Block"... -
Page 81: Temperature Regulation" Control
THE ROOMS MENU Mitho "Temperature regulation" Control Select the "Zone" and "Room" inside which the device Night zone to be controlled is contained (see: “Navigation in the “Rooms” menu” on page 72). Bathroom Double No thermostat in the "Room" is active . bedroom At least one thermostat in the "Room"... -
Page 82: Timer Profile For Programmable Thermostat (Function Carried Out By Panel)
THE ROOMS MENU Mitho Timer profile for programmable thermostat (function carried out by panel) Days of the week. The day of the week for which the profile is currently displayed is shown in yellow Single bedroom Thermostat Current day Pre-programmable Hours of the day axis temperature bands (modes): Comf... -
Page 83: Timer Profile For Hvac Master With Control Through Modes
THE ROOMS MENU Mitho Timer profile for HVAC Master with control through modes The HVAC Master thermostats with HVAC mode profile provide for 3 operating "Modes": Comfort, Standby, Econo- my . Control of the valves and actuators is delegated to the local thermostat . Days of the week. -
Page 84: Create A Daily Temperature Profile (Valid For All Types Of Control)
THE ROOMS MENU Mitho Create a daily temperature profile (valid for Single bedroom Thermostat all types of control) If the thermostat has an active profile, the profile cannot be changed . Press the button to deactivate the profile . Press the button to access the change profile screen . -
Page 85: Programmable Thermostat With Non-Active Profile
THE ROOMS MENU Mitho Programmable thermostat with non-active Single bedroom Thermostat profile Press button to deactivate the automatic profile . Choose one of the operating modes available . “Comfort” - “Stand-by” “Economy” - “Off” Note: From this screen you can temporarily over-ride the tem- perature setpoint associated to the active mode and the speed of the fans in the fan coil units. -
Page 86: Set Parameters (Programmable Thermostat)
THE ROOMS MENU Mitho HVAC Master with setpoint control and non- Single bedroom Thermostat active profile Press button to deactivate the automatic profile . Set the setpoint of the thermostat controlled via the cursor that appears . The side arrows let you fine-tune the value of the temperature set in tenths of a degree . -
Page 87: Other Temperature Setup Items In Systems With Control At Two Points With Fan Coil Units
THE ROOMS MENU Mitho Other temperature setup items in systems Single bedroom Thermostat with control at two points with fan coil units 1 . Button to change the type of operation (cooling/ heating) 2 . Buttons to change the inertia time of the fan coil unit fans DIFF DIFF1... -
Page 88: Set Parameters (Hvac Master With Mode Control)
Mitho THE ROOMS MENU Set parameters (HVAC Master with mode control) Adjustment of operating parameters and unit Single bedroom Thermostat of temperature measurement To change the operating parameters press button Comf Stby: 1 . Button to change the type of operation (cooling / Single bedroom Thermostat heating) 2 . -
Page 89: Actuators On/Off" Control
THE ROOMS MENU Mitho 3 . Button to set the period of cyclic repetition of the value of the time profile . By pressing the icon the keyboard is activated . Note: The value which can be assigned to each temperature range is limited by the values of the next highest and next lowest range. -
Page 90: State Of "Inputs" Display
THE ROOMS MENU Mitho State of "Inputs" display Select the "Zone" and "Room" inside which the device Entries to be controlled is contained (see: “Navigation in the Terrace “Rooms” menu” on page 72). Wind speed Rain sensor 10 Km/h Rain sensor Blackout blind... - Page 91 THE ROOMS MENU Mitho Analogue outputs Swimming pool lights colour By pressing the buttons that control the analogue outputs, a window is opened in which it is possible to ascribe a value to the output . The values entered can be read on the lower part of the button .
-
Page 92: The Functions Menu
THE FUNCTIONS MENU Mitho Implement and store "KNX Scenarios" By selecting the button "Functions" on the main page you access the screen that lets you see the "Functions": KNX Scenes, Burglar alarm, Irrigation, Energy data, Loads control, Alarms . Rooms Door entry Functions Favourites... -
Page 93: Burglar Alarm Management
THE FUNCTIONS MENU Mitho Burglar alarm management Select the "Burglar Alarm" button from the main page Functions of the "Functions" menu to access the list of "Areas" available . Energy KNX scenes data Note: The "Burglar Alarm" icon flashes in the event of there being at least one "Area"... -
Page 94: Management Of Irrigation System
THE FUNCTIONS MENU Mitho Management of irrigation system Select the "Irrigation" button from the main page of the Functions "Functions" menu to access the list of irrigation cycles programmed . Energy The irrigation cycle is a timed sequence of activations KNX scenes data of the single irrigation devices, run cyclically . -
Page 95: Setting The Time And Days Of Activation Of An Irrigation Scenario
THE FUNCTIONS MENU Mitho Setting the time and days of activation of an Irrigation irrigation scenario Hedge Press button 1; set the time at which you want the irrigation cycle to be activated and confirm with Use the pen provided to activate the days of the week on which the irrigation cycle is to be run . - Page 96 THE FUNCTIONS MENU Mitho To programme or change the programming of one of Hedge the listed irrigation devices, press button and select Sprinklers list the desired irrigation device . Irrigation device Irrigation device Block 1A Block 1B 03’ x 5 02’...
-
Page 97: Energy Data
THE FUNCTIONS MENU Mitho Energy Data From the main page of the "Functions" menu select the Functions "Energy Data" button . If the system is equipped with the necessary detection KNX scenes Energy data devices, a set of data on electricity, gas and water con- sumption will be displayed on the main page . -
Page 98: Set Up Electric Energy Data
THE FUNCTIONS MENU Mitho 9 Displays the instantaneous value related to the elec- Energy data trical power (produced or consumed) . Consumed electric energy Depending on the type of display selected (see Year 2013 points 6 7 and 8), the data relating to electric ener- Week 42 gy (produced or consumed) are displayed: (g) Daily value... -
Page 99: Consulting Gas Consumption Statistics
THE FUNCTIONS MENU Mitho Consulting gas consumption statistics Energy data Press button to see statistical data relating to the Instant Consumed Produced domestic gas consumption . power energy energy 2.3kW 22.350 kWh 1.8 kWh The days of the week or the months of the year are Cumulative consumption given on the horizontal axis . -
Page 100: Consulting Water Consumption Statistics
THE FUNCTIONS MENU Mitho Consulting water consumption statistics Energy data Press button to see statistical data relating to the Instant Consumed Produced domestic water consumption . power energy energy 2.3kW 22.350 kWh 1.8 kWh The days of the week or the months of the year are Cumulative consumption given on the horizontal axis . -
Page 101: Loads Control
THE FUNCTIONS MENU Mitho Loads control From the main page of the "Functions" menu select the Functions "Load control" button . KNX scenes Energy data Burglar Loads alarm control Irrigation Alarms Two sub-categories are displayed: "Power profile" and "Loads management" . If the loads control function is active, then both buttons have a white strip . -
Page 102: Setting "Power Profile" Parameters
THE FUNCTIONS MENU Mitho To copy a "Power profile" to other days of the week, Loads control select the day of the week whose profile you want to Power profile copy and then select button Select the day or days of the week to which you want to copy the profile and press to make the copy . - Page 103 THE FUNCTIONS MENU Mitho Day to which the time slots Loads control displayed refer Loads management Current day Control time slot enabled Control time slot not enabled Button to activate the programmed loads control Note: When loads control is active no change can be made to "Loads management".
- Page 104 THE FUNCTIONS MENU Mitho Pressing icon 9 activates a screen from which it is Monday -> Band 1 possible to choose the available loads to be assigned Priority Load Consumption to the control band selected . Oven socket 1.20kW In the central part of the page the list of loads con- trolled in the selected time slot appears .
-
Page 105: Malfunctions/Alarms
THE FUNCTIONS MENU Mitho "Malfunctions/Alarms" From the main page of the "Functions" menu select the Functions "Alarms" button . Via this function it is possible to receive visual and acoustic alarm warnings if certain events connected to KNX scenes Energy data the result (True) of logical operations occur . -
Page 106: The Programs Menu
THE PROGRAMS MENU Mitho Create and manage "Timers" By selecting the button "Programs" on the main page you access the screen that lets you see the list of func- tions that can be programmed . Rooms Door entry Functions Favourites Programs Setup Select the "Timers"... - Page 107 THE PROGRAMS MENU Mitho This accesses the page through which it is possible to Swimming pool lights timer select the device to add a timer to . Select object On the sides of the selection window there are icons that allow you to filter the display of the types of devic- Drive Light Entrance Light es that can have a timer .
-
Page 108: Set Up "Timer" Parameters
THE PROGRAMS MENU Mitho Set up "Timer" parameters Swimming pool lights timer Swimming pool light 1 Press the button to access the "Timers" setup options . Pressing on each of the buttons 1 activates the key- board for setting the 5 values that make up the value profile displayed in the diagram (possible values when the command can have more than one value, for exam- ple the dimmer percentages) . -
Page 109: Create And Manage "Sequences
THE PROGRAMS MENU Mitho Create and manage "Sequences" From the main page of the "Programs" menu select the Programs "Sequences" button . Via this function it is possible to programme the se- Clock quential activation of devices making up the home Timer alarm automation system . - Page 110 THE PROGRAMS MENU Mitho - Burglar alarm (Total Arming/Disarming, Sector Arm- Turn on atrium lights ing/Disarming) Drive Light - Logic (Active/Inactive) ON/OFF Dimmer Once selected the device accesses the window through which it is possible to choose the action that it has to carry out .
-
Page 111: Logics
THE PROGRAMS MENU Mitho Each element of the list of inputs is made up of two Turn on atrium lights parts: the name of the object and the action that the Actions to open door value it takes on leads to . Press button and select one of the “Inputs”... -
Page 112: To Programme The "Alarm Clock
THE PROGRAMS MENU Mitho To programme the "Alarm clock" From the main page of the "Programs" menu select the Programs "Alarm clock" button . Clock To set the time for the alarm clock select button 1 . Set Timer alarm the hour and minutes on the page that appears and confirm with key Screen... -
Page 113: To Record And Listen To "Audio Messages" (Only Mitho Pl Knx)
THE PROGRAMS MENU Mitho To record and listen to "Audio messages" (Only Mitho PL KNX) The "Audio messages" function lets you record a max- Programs imum of 6 voice mails each lasting 10" in the device's memory . The presence of new voice mails is marked on the main... -
Page 114: The Door Entry Menu
THE DOOR ENTRY MENU Mitho (ONLY FOR MITHO PL KNX PANELS) Standard functions Answering a call In the event of a call, the main screen is automatically replaced by the screen in which shows the image of Comfort Door entry the caller filmed from the entry panel . -
Page 115: Transferring A Call To Other Extensions
THE DOOR ENTRY MENU Mitho (ONLY FOR MITHO PL KNX PANELS) Transferring a call to other extensions If you press button (fig . 4), a list will appear of the extensions where you can transfer the call . S elect the desired extension, wait for an answer and hang up to transfer the call . -
Page 116: Assigning A Name To An Extension
THE DOOR ENTRY MENU Mitho (ONLY FOR MITHO PL KNX PANELS) Select one of the extensions listed to begin the call immediately . Intercom 1 Intercom 2 Intercom 3 Intercom 4 Intercom 5 Intercom 6 Back to the previous screen ... -
Page 117: Porter Call List
THE DOOR ENTRY MENU Mitho (ONLY FOR MITHO PL KNX PANELS) Porter call list If the video entry system includes a porter switchboard, Intercom Camera it will be possible to consult a list of the unanswered call view calls made from the porter’s office to our apartment . -
Page 118: Video Entry System Voice Mail
Video entry system voice mail Mitho PL KNX lets you record video calls from the entry panel if you are not at home or cannot answer . When the voice mail function is active, if there is a call, a message can be shown on the entry panel, pre-recorded by the user, which informs the caller that it is possible to leave a video message (e . -
Page 119: Checking The Video Answer Phone
THE DOOR ENTRY MENU Mitho (ONLY FOR MITHO PL KNX PANELS) To activate the video entry voice mail (with or without Setup the message), press icon 2 on the main screen (fig . 17) . Yellow icon Voice mail active... -
Page 120: Office Function
THE DOOR ENTRY MENU Mitho (ONLY FOR MITHO PL KNX PANELS) Button 5 deletes the message you are viewing . Note: The presence of unread video entry system messages on your voice mail is indicated by the yellow flashing “call list”... -
Page 121: The Setup Menu
THE SETUP MENU Mitho By selecting the "Setup" button from the main page you access the screen that brings together all the settings that involve the overall operation of the panel . Rooms Door entry Functions Favourites Programs Setup Melodies Press the “Melodies”... -
Page 122: Date/Time
. Button 5 (active) enables the automatic adjustment of the panel to legal time (the last Sunday in March) . Door Answer (only on MITHO PL KNX panels) See: “Record a voice mail message” on page 118... -
Page 123: General
THE SETUP MENU Mitho General Press on the "General" button to access a screen the Setup brings together all the general settings that relate to the overall operation of the panel . Melodies General Date/Time Display Door Door entry Answer Panel language selection Setup Select button 1 and use the screen that appears to... -
Page 124: Save/Recover System Copy
THE SETUP MENU Mitho Setup Save/recover system copy General Select button 6 to save on the micro SD the system data set locally on the panel (timer, functions, etc . ) . Select button 7 to retrieve the saved system data from the micro SD . -
Page 125: Display
Press button to return to the previous screen . Stand-by Entry phone system (Only on Mitho PL KNX panels) Press the "Door entry" button to access a screen that Setup lets you carry out the setting up of the functions relat- Door entry ing to the video entry system . -
Page 126: Info Panel
. In particular it is possible to see the KNX address of the panel 8 . Mitho PL KNX Mitho HA KNX Reset Reset Device reset Any time that operating anomalies, servicing or other technical reasons require the unit to be reset, press lightly on the button located inside the opening under the body of the device (see figure), using the pen provided .
Need help?
Do you have a question about the Mitho PL KNX and is the answer not in the manual?
Questions and answers