Minolta Dimage V Instruction Manual
Konica minolta digital camera instruction manual dimage v
Hide thumbs
Also See for Dimage V:
- Instruction manual (86 pages) ,
- Software-gebruiksaanwijzing (47 pages) ,
- Software instruction manual (47 pages)
Table of Contents
Advertisement
Quick Links
Minolta (UK) LTD. Photographie Division
Precedent Drive, Rooksley, Milton Keynes, MK13 8HF, England
Tel.
01 908 200 400
Fax. 01 908 208 334
Minolta (IRL) LTD. (Photopak Sales)
241 Western Industrial Estate, Naas Road, Dublin 12, Ireland
Tel.
01 45 66 400
Fax. 01 45 00 452
Minolta Portugal Lda
Rua Afonso Lopes Vieira 55-B, P-1700 Lisboa, Portugal
Tel.
01 793 10 06
Fax. 01 793 10 64
http://www.minolta.com
http://www.minolta.de/europe
© 1997 Minolta Co., Ltd.
under the Berne Convention and
Universal Copyright Convention
Edited in Germany
9222-2755-31 (P9704-A704)
Digital Camera
E
Instruction Manual
Advertisement
Table of Contents

Related Manuals for Minolta Dimage V


Summary of Contents for Minolta Dimage V
-
Page 1: Instruction Manual
Rua Afonso Lopes Vieira 55-B, P-1700 Lisboa, Portugal Tel. 01 793 10 06 Fax. 01 793 10 64 http://www.minolta.com http://www.minolta.de/europe © 1997 Minolta Co., Ltd. under the Berne Convention and Universal Copyright Convention Edited in Germany 9222-2755-31 (P9704-A704) Digital Camera Instruction Manual... - Page 2 EU (European Union) concerning interference causing equipment regulations. CE stands for Conformité Européenne (European Conformity). This device complies with Part 15 of the FCC Digital Camera Model V Rules. Operation is subject to the following two Tested To Comply...
-
Page 3: Standard Symbols
FOR PROPER AND SAVE USE STANDARD SYMBOLS Various symbols are used in the instruction manual and on the product to promote proper and safe use of this product. Read and understand each caution thoroughly before reading the instruction manual. EXAMPLES The outer triangle is for warning. -
Page 4: For Proper And Safe Use
FOR PROPER AND SAFE USE SAFETY CAUTIONS CAUTION Do not lift or swing the camera by the cables (serial cable, lens extension cable). The camera may detach and fall causing damage or injury. Do not fire the flash near the eyes of people or animals, especially infants and young children. -
Page 5: Before You Begin
• "Dimâge V Image Control” Windows/ Macintosh CD-ROM (Software for Windows and Macintosh) • “Dimâge V Instruction Manuals” Windows/Macintosh CD-ROM (Software Windows/Macintosh and Digital Camera Dimâge V) • Serial Cable SC-232C for Windows • Serial Cable SC-422 for the Macintosh •... -
Page 6: Table Of Contents
TABLE OF CONTENTS For Proper and Safe Use ........2 Before you begin . -
Page 7: Quick Operation
QUICK OPERATION PREPARATION See page 20 and 29 for detailed information. Insert the batteries as shown. Insert the image memory card. RECORDING See pages 30-34 for detailed information. Select the image quality. Turn the camera on. Slide the record/play switch to REC. Turn the lens unit forward by 90°... -
Page 8: Playing
QUICK OPERATION PLAYING See pages 48-54 for detailed information. Turn the camera on. Slide the record/play switch to PLAY. Scroll through the images by pressing the + or – button. DELETING IMAGES See pages 58-59 for detailed informati on . Turn the camera on. -
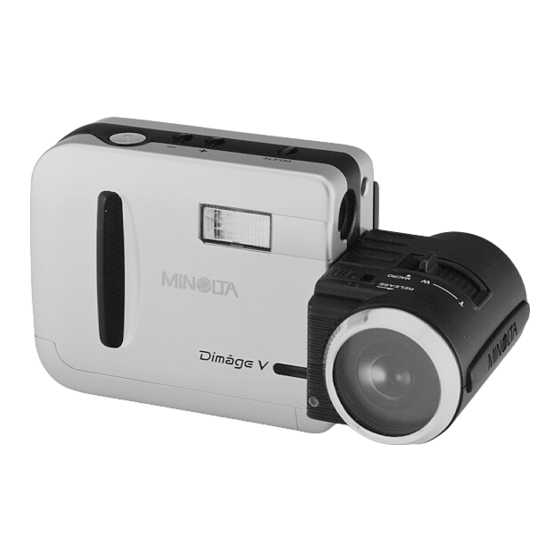
Page 9: Names Of Parts
NAMES OF PARTS BODY Shutter-release + button button – button Delete button Grip Flash* Self-timer lamp Lens unit Serial port DC terminal Card/Battery chamber cover Flash sensor* Flash mode button * Do not touch Lens* LCD monitor Image quality selector Back cover - Outside Lens unit release Zoom lever... -
Page 10: Lcd Monitor
NAMES OF PARTS LCD MONITOR Record mode Date/time area Frame counter Warning area Mode area Pressing the Display button will allow you to turn off the information display or change the LCD information bar. See page 36. Play mode Date/time area Frame counter Warning area Mode area... -
Page 11: Before Recording
ATTACHING THE HAND STRAP Insert the smaller loop of the strap through the strap eyelet. Put the other end of the strap through the small BEFORE loop as shown. RECORDING... -
Page 12: Inserting Batteries
INSERTING BATTERIES This camera requires 4 AA size batteries. Either Alkaline or Nicad batteries can be used. • Nicad batteries must be fully charged in the appropriate charger, as indicated in the battery instruction manual. • Do not mix battery types. Open the card/battery chamber cover as shown. -
Page 13: Adjusting The Lcd Brightness
ADJUSTING THE LCD BRIGHTNESS The Dimâge V is equipped with a quick-responding LCD monitor that has an excellent range of viewing angles. The LCD monitor brightness can be adjusted to compensate for varying lighting conditions and viewing angles. Press the main switch to turn the camera on. - Page 14 SETTING DATE/TIME Press the display button to highlight the date information to be changed. • The selection will change from left to right. • If you don't want to correct the date skip to step Press the + or – buttons to change the date.
-
Page 15: Standard Lens Position
SETTING DATE/TIME Once all the settings are correct, reselect the date format by pressing the protect button ( • The formats will appear in the following sequence: YY MM DD ↓ MM DD YY ↓ DD MM YY ↓ AM/PM (12 hour clock) ↓... -
Page 16: Recording Images
RECORDING IMAGES The SmartMedia™ card included in this package and other standard-accessory cards are already formatted and ready for use. SmartMedia™ cards purchased separately need to be formatted before use. Insert the image memory card using the procedure on the following page. -
Page 17: Selecting Image Quality
SELECTING IMAGE QUALITY Storing uncompressed still-image files normally requires a large amount of disk space. This usually results in small recording capacity on the image memory cards. The Dimâge V uses JPEG compression (an international standard) to compress the image data before it is recorded on the image memory card. - Page 18 BASIC RECORDING Place the lens unit in the standard lens position • If the lens unit is not in the standard position, the flash will not fire and the LCD monitor. While looking at the LCD monitor, adjust the zoom lever to frame the image.
-
Page 19: Flash Modes
FLASH MODES In addition to Auto Flash mode ( ) the Dimâge V has Manual Fill Flash mode ( ) and Flash Cancel mode ( Auto Flash The flash will fire in low light or backlit situations. Use this mode for general photographic situations. Manual Fill Flash The flash will fire every time the shutter-release button is pressed, regardless of lighting conditions. -
Page 20: Changing Lcd Data Display
CHANGING LCD DATA DISPLAY Change the information displayed on the monitor by pressing the display button. The monitor will change as shown in the sequence below. No Data Current Frame (black box) All Data Displayed Frames Remaining (red box) (with Frames Remaining) All Data Displayed (with Current Frame) •... -
Page 21: Advanced Operation
ADVANCED OPERATION MACRO PHOTOGRAPHY The Macro Photography function allows you to fill the frame with a business-card size object. The minimum focus distance in Macro mode is 5cm (2 in). Slide the zoom lever to MACRO until it clicks into place. -
Page 22: Self-Timer
SELF-TIMER Secure the camera on a tripod. Open the back cover, then press the self- timer button • The self-timer mark ( appear on the monitor. Frame the image in the LCD monitor, then press the shutter-release button. • The self-timer lamp on the front of the camera will start blinking. -
Page 23: Photographing Yourself
PHOTOGRAPHING YOURSELF The Dimâge V lens unit rotates from +90° to -90°. This function allows you to photograph yourself while looking at the LCD monitor. Rotate the lens unit 90° backwards until it stops. • The image on the monitor will be right-side-up, but backwards (as if you are looking in a mirror). - Page 24 LENS EXTENSION CABLE Push the connector of the lens extension cable down until it clicks. Match-up the three notches on the lens unit with the three notches on the lens extension cable. Gently put them together as shown. Slide the lens unit down until it clicks.
-
Page 25: Playback Of Recorded Images
LENS EXTENSION CABLE DETACHING THE LENS EXTENSION CABLE Slide the release lever on the lens extension cable's connector until it clicks. Next, slide the connector up and then left as shown. Slide the lens unit release in the direction indicated until it clicks. -
Page 26: Playback
PLAYBACK There are two options available in Play mode; viewing one image at a time (Single Frame Display) or viewing 9 images at once (Index Display). Pressing the display button in Play mode will change the display in the following sequence. Single Frame Display Single Frame Display (no information) -
Page 27: Index Display
SINGLE FRAME DISPLAY When the image on the screen is the last-recorded image (last frame) and the + button is pressed, the frame that will appear is the first-recorded image (first frame). When the first frame is on the screen and the – button is pressed the last frame will appear. Example: 15 frames on the image memory card. - Page 28 INDEX DISPLAY Press either the + or – button to select an image. • The + button moves the cursor to the next frame. The – moves the cursor to the previous frame. • Press and hold the button to continually scroll the cursor.
-
Page 29: Removing Images
INDEX DISPLAY One index display screen holds nine images (one "page"). When changing from Single Image Display to Index Display, the page containing the image that was last viewed will appear. In the example below: Image number 7 is on the monitor when the display button is pressed. -
Page 30: Frame Counter
This section explains how to remove images from the image memory card. There are three types of image removal: DELETE - removes a singe, selected image (page 58). CLEAR - removes all unprotected images on the card (page 60). FORMAT - initializes the card and removes all the images (page 64). Be careful when removing images. -
Page 31: Deleting A Single Image
DELETING A SINGLE IMAGE Below is the procedure to delete a single, unprotected image from the SmartMedia™ in the camera (see page 62 for information on protecting images). • To delete the image that was just taken, start at • To delete an image while viewing in play mode, start at Press the main switch to turn the camera on. -
Page 32: Clearing Unprotected Images
CLEARING UNPROTECTED IMAGES Clearing removes all unprotected images from the SmartMedia in the camera (see page 62 for information on protecting images). Press the main switch to turn the camera on. Slide the record/play switch to PLAY. • The last-recorded image will appear in the LCD monitor. -
Page 33: Protecting Images
PROTECTING IMAGES Important images can be write-protected to guard them from accidental deleting. Protected images cannot be removed from the image memory card by using the Delete or Clear functions. CAUTION: Protected images will be removed when the FORMAT function is used. -
Page 34: Formatting Memory Cards
FORMATTING MEMORY CARDS Formatting the image memory card removes all protected and unprotected images from the card. The standard accessory image memory cards come formatted. SmartMedia™ cards purchased separately need to be formatted before using them for the first time. Insert the image memory card. -
Page 35: Appendix
FORMATTING MEMORY CARDS If the display on the left appears, the formatting operation has failed. Press the shutter-release button to retry. If the display appears a second time, press the clear/format button to quit the format operation. Then, turn the camera off and contact a Minolta Service Facility listed on the front cover of the manual. -
Page 36: Warning Icons
WARNING ICONS Various symbols are designed to appear on the monitor when the following situations occur. This section explains what the symbols mean and describes the action to be taken when the symbol appears. mark represents a blinking icon. Low Battery Battery power is low. -
Page 37: Accessories
WARNING ICONS Card Error Appears when the camera is turned on: There is no image memory card in the card slot. + Turn the camera off. Insert an image memory card following the instructions on page 29. Card Error Appears while recording, playing, or formatting: An error has occurred. -
Page 38: Troubleshooting
TROUBLESHOOTING Refer to these pages to determine the cause of a problem you are experiencing with your camera. If the information does not cover the problem which you are experiencing or the condition continues, contact your nearest Minolta Service Facility. No image appears in the LCD monitor. -
Page 39: Care And Storage
CARE AND STORAGE CLEANING • If the camera or lens unit is dirty, gently wipe it with a soft, clean, dry cloth. If the camera or lens comes in contact with sand, gently blow away loose particles, wiping may scratch the surface. -
Page 40: Technical Details
TECHNICAL DETAILS RECORDING Image Sensor: 1/3 inch CCD, 350,000 pixels (330,000 effective pixels), square pixels, full frame transfer, suited for VGA display Recording Media: SmartMedia™ (SSFDC image memory cards) File Format: EXIF (Exchangeable Image File Format) Compression: JPEG Storage Capacity: 2MB SmartMedia™ cards Fine mode - approx.
Need help?
Do you have a question about the Dimage V and is the answer not in the manual?
Questions and answers