
Subscribe to Our Youtube Channel
Summary of Contents for Magnasonic PI300-SD
- Page 1 SETUP COMPLETE SVAT ELECTRONICS now you can see PI300-SD USER’S MANUAL Covert Alarm Clock DVR with Built-In Color Camera...
-
Page 2: Important! Please Read
Please contact a SVAT customer support representative first regarding additional information on product features, specifications or assistance with setup. For more product information visit www.svat.com Note: This is manual version 1.0 for this product, you may find updated versions by visiting our website. PI300-SD User’s Manual... -
Page 3: Product Warranty Information
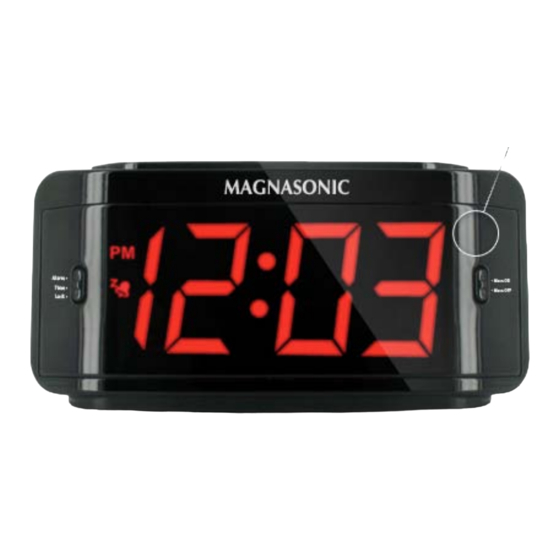
Niagara Falls, ON Canada L2H 1J9 CAUTION RISK OF ELECTRIC SHOCK, DO NOT OPEN MONITOR TO REDUCE THE RISK OF ELECTRIC SHOCK, DO NOT REMOVE THE COVER (BACK). NO USER SERVICEABLE PARTS INSIDE. REFER SERVICING TO QUALIFIED SERVICE PERSONNEL. PI300-SD User’s Manual... - Page 4 Covert DVR Disguised as an Alarm Clock Hidden in a fully functional, Magnasonic LCD alarm clock, you can privately monitor your office, employees, valuables or nanny with this unit’s conventional appearance. Record Over a Month of Footage with the Included 2GB SD Card Capture over a month of high quality video when you record with the included 2 GB SD card.
- Page 5 Increase hour by one back in menu 13. Snooze: Snooze button, delays alarm for 9 minutes 8. Record: 14. Minute: Start manual recording Increase minute by one 9. Play: Prompts playback / plays video 15. Camera: Covert pinhole camera PI300-SD User’s Manual...
-
Page 6: Installation
PI300-SD was designed to be quick and easy to set up and to use. Please follow these simple instructions to get your covert DVR up and running in just a matter of minutes. Powering your PI300 Connect the included AC adapter to conventional AC outlet. -
Page 7: Monitoring Mode
PI300. Please, take the time to read through this manual in its entirety to get the most out of your covert recording experience with the PI300-SD. PI300-SD ICONS... - Page 8 2. While alarm is activated, press the snooze button (13) to disable the alarm for 9 minutes. After 9 minutes, the alarm will sound again and you will again be prompted to either press the snooze button or turn off the alarm. NOTE: The time displayed on the LCD Alarm Clock must set independently from the time setting on the covert DVR PI300-SD User’s Manual...
-
Page 9: The Main Menu
Additionally, you can specify the size of recorded files and set automatic overwriting System Status: Dispalys all of the current settings of your PI300 Power On Setup: Set your OSD language and video format Factory Default: Return the settings of your PI300 to its original factory defaults PI300-SD User’s Manual... -
Page 10: Search And Play
Toggle the date to be displayed in either year/month/day, month/day/year or day/month/year Set Year: Set the year of your covert DVR Set Month: Set the month of your PI300 Set Day: Set the day Set Time: Adjust the time PI300-SD User’s Manual... -
Page 11: Set Motion Detection
Gauges how much motion is detected on screen so you can set your desired sensitivity level with the Motion Detection Threshold. Motion Detection Threshold Alter the degree of motion required to trigger motion activated recording. By decresing the threshold, the motion detection becomes more sensitive. Likewise, increasing the threshold desensitizes motion detection. PI300-SD User’s Manual... -
Page 12: Manual Record
4. Move joystick left or right to adjust the recording type. A indicates motion detection, a indicates constant recording and an indicates no recording. 5. When you have finished setting your recording schedule, press “STOP” to exit. PI300-SD User’s Manual... -
Page 13: Motion Record
320x240 you can select anywhere from 1 up to 30 FPS. When using the resolution 640x480 choose between 1 up to 15 FPS. Quality: Select the desired quality level of footage recorded in Continuous Record Mode. You can select from low, medium and high quality. PI300-SD User’s Manual... -
Page 14: Sd Card Options
SD Card, simply press the “STOP” button to cancel NOTE: Once you have formatted your SD Card, you cannot cancel this process. All of your saved information, whether it be recorded footage or other files, will be erased. PI300-SD User’s Manual... -
Page 15: System Status
If you are using this device in North America, you will want to leave this set to NTSC for it to be compatible with your TV or monitor. Use PAL if you are using this in Europe or Asia PI300-SD User’s Manual... -
Page 16: Factory Default
1/6" Color CMOS Sensor Motion Detection Resolution 640 x 480 Viewing Angle 66 Degrees Outdoor Use Auto Focal Length Board Lens f3.62mm / F2.8 Auto Focus Type Fixed White Balance Auto Min. Illumination 2 lux Signal Noise 46 dB PI300-SD User’s Manual... -
Page 17: Dvr Specifications
Live Frame Rate 30 FPS Dimensions 8” x 4” x 2” Play Search Mode By Date, Time, Record Type Weight 1.2 lbs. Play Speed Forward/Rewind: x1/x2/x4/x8/x16/x32 Disk Full Warning Full Stop / Overwrite (Selectable) Play Mode Single Screen PI300-SD User’s Manual...
Need help?
Do you have a question about the PI300-SD and is the answer not in the manual?
Questions and answers