Table of Contents
Advertisement
Quick Links
Advertisement
Table of Contents

Related Manuals for Zte N860


Summary of Contents for Zte N860
- Page 1 ZTE N860 User Manual...
-
Page 2: Legal Information
® The Bluetooth trademark and logos are owned by the Bluetooth SIG, Inc. and any use of such trademarks by ZTE Corporation is under license. Other trademarks and trade names are the property of their respective owners. We offer self-service for our smart terminal device users. -
Page 3: Table Of Contents
Contents Getting Started ............10 Overview ................ 10 Keys Explained .............. 11 Starting Up ..............12 Installing the microSD Card and Battery ....12 Removing the Battery and microSD Card ....14 Charging the Battery ..........15 Extending the Battery Life ........16 Switching Your Phone On/Off ........ - Page 4 Receiving Calls .............. 32 Answering a Call ............32 Rejecting a Call ............32 Muting a Call ............32 Putting a Call on Hold ..........33 Turning the Speakerphone On/Off ......33 Ending a Call ............33 Adjusting Your Call Settings .......... 33 Contacts ..............
- Page 5 Receiving Emails ............47 Composing and Sending an Email ........ 47 Replying to or Forwarding an Email ....... 48 Deleting an Email Account ..........48 Email Settings ..............48 Getting Connected to the Internet ......49 Enabling/Disabling Data Access ........49 Turning On Wi-Fi............
- Page 6 Adjusting Camcorder Settings ........58 Music Player ..............59 Creating Playlists ............. 60 Managing Playlists ........... 60 Adding a Song to a Playlist ........60 Setting a Song as Ringtone ........60 Playing Your Videos ............61 Opening Your Gallery ............ 62 Making Voice Memos ............
- Page 7 Sound Settings............... 74 Language Settings ............75 Mobile Network Services ..........75 Enabling or Disabling Data Services ......75 Switching the Network Mode ........75 Security Settings ............76 Protecting Your Phone With a Screen Unlock Pattern ................. 76 Protecting Your Phone With a PIN or Password ..77 Disabling Screen Lock Settings ........
- Page 8 My Files ................. 84 Accessing My Files ..........84 Opening Files in My Files ......... 84 Note Pad ............... 85 Play Books ..............85 Play Movies ..............85 Stopwatch ..............86 Task Manager ............... 86 Voice Dialer ..............86 Calling a Contact With Voice Dialer ......87 Calling a Phone Number With Voice Dialer .....
- Page 9 Normal Use Position ..........97 Air Bags ..............98 Seizures/Blackouts ........... 98 Repetitive Strain Injuries .......... 99 Emergency Calls ............99 Loud Noise ............... 99 Phone Heating ............99 Electrical Safety ............100 Accessories ............100 Connection to a Car ..........100 Faulty and Damaged Products .......
-
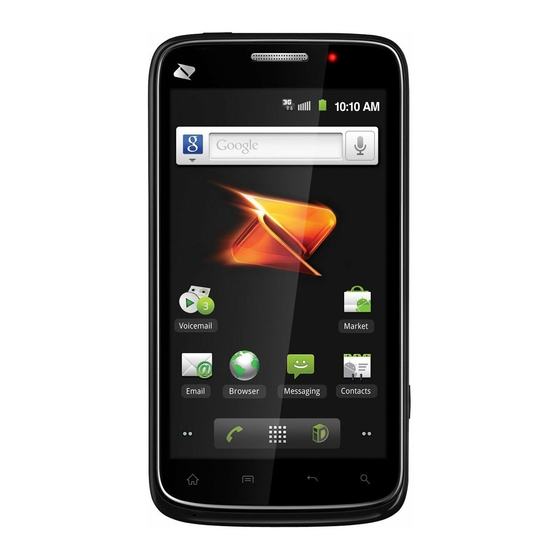
Page 10: Getting Started
Getting Started Overview Power Key Headset Jack Earpiece LED Indicator Charger/ USB Jack Touchscreen Camera Home Key Search Key Menu Key Back Key... -
Page 11: Keys Explained
Volume Camera Lens Flash Lamp Volume Down Back Cover Speaker Keys Explained Function • Power Key Press and hold to turn on or off Silent or Airplane mode, or to power off. • Press to switch your phone to Sleep mode. -
Page 12: Starting Up
Function • Home Key Touch to return to the Home Screen from any application or screen. • Touch and hold to see recently used applications. Menu Key Touch to get the options for the current screen. Back Key Touch to go to the previous screen. Search Key Touch to search information on the current screen or application. - Page 13 1. Remove the back cover. 2. Hold your microSD card with the metal contacts facing down and slide it in. NOTE: The microSD logo is a trademark of the SD Card Association.
-
Page 14: Removing The Battery And Microsd Card
3. Insert the battery by aligning the gold contacts on the battery with the gold contacts in the battery compartment. Gently push down on the battery until it clicks into place. 4. Press the cover gently back into place until you hear a click. -
Page 15: Charging The Battery
3. Disconnect the charger when the battery is fully charged. NOTE: Use only ZTE-approved batteries and chargers with your phone. The failure to use a ZTE-approved battery and charger may increase the risk that your phone will overheat, catch fire or explode, resulting in serious bodily injury, death... -
Page 16: Extending The Battery Life
How much charge have you got? If the battery is low, there will be a pop-up message on the screen. As you charge your phone, the screen will tell you the exact battery level each time you wake up your phone. If the phone is on, you’ll see this charging icon appear on the status bar. -
Page 17: Switching Your Phone On/Off
Switching Your Phone On/Off Make sure the battery is charged. • Press and hold the Power Key to switch on your phone. • To switch it off, press and hold the Power Key to get the phone options. Touch Power off, and then touch OK. Switching to Sleep Mode To save battery power, Sleep Mode suspends your phone to a low-power-consumption state while the display is off. -
Page 18: Getting Around Your Phone
Getting Around Your Phone Using the Touch Screen Your phone’s touch screen lets you control actions through a variety of touch gestures. • Touch When you want to type using the onscreen keyboard, select items onscreen such as application and settings icons, or press onscreen buttons, simply touch them with your finger. -
Page 19: Home Screen
at once and pinching them together (to zoom out) or spreading them apart (to zoom in). • Rotate the screen For most screens, you can automatically change the screen orientation from portrait to landscape by turning the phone sideways. Home Screen You choose what is shown on your Home Screen. - Page 20 Extended Home Screens The Home Screen extends beyond the screen width, giving you more space to add more stuff. To access the extended Home Screens, you can: • Simply slide your finger left or right on the screen. • Touch the dots on the bottom corners of the screen. •...
- Page 21 4. Select a category (shortcuts, widgets or folders). 5. Choose the item you want to add to the Home Screen. Removing Items From Your Home Screen 1. Touch the Home Key to return to the Home Screen. 2. Touch and hold the item you want to delete until the icon appears on the screen.
-
Page 22: Status And Notification Icons
Status and Notification Icons Mobile data No signal connected Mobile data in use Signal strength Battery very low Phone speaker off Battery low Phone microphone off Battery partially Recording phone call drained Battery full Speaker on Battery charging GPS on Vibrate mode microSD card unmounted Airplane mode... -
Page 23: Using The Notification Panel
New instant Upcoming event message Missed call Playing song Call in progress Downloading data Content downloaded and Syncing installed successfully USB connected Sending data Error or warning More (not displayed) notifications Using the Notification Panel Flick the status bar downwards to open the Notification Panel, where you can see your calendar events, new messages, and call status, etc. -
Page 24: Applications And Settings Preview
the Menu Key > Notifications from the Home Screen. Applications and Settings Preview Applications Preview Your phone has lots of functions. Touch to see the following applications. Applications Description Alarm Set alarms. Browser Browse the Internet. Calculator Do basic calculation. Calendar Schedule appointments and events. - Page 25 Applications Description Access your Gmail account and check your Gmail Gmail on your mobile phone. Share updates and see what’s going on around Google+ you with Google+. See your friends’ locations and share yours with Latitude them via Google Maps Latitude. Track your current location, view real-time traffic, Maps and receive detailed directions to your destination.
-
Page 26: Settings Preview
Applications Description Play Music Use Google Play Music to listen to your music. Access useful applications and fun games to Play Store download. Search Search for information online or on your phone. Settings Adjust phone settings. Sound Recorder Capture audio clips. Measure exactly how long it takes to do Stopwatch something. - Page 27 Configure and manage wireless ® connections, such as Wi-Fi, Bluetooth Wireless & networks mobile networks and Virtual Private Networks. You can also select Airplane mode from here. Set up TTY mode, hearing aids, DTMF tones, speed dial, plus code dialing, call Call settings forwarding, voice privacy and Internet call settings.
- Page 28 Configure privacy settings, such as Privacy back-up, restoration, and personal data. Check the storage information of the Storage microSD card and phone. Language & Set operating system language, plus keyboard text input options. Set up voice recognition and Voice input & output text-to-speech options.
- Page 29 2. Touch the application you want to open.
-
Page 30: Phone Calls
Phone Calls Making Calls There are many ways to make a call with your phone. And they’re all easy to do. Calling From the Dialer 1. Touch the Home Key > > Dialer or touch the Home Screen. 2. Enter the phone number with the on-screen keypad. Touch to delete wrong digits. -
Page 31: Calling From Your Call History
Calling From Your Call History 1. Touch the Home Key > > Call log. 2. Touch next to the number you want to call. Calling From a Message If a message contains a phone number that you want to call, you can make the call while viewing the text message. -
Page 32: Receiving Calls
Receiving Calls Answering a Call Drag to the right to answer the call. Rejecting a Call Drag to the left to reject the call. TIP: To silence the ringer of the incoming call, press the Volume Keys either up or down. Muting a Call During a call, you can mute your microphone so that the person you are speaking to cannot hear you, but you can still... -
Page 33: Putting A Call On Hold
Putting a Call on Hold During a call, you can put it on hold by touching the Menu Key > Flash calls. Touch the Menu Key > Flash calls again to unhold the call. Turning the Speakerphone On/Off Touch Speaker during a call to turn the speakerphone on. The icon will appear in the status bar. - Page 34 Set the length of dual-tone multi-frequency DTMF Tones (DTMF) signal tones. Speed dial Set speed dialing keys and numbers. Plus Code Dialing Set Plus Code dialing number. Setting Forward your incoming calls to a different Call forwarding number. Enable enhanced privacy mode. Voice Privacy Accounts Set up Internet calling (SIP) accounts.
-
Page 35: Contacts
Contacts You can add contacts on your phone and synchronize them with the contacts in your Google account or other accounts that support contact syncing. To see your contacts, touch the Home Key > > Contacts. From there, you can touch the tabs on the top to quickly switch to dialer, call log, favorite contacts, or contact groups. -
Page 36: Sharing Contacts Information
Contacts Screen. 2. Choose Import from SD card or Export to SD card. For import, you should have vCard files saved in the microSD card. If there’s more than one vCard file, you need to select the vCard file and touch OK. For export, the phone will prompt you with the name of ... -
Page 37: Searching For A Contact
Searching for a Contact 1. Touch the Menu Key > Search in the Contacts Screen. 2. Input the contact name you want to search for. The contacts matched will be listed. Creating a New Group 1. Touch the Groups tab from the Contacts Screen. 2. -
Page 38: Entering Text
Entering Text When you enter a field that needs text or numbers, a keyboard automatically appears on the screen. Touch and hold the input box and then touch Input method from the pop-up menu to change input method. You can also touch the Back Key or hold the Menu Key to hide the onscreen keyboard. -
Page 39: Xt9 Text Input
• Touch the alphabetic keys to enter letters. Touch and hold some specific keys to enter associated accented letters or numbers. For example, to enter È, touch and hold and the available accented letters and number 3 appear. Then slide to choose È. •... - Page 40 until you reach the end of the word. XT9 offers three keyboard layouts: Keyboard, Reduced keyboard, and Phone keypad. • Keyboard Touch to switch between uppercase and lowercase. Delete text before Touch twice to lock the cursor. on uppercase. Touch or hold to Touch to select input emoticons.
-
Page 41: Phone Keypad
• Reduced keyboard Touch and hold to switch between multi-tap and predictive text input. • Phone keypad Touch and hold to switch between multi-tap and predictive text input. To use the toolbar: Touch to access the XT9 settings. Touch to open the toolbar. Touch to close the toolbar. -
Page 42: Touch Input Settings
NOTE: The icon is available when more than one language is activated. You can select more input languages by touching the Menu Key > Settings > Language & keyboard > XT9 Text Input > Languages and settings from the Home Screen. Tips for using XT9 Text Input: •... -
Page 43: Messaging
Messaging Your SMS (text message) and MMS (multimedia messaging service) are combined into one menu in Messaging. The Message Box Instead of an inbox and outbox, your phone organizes all messages you sent and received into one box, where messages exchanged with the same number are grouped into one message thread in the Messaging Screen. -
Page 44: Message Settings
If you are sending an MMS, touch the Menu Key to add a subject, or attach pictures, videos, audios, slideshows or files. 4. Touch Send to send your message. NOTE: Add an attachment to text message and it will be converted into an MMS automatically. - Page 45 • Roaming auto-retrieve: Automatically retrieve MMS messages when you’re roaming. Notification settings: • Notifications: Show message notifications in the status bar. • Select ringtone: Choose a ringtone for your incoming messages. • Vibrate: Make your phone vibrate when a new message arrives.
-
Page 46: Email
Email Touch the Home Key > > Email. You can enter the Email Screen to setup your Email account and exchange Emails. Creating an Email Account 1. When you open Email for the first time, enter your Email address and password and then touch Next. 2. -
Page 47: Receiving Emails
TIP: To add more Email accounts, open Email to get the Inbox screen. Then touch the Menu Key > More > Accounts > Menu Key > Add account. Receiving Emails Touch the Menu Key > Refresh to download recent Emails. You can touch Load more messages at the bottom of the Email list to download earlier messages. -
Page 48: Replying To Or Forwarding An Email
Replying to or Forwarding an Email 1. Open the Email you want to reply to or forward from Inbox Screen. 2. Touch Reply or the Menu Key > Forward to reply to/forward the Email. NOTE: You can also touch Reply all to reply to all recipients of the Email. -
Page 49: Getting Connected To The Internet
Getting Connected to the Internet Your phone’s impressive networking capabilities allow you to access the Internet or your corporate network with ease. You can use default connection settings to connect to the Internet via your mobile network or Wi-Fi. Enabling/Disabling Data Access The data connection can be enabled or disabled manually. -
Page 50: Checking The Wi-Fi Network Status
The Wi-Fi network names and security settings (open or secured) that your phone has detected are shown in the Wi-Fi networks section. 2. Touch a network to connect to it. If the network is secured, you need to enter a password. TIP: Touch the Menu Key >... -
Page 51: Browsing The Internet
Browsing the Internet You can use your phone to browse the Internet via a mobile data or Wi-Fi connection. Touch the Home Key > > Browser. There are different ways to open web pages: • Touch the address bar to enter the website you want to browse and then touch •... -
Page 52: Using Bookmarks
• Copy: Touch the Menu Key > More > Select text and slide your finger on the page to select the text you want to copy. Touch the selected text and your phone automatically copies it to the clipboard. • Share pages: Touch the Menu Key > More > Share page to send a page. -
Page 53: Editing A Bookmark
3. Touch Add or Add bookmark. 4. Give the bookmark a name and touch OK. TIP: You can touch the Menu Key > List view/Thumbnail view to change how you view bookmarks on your phone screen. Editing a Bookmark 1. Open the browser. 2. -
Page 54: Bluetooth
® Bluetooth ® Bluetooth is a short-range wireless communication technology. Phones or other devices with Bluetooth capabilities can exchange information wirelessly within a distance of about 10 meters. The Bluetooth devices must be paired before the communication is performed. Turning Bluetooth On/Off Touch the Home Key >... -
Page 55: Changing The Device Name
3. Tick the Discoverable check box to make your phone visible. NOTE: To make your phone ‘invisible’, simply clear the Discoverable check box. Changing the Device Name When your phone is visible to other Bluetooth devices it will be seen by its name, and you can make that anything you want –... - Page 56 Select the device you want to pair with. If required, enter your PIN and touch OK. If a PIN is required, the same PIN should be entered on the other device.
-
Page 57: Making The Most Of Multimedia
Making the Most of Multimedia Taking Pictures With Your Camera 1. Open the camera by holding the Camera Key or touching the Home Key > > Camera. 2. Aim the camera at the subject and then touch press the Camera Key to take a shot. 3. -
Page 58: Shooting Video With Your Camcorder
• Press the Volume Keys up or down to zoom in or out. TIP: To change quickly from camera to camcorder or vice versa, use the switch icon . Use the bar to adjust the brightness. WARNING! Keep a safe distance when using the flash. Do not point the flash toward people or animals’... -
Page 59: Music Player
and video duration together, including High, Low, MMS, YouTube and custom mode. Music Player You can play the audio files stored in your phone’s microSD card with Music. 1. Touch the Home Key > > Music to open the Music Screen. -
Page 60: Creating Playlists
Creating Playlists Playlists help you organize your music files: 1. Select a music file you want to add to a new playlist. 2. Touch and hold the file until a shortcut menu pops up. 3. Touch Add to playlist > New. 4. -
Page 61: Playing Your Videos
3. Touch Use as phone ringtone. Playing Your Videos 1. To play a video file, touch the Home Key > > Videos. This will open the Videos screen and show the video files saved in your microSD card. Touch a video file to start playing. Touch on the screen and the control bar will appear as below. -
Page 62: Opening Your Gallery
Opening Your Gallery Touch the Home Key > > Gallery. You can use Gallery to view pictures and play videos. You can also do some basic editing of your pictures – such as setting them as wallpaper or contact icons, and sharing with friends. -
Page 63: Making Voice Memos
Touch to return to the previous folder. Show the number of Touch to return to pictures in the folder. Gallery. Touch to zoom in or out. Touch to view pictures in the folder in a slideshow. Making Voice Memos Sound Recorder enables you to record your voice memos. You need a microSD card to use it. - Page 64 2. Touch to start recording. 3. Touch to stop recording. 4. Touch to play back the voice recording. 5. Touch OK to save the voice recording, or touch Discard to delete it. NOTE: You can find your recordings by touching the Menu Key >...
-
Page 65: Turning On/Off Usb Mass Storage
Turning On/Off USB Mass Storage You can use the USB mass storage feature to transfer data between the microSD card and PC. To turn on USB mass storage: Insert the microSD card into your phone and connect the phone to the PC with a USB cable. Slide down the notification panel and touch USB connected >... -
Page 66: Using Your Google™ Applications
Using Your Google™ Applications Signing in to your Google Account lets you synchronize Gmail, Calendar, and Contacts between your phone and the web. And if you don’t have an account, you can easily create one. 1. Touch a Google application that needs a Google account, such as Gmail. -
Page 67: Google Calendar
3. Enter the email address of the person you’re contacting in the ‘To’ field. If you’re sending the email to several people, separate the email addresses with commas. You can add as many recipients as you want. 4. Enter the email subject, and then write your email. 5. -
Page 68: Adding A New Friend
Adding a New Friend You can only add people who have a Google Account. 1. In the Friends list, touch the Menu Key > Add friend. 2. Enter the Google email address of the friend you want to add. Your friend will receive an invitation from Google. Touch the Menu Key >... -
Page 69: Navigation
2. Touch the Home Key > > Places. Wait while you are being located. Your location, when found, is shown on the screen. 3. Select a business category and the information of that type of business near you will be displayed. NOTE: Touch the Menu Key >... -
Page 70: Latitude
Contacts: Get directions to the address stored in your Contacts. Starred places: Get directions to the places you have starred in Google Maps. Latitude Google’s Latitude service is a social tool for sharing your location information with selected friends. Touch the Home Key >... -
Page 71: Google
Google+ Google+ makes connecting on the web more like connecting in the real world. Share your thoughts, links and photos with the right circles. Get everyone on the same page with fast and simple group chat. NOTE: For detailed information about Google+, open Google+ and touch the Menu Key >... - Page 72 circle you're in, or everyone. Messenger: Start a conversation with a group of friends while you're on the go. You can also touch the Home Key > > Messenger to open Google Messenger. Photos: View photos taken by you, photos you've ...
-
Page 73: Sorting Out Your Phone Settings
Sorting out Your Phone Settings Setting Date and Time Format 1. Touch the Home Key > Menu Key > Settings > Date & time. 2. Touch the check box Use 24-hour format if you want to change the time format. 3. -
Page 74: Sound Settings
Sound Settings By touching the Home Key > Menu Key > Settings > Sound, you can adjust the sound settings, such as ringtones and alerts. • Silent mode: Tick the check box to mute all sounds except media and alarms. •... -
Page 75: Language Settings
Key (down) - or - if the screen is locked, drag the icon to the left. Language Settings You can change the language of your phone system in two simple steps. 1. Touch the Home Key > Menu Key > Settings > Language &... -
Page 76: Security Settings
2. Select one of the following: CDMA/EvDo, CDMA only, or EvDo only. Security Settings Here’s how to protect your phone from unauthorized use. Protecting Your Phone With a Screen Unlock Pattern Creating Your Screen Unlock Pattern 1. Touch the Home Key > Menu Key > Settings > Location &... -
Page 77: Protecting Your Phone With A Pin Or Password
Cannot recall your screen unlock pattern? You have up to five attempts to unlock your phone. If you still cannot recall the screen unlock pattern, you can touch Forgot pattern? and enter your Google account user name and password to reset the screen unlock pattern. IMPORTANT: You must sign in or create a Google account on your phone before using the above method to reset the pattern. -
Page 78: Disabling Screen Lock Settings
Disabling Screen Lock Settings If you have created an unlock pattern, PIN or password, you can disable it. 1. Touch the Home Key > Menu Key > Settings > Location & security > Change screen lock. 2. Draw the screen unlock pattern or enter your PIN/ password you have created. -
Page 79: Managing Your Device Memory
Managing Your Device Memory Touch the Home Key > Menu Key > Settings > Storage. You can view the space information for the microSD card and storage information for the phone storage. • Unmount/Mount SD card: You can unmount the microSD card and safely remove it, or mount the card. -
Page 80: Installing An Application
applications. • Running services: Check currently running services and stop them if needed. • Storage use: View storage used by applications. • Battery use: See what has been using the battery. • Development: Set options for application development. Installing an Application You can install a free or paid application from the Google Play Store (the Home Key >... -
Page 81: Moving An Application
2. Select the application you want to delete. 3. Touch Uninstall and OK to confirm. Moving an Application You can move the applications downloaded or installed on your phone to the microSD card when the phone memory is full. You can also move applications to your phone if the microSD card is getting full. -
Page 82: Accessibility
input & output. NOTE: You need to download voice data in order to use the text-to-speech function. Just touch Install voice data in Text-to-speech settings. Accessibility You can configure accessibility options for accessibility-related applications by touching the Home Key > Menu Key > Settings >... -
Page 83: Other Applications
Other Applications Alarms 1. Touch the Home Key > > Alarm. 2. Touch the default alarm to configure it. Or, to create a new alarm, touch the Menu Key > Add alarm. 3. Tick the Turn on alarm box and set up the alarm options. TIP: You can also touch the Menu Key in the Alarm Screen to use the phone as a full screen bed clock and set the alarm and bed clock options. -
Page 84: Global Time
Global Time Touch the Home Key > > Global Time. Then touch the Menu Key > Show time zone to see what time it is in the world’s major cities. My Files Accessing My Files Touch the Home Key > >... -
Page 85: Note Pad
Touch and hold a folder or file to select, rename, delete it or view its properties. 3. Touch your desired file to launch the associated application. Note Pad Note pad is for your memos. Touch the Home Key > >... -
Page 86: Stopwatch
• The My Rentals tab displays your recent movie rentals. You can stream them for online watching or download them to watch offline. • The Personal Videos tab displays videos from other sources. Touch one video to play it. Stopwatch 1. -
Page 87: Calling A Contact With Voice Dialer
Calling a Contact With Voice Dialer Touch the Home Key > > Voice Dialer. When you see “Listening”, say “Call” followed by the name and label of contact you want to call. For example, say “Call John Doe Mobile”. Calling a Phone Number With Voice Dialer Touch the Home Key >... -
Page 88: For Your Safety
For Your Safety General Safety • Don’t make or receive handheld calls while driving. And never text while driving. • Don’t use at gas stations. • Keep your phone at least 1.5 cm away from your body while making calls. •... -
Page 89: Radio Frequency (Rf) Energy
• Don’t rely on your phone for emergency communications. Radio Frequency (RF) Energy This model phone meets the government’s requirements for exposure to radio waves. This phone is designed and manufactured not to exceed the emission limits for exposure to radio frequency (RF) energy set by the Federal Communications Commission of the U.S. -
Page 90: Fcc Compliance
FCC requirements.) While there may be differences between the SAR levels of individual N860 phones and at various positions, they all meet the government requirement. The FCC has granted an Equipment Authorization for this model phone with all reported SAR levels evaluated as in compliance with the FCC RF exposure guidelines. - Page 91 device may not cause harmful interference, and (2) this device must accept any interference received, including interference that may cause undesired operation. CAUTION: Changes or modifications not expressly approved by the manufacturer could void the user’s authority to operate the equipment. NOTE: This equipment has been tested and found to comply with the limits for a Class B digital device, pursuant to part 15 of the FCC Rules.
-
Page 92: Using Your Phone With A Hearing Aid Device
• Consult the dealer or an experienced radio/TV technician for help. Using Your Phone With a Hearing Aid Device Your N860 is compliant with the FCC Hearing Aid Compatibility (HAC) requirements. For additional HAC information, including the HAC rating of this product, please refer to www.zteusa-support.com. - Page 93 happens to be vulnerable to interference, you may not be able to use a rated phone successfully. Trying out the phone with your hearing device is the best way to evaluate it for your personal needs. M-Ratings: Phones rated M3 or M4 meet FCC requirements and are likely to generate less interference with hearing devices than phones that are not labeled.
-
Page 94: Turning On The Hac Setting
Hearing Aid Device” on page 91. This section applies to T-Rating only and hearing aids that contain telecoils. When the HAC setting is on, your N860 sends the audio from your phone calls to the telecoil rather than to the microphone of your hearing aid. You are likely to hear calls much better because volume is increased and background noise and feedback are diminished. -
Page 95: Operating Machinery
an accident. You must comply with local laws and regulations restricting the use of wireless devices while driving. Operating Machinery Full attention must be given to operating the machinery in order to reduce the risk of an accident. Product Handling General Statement on Handling and Use You alone are responsible for how you use your phone and any consequences of its use. -
Page 96: Small Children
aerosols to clean the device or its accessories. • Do not paint your phone or its accessories. • Do not attempt to disassemble your phone or its accessories, only authorized personnel can do so. • Do not expose your phone or its accessories to extreme temperatures, minimum - [5] and maximum + [50] degrees Celsius. -
Page 97: Antenna
Antenna GPS antenna Bluetooth antenna Main antenna Do not touch the antenna unnecessarily. Normal Use Position When placing or receiving a phone call, hold your phone to your ear, with the bottom towards your mouth. Antenna... -
Page 98: Air Bags
Antenna Air Bags Do not place a phone in the area over an air bag or in the air bag deployment area as an airbag inflates with great force and serious injury could result. Store the phone safely before driving your vehicle. Seizures/Blackouts The phone can produce a bright or flashing light. -
Page 99: Repetitive Strain Injuries
Repetitive Strain Injuries To minimize the risk of Repetitive Strain Injury (RSI) when texting or playing games with your phone: • Do not grip the phone too tightly. • Press the buttons lightly. • Use the special features which are designed to minimize the times of pressing buttons, such as Message Templates and Predictive Text. -
Page 100: Electrical Safety
Electrical Safety Accessories Use only approved accessories. Do not connect with incompatible products or accessories. Take care not to touch or allow metal objects, such as coins or key rings, to contact or short-circuit in the battery terminals. Connection to a Car Seek professional advice when connecting a phone interface to the vehicle electrical system. -
Page 101: Radio Frequency Interference
Radio Frequency Interference General Statement on Interference Care must be taken when using the phone in close proximity to personal medical devices, such as pacemakers and hearing aids. Pacemakers Pacemaker manufacturers recommend that a minimum separation of 15 cm be maintained between a mobile phone and a pacemaker to avoid potential interference with the pacemaker. -
Page 102: Medical Equipment
Medical Equipment Switch off your wireless device when requested to do so in hospitals, clinics or health care facilities. These requests are designed to prevent possible interference with sensitive medical equipment. Aircraft Switch off your wireless device whenever you are instructed to do so by airport or airline staff. -
Page 103: Blasting Caps And Areas
Areas with potentially explosive atmospheres include fuelling areas, below decks on boats, fuel or chemical transfer or storage facilities, areas where the air contains chemicals or particles, such as grain, dust, or metal powders. Blasting Caps and Areas Power off your mobile phone or wireless device when in a blasting area or in areas posted where you are told to power off “two-way radios”... -
Page 104: Consumer Limited Warranty
Consumer Limited Warranty ZTE ("Seller") offers you a limited warranty that the enclosed product or products (the "Product") will be free from defects in material and workmanship for a period that expires one year from the date of sale of the Product to you, provided that... - Page 105 sale or receipted invoice which evidences that the subject Product is within the one year warranty period. After the one year warranty period, you must pay all shipping, parts and labor charges. In the event that the product is deemed un-repairable or has been removed from the list of products supported by the Seller, you will only be liable for shipping and labor charges.
- Page 106 the Product is not specified to tolerate, including damage caused by mishandling, shipping and blown fuses; (ix) consumables (such as fuses); or (x) any Product which has been opened, repaired, modified or altered by anyone other than Seller or a Seller authorized service center. USE ONLY SELLER APPROVED ACCESSORIES WITH SELLER PHONES.
- Page 107 REPAIR OR REPLACEMENT OF A DEFECTIVE PRODUCT OR REFUND OF THE PURCHASE PRICE RELATING TO A DEFECTIVE PRODUCT, AS PROVIDED UNDER THIS WARRANTY, ARE YOUR SOLE AND EXCLUSIVE REMEDIES FOR BREACH OF THE LIMITED WARRANTY, AND SUBJECT TO THIS WARRANTY, THE PRODUCTS ARE APPROVED AND ACCEPTED BY YOU "AS IS".
- Page 108 For warranty service information, please call the following telephone number: 1-877-817-1759 or return to the point of sale for the products. The retailer can return the units to ZTE authorized service center in US for repair service. IMPORTANT: Please provide warranty information (proof of purchase) to ZTE in order to receive warranty service at no charge.
Need help?
Do you have a question about the N860 and is the answer not in the manual?
Questions and answers