elero TempoTel 2 Operating Instructions Manual
Hide thumbs
Also See for TempoTel 2:
- Operating instructions manual (21 pages) ,
- Operating instructions manual (20 pages) ,
- Operating instructions manual (38 pages)

Related Manuals for elero TempoTel 2


Summary of Contents for elero TempoTel 2
- Page 1 TempoTel 2 Nr. 282650001, 282660001, 282670001 0682 Original Bedienungsanleitung Operating instructions (translation) 182020001/0810 DE/GB...
-
Page 2: Table Of Contents
Weitere Sender einlernen ............21 Endlagen anfahren Rollladen/Markise/Jalousie......22 Zwischenpositionen für Rollladen/Markise/Jalousie ....23 Positionen löschen/Sender löschen.......... 24 Batteriewechsel................25 Reinigung ..................25 Entsorgung ................... 25 Hinweise für die Fehlersuche ............. 26 Hinweise zur Reparatur ............... 27 EG-Konformitätserklärung............28 Adresse ..................28 DE-2 www.elero.com... -
Page 3: Sicherheitshinweise
Das Gerät enthält verschluckbare Teile. Transport Sollten Sie das Gerät trotz fachgerechter Verpackung beschädigt erhalten, darf es nicht in Betrieb genommen werden. Reklamieren Sie Beschädigungen sofort beim Transportunternehmen. Installation Bei der Installation alle Vorschriften beachten. www.elero.com DE-3... -
Page 4: Sicherheitshinweise Funkbetrieb
Die Reichweite vom Funksignal ist durch den Gesetzgeber und die baulichen Bedingungen begrenzt. Bestimmungsgemäße Verwendung Der TempoTel 2 ist ein Mehrkanal-Sender. Dieser kann unidirektional (kompatibel mit dem bisherigen ProLine-Programm) oder bidirektional verwendet werden. Der Handsender darf nur zur Steuerung von Rollladen-, Jalousie- und Sonnenschutzanlagen benutzt werden, die mit elero-Funkempfängern ausgestattet sind. -
Page 5: Haftungsausschluss
Einsätze, Veränderungen am Gerät, unsachgemäßes Handeln, Nichtbeachten der Anleitung entstehen, übernimmt die elero GmbH keinerlei Haftung. Die Sachmängelhaftung ist in solchen Fällen ausgeschlossen. Lieferumfang TempoTel 2 (Batterien sind im Gerät enthalten), Wandhalterung, 2 Dübel, 2 Schrauben. Technische Daten Gerätebezeichnung TempoTel 2... -
Page 6: Montage Wandhalterung
Leitungen treffen! Vor der Montage an der gewünschten Montageposition die einwandfreie Funktion von Sender und Empfänger prüfen. Die Halterung mit den beigelegten Dübeln und Schrauben an der Wand befestigen. Das Oberteil vom Wandhalter ist verschiebbar. DE-6 www.elero.com... -
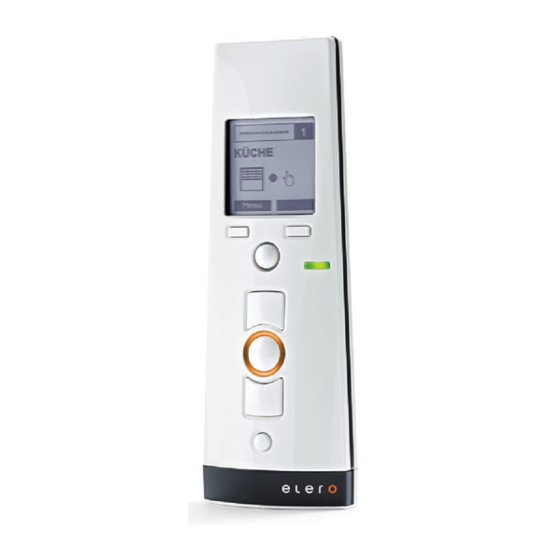
Page 7: Geräteerklärung
Geräteerklärung Gerätevorderseite 1 Display 2 Linke Menütaste 3 Rechte Menütaste 4 Joystick 5 Betriebsmodus-Anzeige 6 AUF-Taste 7 STOPP-Taste 8 Statusanzeige 9 AB-Taste 10 Auswahltaste Geräterückseite 11 Lerntaste P www.elero.com DE-7... -
Page 8: Funktionserklärung
Weitergabe des Funksignals von Funkempfänger zu Funkempfänger ist nicht möglich. Inbetriebnahme Mit einem Tastendruck wird der Handsender eingeschaltet, Display, Statusanzeige und Betriebsmodus-Anzeige leuchten auf. Bei der Erstinbetriebnahme ist der Handsender im Automatikmodus. HINWEIS Bei der Erstinbetriebnahme die gewünschte Sprache in der Menüführung wählen! DE-8 www.elero.com... -
Page 9: Werkseinstellungen
Zeitschaltbefehl AB) Produktwahl Rollladen HINWEIS Kanalbezogene Einstellungen sind nur verfügbar, wenn mindestens ein Kanal eingelernt wurde. Achtung: Durch die Bestätigung "Werkseinstellungen“ im Menü FUNKTION wird der Handsender zu Werkseinstellungen für alle internen Einstellungen zurückgesetzt (“Einstellungen“, “Programm“), außer Kanallöschen. www.elero.com DE-9... -
Page 10: Joystick
10 Kanälen ausgewählt werden. Die Kanäle werden im Display mit der Kanalnummer angezeigt. Ein zusätzlicher Kanal ist für den Zentralbefehl reserviert, der automatisch allen Einzelkanälen zugewiesen wird. Die Anwahl des Zentralkanals erfolgt mit dem Joystick durch kurzes Betätigen nach links. DE-10 www.elero.com... -
Page 11: Auswahltaste
Zentralkanal wird der Betriebsmodus AUTO oder MANUELL für alle Einzelkanäle geändert. Ein unterschiedlicher Betriebsmodus von Einzelkanälen (AUTO und MANUELL), angezeigt durch die orange Betriebsmodus-Anzeige und im Display mit A+M, wird beim Umschalten für alle Kanäle auf den Betriebsmodus AUTO gesetzt. www.elero.com DE-11... -
Page 12: Betriebsmodus
Kanal-Nr./ Bezeichnung Betriebsmodus/Zustands- symbol Schaltzeitart/nächste Schaltzeit Durch Drücken der Menütaste “Timer“ kann die Aktivierung der automatischen Zeitschaltfunktion für den Kanal ein- oder ausgeschaltet werden. Fahrt auf Stoppzustand Fahrt ab Windsperre Endlage oben Timerfunktion ein Endlage unten Astrofunktion ein DE-12 www.elero.com... -
Page 13: Menüstruktur
Menüstruktur www.elero.com DE-13... -
Page 14: Menümodus
90 Sek. nicht benutzt werden, wird das Menü automatisch wieder in den Betriebsmodus verlassen. Menü DATUM/UHRZEIT Datum und Uhrzeit einstellen. Schaltzeiten Kanal 4 Für die Nutzung automatischer Schaltbefehle ist eine aktuelle Einstellung notwendig. Schaltzeit-Beispiel: 07 : 25 20 : 15 Zurück Ändern DE-14 www.elero.com... - Page 15 Abfahren durch die Astrofunktion. Eine individuelle, der örtlichen Gegebenheit angepasste Schaltzeit für das Abfahren kann durch das Einstellen einer Astro- verschiebung (siehe Einstellungen) erreicht werden. Sperrzeit Verhindert ein zu frühes Auf- oder Abfahren durch die Astrofunktion. www.elero.com DE-15...
-
Page 16: Menü Einstellungen
Funkkanäle bestehen. Für unidirektionale Funkübertragungen ist die Gruppenzuordnung nicht möglich. Menü EINSTELLUNGEN Funktionen nach eigenen Wünschen anpassen. Die ausgewählte Anpassung wird im Menü durch einen Scrollbalken hervorgehoben. Globale Einstellungen Einstellungen für Urlaub, Astroverschiebung, Sprache, Beleuchtung und Sommer-/Winter-Zeit gelten für alle Kanäle. DE-16 www.elero.com... -
Page 17: Kanalbezogene Einstellungen
Die folgenden Einstellungen gelten für je einen Kanal. Mögliche Laufzeit zur Zwischenposition: von 0 bis 360 Sekunden, Laufzeit zur Lüftungsposition: Rollladen 0 bis 120 Sekunden, Jalousie 0 bis 180. Die Zwischen-/Lüftungs-/Wendeposition kann auch programmiert werden. Einlernen ist auch am Empfänger möglich. www.elero.com DE-17... - Page 18 Nach Auswahl von einem Kanal kann eine Laufzeit für das Anfahren einer Lüftungsposition (Rollladen) bzw. Wendeposition (Jalousie) aus der unteren Endposition in 0,1 s-Schritten eingestellt werden. Anfahren der Lüftungs- oder Wendeposition (nach der eingestellten Laufzeit): kurze Doppelbetätigung der AUF-Taste. Werkseitig ist die Lüftungspositions-Laufzeit 0 (---). DE-18 www.elero.com...
- Page 19 Ein zeitgesteuerter Abfahrbefehl schaltet die Beschattungs- automatik aus. Ein zeitgesteuerter Auffahrbefehl schaltet die Beschattungsautomatik wieder ein. Vorausgesetzt die Einstellung Beschattung steht auf “Automatik ein“. Werkseitig ist die Einstellung Beschattung auf “Automatik aus“. Für unidirektionale Kanäle ist nur eine gemeinsame Einstellung möglich. www.elero.com DE-19...
-
Page 20: Werkseinstellung
Ab-Richtung. 4. Sofort (max. 1 Sek.) nach Beginn einer Abfahrt die AB-Taste drücken. Die Statusanzeige leuchtet kurz auf. Der Behang bleibt stehen. Der Kanal vom Sender ist eingelernt. HINWEIS Stoppt der Behang nicht, muss das Einlernen wiederholt werden. DE-20 www.elero.com... -
Page 21: Weitere Sender Einlernen
Senderkanal im Lernmodus in den Gruppenmodus. Der Gruppenmodus wird an der Statusanzeige durch Flackern mit Pausen angezeigt. Das Einlernen im Gruppenmodus wird nach 2 min Pause oder 6 Sekunden langem Drücken der Stopp-Taste beendet. www.elero.com DE-21... -
Page 22: Endlagen Anfahren Rollladen/Markise/Jalousie
Endlage/die Markise fährt ein. Obere Endlage anfahren (Jalousie) Die AUF-Taste so lange drücken, bis die Statusanzeige kurz aufleuchtet. Der Behang fährt in die obere Endlage. Die AUF-Taste nur kurz (Tippbetrieb) drücken, der Behang fährt kurz an und stoppt wieder. DE-22 www.elero.com... -
Page 23: Zwischenpositionen Für Rollladen/Markise/Jalousie
1. Den Behang mit der AUF-Taste soweit in AUF-Richtung fahren, bis sich die Lüftungsschlitze öffnen, bzw. die Lamellenwendung erreicht ist. Während der Fahrt die AUF-Taste gedrückt halten. 2. Die STOPP-Taste zusätzlich drücken. Der Behang stoppt. Die Statusanzeige leuchtet kurz auf. Die Lüftungsposition/Wendeposition ist programmiert. www.elero.com DE-23... -
Page 24: Zwischenposition Anfahren
2. Diese Tastenkombination ca. 3 Sek. gedrückt halten. Die Statusanzeige leuchtet kurz auf. Senderkanal im Empfänger löschen 1. Die STOPP-Taste und zusätzlich die Lerntaste P drücken (Geräterückseite). 2. Diese Tastenkombination ca. 6 Sek. gedrückt halten, bis die Statusanzeige kurz orange und dann rot aufleuchtet. Im DE-24 www.elero.com... -
Page 25: Alle Sender Im Empfänger Löschen
3. Die neuen Batterien lagerichtig einlegen. 4. Das Gerät wieder zusammenbauen. Verbrauchte Batterien fachgerecht entsorgen. Reinigung Das Gerät mit einem feuchten Tuch reinigen. Kein Reinigungsmittel verwenden. Dieses kann den Kunststoff angreifen. Entsorgung Das Gerät nach dem letzten Gebrauch nach den geltenden Vorschriften entsorgen. www.elero.com DE-25... -
Page 26: Hinweise Für Die Fehlersuche
Uhrzeit einstellen Schaltbefehle nicht eingestellt 2. Betriebsmodus 2. Betriebsmodus "MANUELL“ ist "AUTO“ einstellen eingestellt 3. Kanalbezogene 3. Zeitschalt- Aktivierung der funktion für den Zeitschaltfunktion Kanal aktivieren fehlt Handsender führt Urlaubsfunktion ist Urlaubsfunktion eingestellte eingeschaltet ausschalten Schaltbefehle ungenau aus DE-26 www.elero.com... -
Page 27: Hinweise Zur Reparatur
Schaltbefehle Hinweise zur Reparatur Bei Rückfragen wenden Sie sich bitte an Ihren Fachbetrieb. Bitte immer folgendes angeben: Artikelnummer und Artikelbezeichnung auf Typenschild Art des Fehlers Vorausgegangene ungewöhnliche Vorkommnisse Begleitumstände Eigene Vermutung www.elero.com DE-27... -
Page 28: Eg-Konformitätserklärung
MonoTel 2 (-868) alle Varianten (Progreso1) LumeroTel 2 (-868) alle Varianten (Progreso1M) VarioTel 2 (-868) alle Varianten (Progreso5M) TempoTel 2 (-868) alle Varianten Beschreibung: Funkhandsender für bidirektionale Kommunikation zwischen Sender und Empfänger zur Steuerung von Rollläden, Markisen und Jalousien. - Page 29 TempoTel 2 Nr. 282650001, 282660001, 282670001 0682 Operating instructions (translation) 182020001/0810 DE/GB...
- Page 30 Intermediate positions for roller shutters / awnings / venetian blinds..................23 Deleting positions/deleting transmitter ........24 Battery replacement ..............25 Cleaning ..................25 Disposal ..................25 Notes on troubleshooting ............26 Notes on repair................27 EC Declaration of conformity ............. 28 Address..................28 GB-2 www.elero.com...
-
Page 31: Safety Instructions
The device contains small parts which can be swallowed. Transport Should you receive the device in a damaged condition despite proper packaging, you must not put it into operation. Complain about the damage to the transport company immediately. www.elero.com GB-3... -
Page 32: Safety Instructions For Radio Operation
The range of the radio signal is limited by the government and the structural conditions. Intended use The TempoTel 2 is a multi-channel transmitter. This can be used unidirectionally (compatible with the existing ProLine program) or bidirectionally. The hand-held transmitter should only be used for... -
Page 33: Exclusion Of Liability
Other use, or use beyond this is not considered to be use for intended purpose. In this guide the manual transmitter is referred to as "device". Exclusion of liability elero GmbH assumes no liability for personal injuries, property damage and financial losses which arise from modifications to the device, improper use and a failure to observe the instructions. -
Page 34: Mounting Of Wall Bracket
Before installing the unit in the required position, check that the transmitter and receiver are functioning perfectly. Attach the bracket to the wall with the dowels and screws provided. The top part of the wall bracket can be moved. GB-6 www.elero.com... -
Page 35: Device Explanation
1 Display 2 Left menu button 3 Right menu button 4 Joystick 5 Operating mode display 6 UP button 7 STOP button 8 Status display 9 DOWN button 10 Selection button Back of device 11 Programming button P www.elero.com GB-7... -
Page 36: Explanation Of Functions
Press a button to switch on the hand-held transmitter and illuminate the display, status display and operating mode display. The hand- held transmitter is in automatic mode during initial operation. NOTE Select the required language by navigating the menu during initial operation. GB-8 www.elero.com... -
Page 37: Factory Settings
Settings according to channels are only available if at least one channel has been programmed. Notice: Confirming “Factory settings” in the menu FUNCTION restores all the internal settings of the hand-held transmitter to the factory settings (“Settings”, “Program”) except the setting for deleting the channel. www.elero.com GB-9... - Page 38 10 channels. The channels are indicated by channel number in the display. An additional channel is reserved for the central command, to which all the individual channels are assigned automatically. You can select the central channel by moving the joystick briefly to the left. GB-10 www.elero.com...
- Page 39 Switching all the channels to AUTO operating mode sets a different operating mode for individual channels (AUTO and MANUAL),as indicated by the orange operating mode display and the letters A+M in the display. www.elero.com GB-11...
-
Page 40: Operating Mode
Switching time type/next switching time Pressing the menu button “Timer” can activate or deactivate the automatic timed switching function for the channel. Stop status Down Wind interlock Top end position Timer function on Bottom end position Astro function on GB-12 www.elero.com... -
Page 41: Menu Structure
Program position switching command mode Priority Priority automatic commands on/off Activating automatic shading Shading system with time up on/off Restoring all the settings to the factory settings Factory settings Function (without change of channel assignment) Version Version details www.elero.com GB-13... -
Page 42: Menu Mode
90 seconds, the menu is automatically left in operating mode again. DATE/TIME menu Setting the date and time. Switch times channel 4 Using the automatic switching commands requires a current setting. Switching time example: 07 : 25 20 : 15 Change Back GB-14 www.elero.com... - Page 43 An individual switching time, adjusted to local conditions, for movement down can be achieved by setting an Astro offset (see settings). Lock time This prevents movement up or down in accordance with the Astro function occurring too soon. www.elero.com GB-15...
-
Page 44: Settings Menu
Settings for holidays, Astro offset, language, lighting and summer/winter time apply to all channels. Holiday The holiday function simulates an occupied house while you are on holiday. If this function is active, all the programmed switching times are delayed by 0-30 min. at random. GB-16 www.elero.com... -
Page 45: Settings For Specific Channels
Possible run time for intermediate position: from 0 to 360 seconds, run time for ventilation position: roller shutters 0 to 120 seconds, venetian blinds 0 to 180. In addition, you can program intermediate/ventilation/tilting positions. You can also program on the receiver. www.elero.com GB-17... - Page 46 (venetian blinds) from the bottom end position in 0.1-second steps. Approaching the ventilation or tilting position (according to the set run time): touch the UP button briefly twice. The ventilation position run time is set at 0 (---) at the factory. GB-18 www.elero.com...
- Page 47 A time controlled movement up command switches the automatic shading system on again, provided the shading setting is “Automatic on”. The shading setting is set at “Automatic off” at the factory. In unidirectional channels only a common setting is possible. www.elero.com GB-19...
-
Page 48: Factory Setting
The blind stops. The transmitter channel is programmed. NOTE If the blind does not stop, it must be programmed again. Programming additional transmitters NOTE If several receivers are connected to the same feed line, then all are simultaneously in programming mode. GB-20 www.elero.com... - Page 49 Programming in group mode is completed after a 2-minute pause or pressing the stop button for 6 seconds. NOTE For venetian blinds, a jogging mode for quickly reaching receivers which are further away is not possible in a transmitter channel with more than 10 programmed receivers. www.elero.com GB-21...
-
Page 50: Approaching Limit Positions Of Roller Shutter / Awning / Venetian Blind
Approaching the upper end position (venetian blind) Press the UP button until the status display lights up briefly. The blind approaches the upper end position. Only press the UP button briefly (jogging mode) and the blind moves a short distance and stops again. GB-22 www.elero.com... -
Page 51: Intermediate Positions For Roller Shutters / Awnings / Venetian
Keep pressing the UP button while it is moving. 2. In addition press the STOP button. The blind will stop. The status display lights up briefly. The ventilation/tilting position is programmed. www.elero.com GB-23... -
Page 52: Deleting Positions/Deleting Transmitter
1. Press both the STOP button and the programming button P (on the back of the device). 2. Hold down this button combination for approx. 6 seconds until the status display lights up orange briefly and then red. In GB-24 www.elero.com... -
Page 53: Battery Replacement
4. Put the device back together again. Dispose of used batteries properly. Cleaning Clean the device with a damp cloth. Do not use a detergent. This may attack the plastic. Disposal Dispose of the device in accordance with the applicable regulations. www.elero.com GB-25... -
Page 54: Notes On Troubleshooting
3. Activate the switching functions timed switching for specific function for the channels are not channel. activated The hand-held Holiday function is Switch holiday transmitter does switched on function off not carry out the set switching commands accurately. GB-26 www.elero.com... -
Page 55: Notes On Repair
Please contact your dealer if you have any queries. Please provide the following information: Item number and name: on the type plate Type of fault Previously occurring unusual events Accompanying Own presumption conditions www.elero.com GB-27... -
Page 56: Ec Declaration Of Conformity
MonoTel 2 (-868) all versions (Progreso1) LumeroTel 2 (-868) all versions (Progreso1M) VarioTel 2 (-868) all versions (Progreso5M) TempoTel 2 (-868) all versions Description: Radio hand-held transmitters for bidirectional communication between transmitters and receivers to control roller shutters, awnings and venetian blinds.
Need help?
Do you have a question about the TempoTel 2 and is the answer not in the manual?
Questions and answers