Table of Contents
Advertisement
Advertisement
Table of Contents

Related Manuals for Focusrite Scarlett solo


Summary of Contents for Focusrite Scarlett solo
-
Page 1: User Guide
User Guide www.focusrite.com FFFA001168-01... -
Page 2: Important Safety Instructions
IMPORTANT SAFETY INSTRUCTIONS 1. Read these instructions. 2. Keep these instructions. 3. Heed all warnings. 4. Follow all instructions. 5. Do not use this apparatus with water. 6. Clean only with dry cloth. 7. Do not install near any heat sources such as radiators, heat registers, stoves, or other apparatus (including amplifiers) that produce heat. 8. Protect the power cord from being walked on or pinched particularly at plugs, convenience receptacles, and the point where they exit from the apparatus. 9. Only use attachments/accessories specified by the manufacturer. 10. Use only with the cart, stand, tripod, bracket, or table specified by the manufacturer, or sold with the apparatus. When a cart is used, use caution when moving the cart/ apparatus combination to avoid injury from tip-over. -
Page 3: Environmental Declaration
ENVIRONMENTAL DECLARATION Compliance Information Statement: Declaration of Compliance procedure Product Identification: Focusrite Scarlett Solo Studio Responsible party: American Music and Sound Address: 4325 Executive Drive Suite 300 Southaven, MS 38672 Telephone: 800-431-2609 This device complies with part 15 of the FCC Rules. Operation is subject to the following two conditions: (1) This device may not cause harmful interference, and (2) this device must accept any interference received, including interference that may cause undesired operation. For USA To the User: 1. Do not modify this unit! This product, when installed as indicated in the instructions contained in this manual, meets FCC requirements. Modifications not expressly approved by Focusrite may void your... -
Page 4: Table Of Contents
TABLE OF CONTENTS IMPORTANT SAFETY INSTRUCTIONS . . . . . . . . . . . . . . . . . . . . . . . . . . . . . . . . . . . . . . . . . . . . . . 2 OVERVIEW . -
Page 5: Overview
OVERVIEW Introduction Thank you for purchasing the Scarlett Solo Studio package, part of the range of Focusrite professional computer audio interfaces incorporating high quality, Focusrite analogue pre-amplifiers. You now have a simple, compact and complete solution for recording with a microphone or directly from instruments, by routing high quality audio to and from your computer. This User Guide provides a detailed explanation of the components to help you achieve a thorough understanding of the Scarlett Solo’s operational features. We recommend that whether you are new to computer recording or a more experienced user, you should take the time to read through the user guide so that you are fully aware of all the possibilities that the Scarlett Solo Studio components and accompanying software has to offer. If the main User Guide sections do not provide the information you need, be sure to consult http://www.focusrite.com/answerbase, which contains a comprehensive collection of answers to common technical support queries. Features The Scarlett Solo Studio package comprises a Scarlett Solo computer audio interface, a Scarlett CM25 studio quality condenser microphone, a pair of Scarlett HP60 reference quality headphones and all the necessary software – including Steinberg’s Cubase LE - to get you started with recording... -
Page 6: Box Contents
Box Contents You should find that your Scarlett Solo Studio package comprises: • Scarlett Solo computer audio interface • Scarlett CM25 condenser microphone • Scarlett HP60 headphones • Software Activation card, with codes for accessing the following on-line resources: - USB Drivers for Windows - Scarlett Plug-in Suite for Mac and Windows - Cubase LE - LoopMasters sample library (1 GB) - Novation Bass station - Multi-language User Guides • Red XLR microphone cable (3 m) • USB cable (1.5 m), Type ‘A’ – Type ‘B’ • “Getting Started Guide” System requirements Mac OS Apple Macintosh with a high-speed USB 2.0-compliant USB port OS: Mac OS X 10.8 or 10.9 Windows Windows compatible computer with a USB 2.0-compliant USB port OS: Windows 7 (all versions) or Windows 8 (excluding Windows 8 RT) -
Page 7: Getting Started
GETTING STARTED IMPORTANT PC USERS - PLEASE ENSURE THAT YOU INSTALL THE SCARLETT DRIVERS BEFORE CONNECTING THE INTERFACE TO YOUR COMPUTER. The registration card (“Download your Software”) included with the Scarlett Solo Studio package enables you to download the latest Windows drivers from the Focusrite website. Registering your product To operate correctly with Windows, your Scarlett Solo first needs software drivers to be installed on your computer. These - and several powerful and useful extras - are available for download from the Focusrite website (www.focusrite.com/register). The Software Activation card provided with your Scarlett Solo contains validation codes which you will need to enter at the above web address. This procedure ensures that you will have the most up-to-date software versions. Can’t get started? If you have any trouble with this product do not go back to the place of purchase. Contact our support team on:... -
Page 8: Software Installation
Sound > Sound > Manage Audio Devices Default Playback Recording and confirm that ‘ ’ and ‘ ’ Scarlett Solo USB are set to ‘ ’. Powering the Scarlett Solo The Scarlett Solo is an active device, and needs a DC power source to operate. This will be supplied by the Mac or PC to which it is connected, via the single USB connection. Note that an external power supply is not required. You should experience no problems in powering the Scarlett Solo from the USB ports on any compatible Mac or PC. However, please be aware that USB ports on some laptops may not be able to deliver the same current to externally-connected devices when they are running off their internal batteries, compared to their current capability when running from AC mains. We therefore strongly recommend that if you are using Scarlett Solo with a laptop, please power the laptop from the mains... -
Page 9: Connecting Your Scarlett Solo
Scarlett Solo is compatible with any Windows-based DAW that supports ASIO or WDM and any Mac-based DAW that uses Core Audio. After installing the drivers and connecting the hardware, you can start using Scarlett Solo with the DAW of your choice. Steinberg Cubase LE can be downloaded free of charge once you have registered the product; this will allow you to get started if you do not already have a DAW application installed on your computer. To help you install Cubase LE and get started with it, please go to the following URL where you will find a dedicated article on the subject. http://global.focusrite.com/answerbase/how-to-install-and-activate-cubase-le-7 Focusrite has also prepared a video tutorial to accompany this, which can be found at http://global.focusrite.com/answerbase/video-how-to-install-and-activate-cubase-le-7. Operating instructions for Cubase LE are beyond the scope of this User Guide, but the application includes a full set of Help files. - Page 10 Scarlett driver for Mac or for Windows). Please refer to your DAW’s Solo USB Focusrite Scarlett ASIO documentation (or Help files) if you are unsure where to select the ASIO/Core Audio driver. The Device Setup example below shows the correct configuration in the Cubase LE pane (Mac version shown). Once the Scarlett Solo driver is selected as the preferred Audio Device*, its inputs and outputs will appear in your DAW’s Audio I/O preferences. Depending on your DAW, you may need to enable...
-
Page 11: Example Of Usage
Example of Usage The Scarlett Solo is an ideal audio interface for many DAW applications running on a laptop or other computer, PC or Mac. A typical set of connections is illustrated below: Connecting a microphone/instrument This setup illustrates a typical configuration for recording using DAW software on your Mac or PC. In this case, you might record vocals through Input 1 and guitar through Input 2 into your recording application, while monitoring the playback via headphones or loudspeakers. Scarlett Solo’s inputs are on the front panel; Input 1 uses a standard 3-pin XLR socket, and is configured to work with microphones of most types; you will find a mating XLR male connector on the end of the mic cable supplied. Input 2 uses a ¼” (6.35 mm) jack socket (2-pole when in instrument mode and 3-pole when used as a line input), and is intended to accept higher level signals from a guitar or bass. -
Page 12: Recording With A Microphone
Recording with a microphone The Scarlett CM25 microphone supplied with Scarlett Solo Studio is a studio quality condenser mic which is ideal for recording vocals and most acoustic instruments. Connect the CM25 to the Scarlett Solo’s Input 1 with the cable supplied. Note that the cable has a male and a female connector; the female end connects to the microphone and the male end to the Scarlett Solo. Condenser microphones (also sometimes referred to as “capacitor” microphones) require a source of DC power to operate. This is almost always supplied by “phantom” powering from the mic pre-amp to which the mic is connected (early and special-purpose condenser mics might have a separate power supply). For the CM25 (or any other condenser mic) to work with the Scarlett Solo, press the 48V button on the front panel (see front panel diagram on page 16, item [3]). We recommend that you follow the following sequence: •... - Page 13 Microphone Dos and Don’ts A guide to microphone technique is beyond the scope of this User Guide (though many excellent books on the subject are available), but if you are new to recording with a studio quality microphone, you need to observe a few golden rules. DO use a mic stand. The CM25 has an industry-standard 5/8” threaded insert which allows it to be mounted on most mic stands. An 3/8” adaptor is included to allow it to be fitted to mic stands that have this thread size. Inexpensive short, long and boom stands are readily available from music stores. DO observe the microphone’s orientation. The CM25 has a cardioid response pattern; this basically means that it has a “front” and a “back”, and if you point it the wrong way round, it will sound awful. This mark (a cardioid response pattern) identifies the front of the microphone.
-
Page 14: Using Direct Monitoring
Using Direct Monitoring You will frequently hear the term “latency” used in connection with digital audio systems. In the case of the simple recording application described above, latency will be the time it takes for your input signals to pass through your recording device (your Mac or PC) and the associated software. Latency can be a problem for a performer who wishes to record while monitoring their input signals. Scarlett Solo is fitted with a “Direct Monitoring” option, which overcomes this problem. Setting the front panel DIRECT MONITOR switch to ON will route your input signals directly to Scarlett Solo’s headphone and main monitor outputs. This enables you to hear yourself with zero latency – i.e., in “real time” – along with the computer playback. The input signals to your computer are not affected in any way by this setting. When “Direct Monitoring” is set to ON, ensure that Cubase LE (or other DAW) is not set to route its input (what you are currently recording) to its output. If it is, you will hear yourself twice, with one signal audibly delayed as an echo. Connecting Scarlett Solo to headphones The Scarlett Solo Studio package includes a pair of high quality headphones, the Scarlett HP60s. They are lightweight and durable, and should prove comfortable to wear for extended periods. The headband is adjustable. The HP60 headphones have a low noise, oxygen-free copper cable, fitted with a ¼” (6.35 mm) 3-pole (TRS) jack plug. This should be connected to the socket at the right hand side of the Scarlett Solo’s front panel (indicated by a symbol). The Scarlett Solo’s headphone output is, of course, suitable for use with other models of headphones. The volume in the headphones can be adjusted by the rotary MONITOR control. Please be aware that headphones are capable of generating very high sound pressure levels at the ear; prolonged exposure to high sound levels may impair your hearing. Never turn headphones volume up any further than necessary. -
Page 15: Connecting Scarlett Solo To Loudspeakers
Connecting Scarlett Solo to loudspeakers The phono (RCA) outputs on the rear panel can be used to connect monitoring speakers. Self-powered monitors (i.e., typical computer speakers) incorporate internal amplifiers, and may be connected directly. Larger, passive loudspeakers will require a separate stereo amplifier; in this case, the rear panel outputs should be connected to the amplifier’s inputs. Powered Monitor Amplifier Alternative methods for connecting monitor speakers. The line output connectors are standard phono (RCA) sockets. Typical consumer (hi-fi) amplifiers and small powered monitors will have inputs on phono (RCA) sockets or a single 3.5 mm 3-pole jack plug (intended for direct connection to a computer). In either case, use a suitable connecting cable with phono plugs (RCA jacks) at one end. NOTE: You run the risk of creating an audio feedback loop if loudspeakers are active at the same time as a microphone! We recommend that you always turn off (or turn down) monitoring loudspeakers while recording, and use headphones when overdubbing. -
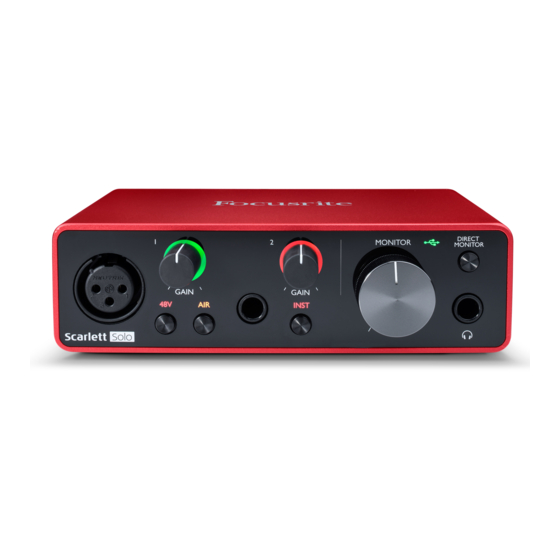
Page 16: Hardware Features
HARDWARE FEATURES Front Panel The front panel includes the input connectors for mic and line/instrument signals, and the input gain and monitoring controls. 1. Input 1 – electronically balanced input via 3-pin XLR socket for microphones. 2. 01 – adjust the gain for the microphone signal at input 1. The gain control has a concentric bi-colour LED ‘ring’ to confirm signal level: green indicates an input level of at least -24 dBFS (i.e. ‘signal present’), the ring then turns red when signal level reaches 0 dBFS. -
Page 17: Back Panel
Back Panel 1. Kensington security lock – secure your Scarlett to a suitable structure if desired. 2. USB 2 .0 port – Type B connector; connect to your laptop or computer with the USB cable supplied. 3. LINE OUTPUTS - 2 x phono (RCA) sockets; +9 dBu max. output level. -
Page 18: Specifications
SPECIFICATIONS Performance Specifications Clock source: Internal 106 dB ‘A-weighted’ (all inputs). Converter chipset A/D ADC Dynamic Range dynamic range 114 dB Range 106 dB ‘A-weighted’ (all outputs). Converter chipset DAC Dynamic Range D/A dynamic range 114 dB 44.1 kHz, 48 kHz, 88.2 kHz, 96 kHz / 24 bit – operation with Supported Sample Rates Mac and PC Microphone Input Frequency Response 20 Hz to 20 kHz +/-0.3 dB Gain Range -4 dB to +46 dB -97 dB Noise (EIN) - 125 dB Dynamic Range 106 dB (A-weighted) Max. Input level +4 dBu Instrument Input Frequency Response... -
Page 19: Physical And Electrical Characteristics
Line Outputs -100 dB Noise (Equivalent Output Noise) -92 dB, Noise = -97 dB (A-weighted) Dynamic Range 106 dB Max. Output Level +9 dBu, unbalanced Headphone Output -100 dB Dynamic Range 106 dB Max. Output Level +10 dBu (no load) Physical and Electrical Characteristics Analogue Input 1 Connector Balanced, via female 3-pin XLR on front panel Phantom power 48 V phantom power switch Analogue Input 2 ¼” (6.35 mm) jack socket on front panel Connector Instrument mode: Unbalanced, 2-pole Line input mode: Balanced, 3-pole Analogue Outputs Unbalanced, via 2 x phono (RCA) sockets on Main outputs rear panel Stereo headphone output... -
Page 20: Scarlett Cm25 Microphone Specifications
Scarlett CM25 Microphone Specifications Capsule Type 20 mm dia. condenser element Response type Cardioid Mounting Standard 5/8” female; 3/8” adaptor supplied Performance Frequency response 30 Hz to 20 kHz Sensitivity -36 dB ±2 dB (0 dB = 1 V/Pa) Self noise 18 dBA Maximum SPL 130 dB (1 kHz) S/N ratio 76 dB (A-weighted) Impedance 150 ohms Power Via 48 V phantom supply Scarlett HP60 Headphones Specifications Type Closed Driver diameter 53 mm Impedance 60 ohms Sensitivity SPL 94 dB ±3 dB Frequency response 10 Hz to 30 kHz Max. power rating 1.2 W Cable length... -
Page 21: Troubleshooting
TROUBLESHOOTING For all troubleshooting queries, please visit the Focusrite Answerbase at www.focusrite.com/answerbase where you will find articles covering numerous troubleshooting examples. COPYRIGHT AND LEGAL NOTICES Focusrite is a registered trade mark and Scarlett Solo and Scarlett Solo Studio are trade marks of Focusrite Audio Engineering Limited. All other trade marks and trade names are the property of their respective owners. 2014 © Focusrite Audio Engineering Limited. All rights reserved.
Need help?
Do you have a question about the Scarlett solo and is the answer not in the manual?
Questions and answers