Table of Contents
Advertisement
Advertisement
Table of Contents

Related Manuals for Sans Digital Towerraid 6G series


Summary of Contents for Sans Digital Towerraid 6G series
- Page 2 Copyright Copyright © 2013 Sans Digital. This document contains materials protected by International Copyright Laws. All rights reserved. No part of this manual may be reproduced, transmitted or transcribed in any form and for any purpose without the express written permission of Sans Digital. Trademarks Companies and products mentioned in this manual are for identification purpose only. Product names or brand names appearing in this manual may or may not be registered trademarks or copyrights of their respective owners. Backup your important data before using Sans Digital's products and use at your own ...
-
Page 3: Table Of Contents
Table of Contents Sans Digital TowerRAID SATA 6G to eSATA 6G Port Multiplier ............ 5 Overview ............................ 5 Sans Digital 2nd Generation SATA 6Gb/s PCI‐E 2.0 RAID Controller ........... 5 Chapter 1 ‐ Features and Specifications .................. 6 Hardware Specifications ...................... 6 Monitor, Alerts and LED Indicators ..................... 6 Advanced RAID Features ...................... 6 Operating System Support ...................... 6 Chapter 2 ‐ Physical Specifications .................... 7 Chapter 3 ‐ Kit Contents ........................ 8 Chapter 4 ‐ Hardware Description and Installation ................. 9 4.1 RocketRAID 642L Host Adapter board layout .............. 9 4.2 Installing the RocketRAID 642L Host Adapter .............. 9 4.3 Verifying Installation ...................... 10 Chapter 5 ‐ RocketRAID 642L BIOS Utility .................. 11 5.1 BIOS Settings Overview .................... 11 5.2 Using the BIOS Utility .................... 11 5.3 BIOS Commands ...................... 12 5.4 Creating RAID Arrays ..................... 14 5.5 Delete Arrays ........................ 23 ... - Page 4 7.1.1 Install the Web RAID Management Software ............ 40 7.1.2 Uninstall the Web RAID Management Software ........... 44 7.2 Installing / Uninstalling the Web RAID Management Software ‐ Linux ...... 46 7.2.1 Install the Web RAID Management Software ............ 46 7.2.2 Uninstall the Web RAID Management Software ............ 46 7.3 Using the Web RAID Management Software .............. 46 4 ...
-
Page 5: Sans Digital Towerraid Sata 6G To Esata 6G Port Multiplier
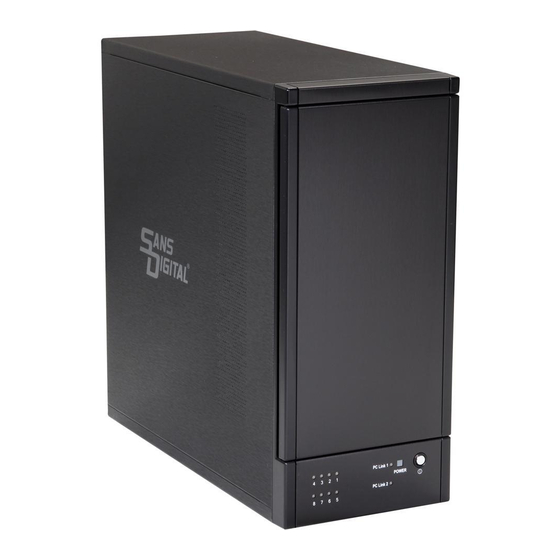
Sans Digital TowerRAID SATA 6G to eSATA 6G Port Multiplier Overview Sans Digital 4 bay / 5 bay / 8 Bay TowerRAID 6G Storage Sans Digital’s TowerRAID 6G port multiplier (PM) Storage tower utilize latest SATA 6G technology, with 6G port multiplier, using a single cables connect to 4 drives (TR4M6G) or 5 drives (TR5M6G), or two cables connect to 8 drives (TR8M6G). Bundled second generation 6G controller card provides high bandwidth using PCIe 2.0 x4 connection. TowerRAID 6G PM series provide an easy to setup, manage and high performance storage tower for small or medium sizes business, enterprises, video entertainments and video surveillance in primary or backup storage applications. Sans Digital 2nd Generation SATA 6Gb/s PCI‐E 2.0 RAID Controller All models bundled with Sans Digital’s second generation RocketRAID CONTROLLER (RocketRAID RR642L). It is an high‐performance, 2 ports eSATA 6Gb/s RAID controller supporting port multiplier. The controller utilize a PCI‐Express 2.0 host bus interface x4, Sans Digital's Industry‐proven RAID engine, and support RAID configurations including 0, 1, 5, 10 and JBOD. RocketRAID 642L controller are fully backwards compatible with SATA 3Gb/s devices, PCI‐Express 1.0 and 2.0 motherboards, and are compliant with operating systems including Windows 8 and 7, MAC and Linux. Each RocketRAID 642L controller directly supports up to 2 eSATA ports, and up to 20 when used in conjunction with port multiplier storage devices, TR4M6G, TR5M6G and TR8M6G. 5 ... -
Page 6: Chapter 1 - Features And Specifications
Chapter 1 ‐ Features and Specifications Hardware Specifications • PCI Express 2.0 x4 • 4x SATA 6Gb/s Ports • Industry standard SATA/eSATA/Mini‐SAS connectors • Directly supports 4 SATA devices / Up to 20 with port multiplier capable enclosure • Backwards compatible with Sans Digital SATA RAID CONTROLLER’s • Low Profile Monitor, Alerts and LED Indicators • Hard Drive LED Indicators (Activity and Failed) • SMTP email notification for events and error reporting • Alarm/Buzzer alerts for drive/array failure Advanced RAID Features • RAID 0, 1, 5, 10, 50, JBOD • Redundant RAID Configuration for Array availability • RAID Initialization Types ‐ Background, Foreground, Quick Initialization and Keep Old Data • Spin Down Idle Disk • S.M.A.R.T Support • Auto Rebuild on spare drive • Hot‐Plug and Hot‐Swap support • Larger than 2 TB drive support • Bootable RAID Array support •... -
Page 7: Chapter 2 - Physical Specifications
Chapter 2 ‐ Physical Specifications Dimensions: RocketRAID 642L: 79mm x 67mm x 1.5mm (3.12” x 2.68” x 0.06”) EMI: FCC Part 15 Class B and CE Thermal and Atmospheric Characteristics: Work Temperature Range: +5°C ~ + 55°C Relative Humidity Range: 5% ~ 60% non‐condensing Storage Temperature: ‐20°C ~ +80°C MTBF: 920,585 Hours Electrical Characteristics: PCI‐E 3.3V Power 4W max 1W max 7 ... -
Page 8: Chapter 3 - Kit Contents
Chapter 3 ‐ Kit Contents Each package should content the followings: • TR4M6G / TR5M6G / TR8M6G storage unit • RocketRAID 642L Controller card • Quick Installation Guide • Sans Digital Software CD • Low Profile Bracket eSATA 6Gb/s cables (1pc for TR4M6G and TR5M6G, 2 for TR8M6G) If missing any of the content, please contact info@sansdigital.com . 8 ... -
Page 9: Chapter 4 - Hardware Description And Installation
Chapter 4 ‐ Hardware Description and Installation 4.1 RocketRAID 642L Host Adapter board layout 4.2 Installing the RocketRAID 642L Host Adapter Note: Make sure the system is powered‐off before installing the RocketRAID host adapter. The RocketRAID 642L CONTROLLER may include both standard and low‐profile brackets. It may be necessary to attach the low‐profile bracket in place of the standard bracket, depending upon the chassis design. 1. Open the system chassis and locate an unused PCI‐E 3.0/2.0/1.0 (x4, x8, x16) slot. 2. Remove the PCI‐E slot cover. 3. Gently insert the RocketRAID 642L controller into the PCI‐E slot, and secure the bracket to the system chassis. 9 ... -
Page 10: Verifying Installation
4. After installing the adapter, attach the hard disks or backplane enclosure to the host adapter using the appropriate cables. Note: Many server‐level chassis include hard‐drive hot‐swap bays. For these system chassis, cables are attached to the chassis backplane, rather than directly to each individual hard drive. Consult the chassis manual for proper installation procedures. 5. Close and secure the system chassis. 4.3 Verifying Installation Once the host adapter and hard drives have been installed into the chassis, boot‐up the system to verify that the hardware is properly recognized. 1. Power on the system. If the system detects the presence of the adapter, the RocketRAID BIOS Utility will be displayed during boot up. 2. Press “Ctrl+H” key combination to access the RocketRAID 642L adapter’s BIOS Utility. 10 ... -
Page 11: Chapter 5 - Rocketraid 642L Bios Utility
Chapter 5 ‐ RocketRAID 642L BIOS Utility The RocketRAID 642L controller will display its BIOS screen during the system's boot process. The BIOS Utility will display information about hard drives attached to the adapter. Make sure all attached drives are detected by this utility. If any of the hard drive is not detected, power down the system and check the power and cable connections. Press “Ctrl+H” key combination to access the RocketRAID 642L adapter’s BIOS Utility. 5.1 BIOS Settings Overview The RocketRAID 642L controller BIOS utility is an interface that provides management commands and controller related settings. 5.2 Using the BIOS Utility The following keys are utilized by the RocketRAID 600L600LS BIOS utility: Arrow keys – Use these to move between different menu items. Enter – Open the selected toolbar command/execute the selected command. Esc – Move back to the previous menu, cancel the selected operation, or exit the BIOS Utility. 11 ... -
Page 12: Bios Commands
5.3 BIOS Commands Create: This command is used to open the RAID Creation menu. Delete: This command will delete the selected RAID array. Add/Remove This command is used to assign hard disks to function as spare disks. The controller is Spare capable of using spare disks to automatically rebuild broken or faulted RAID arrays. Settings This command opens the settings menu (To selecting the boot disk/array, staggered drive spin up etc.) View This command is used to view hard disk and RAID information. Initialize This command is used to prepare disks for use with RAID arrays. Disks must be initialized before they can be used to create arrays. 12 ... - Page 13 13 ...
-
Page 14: Creating Raid Arrays
5.4 Creating RAID Arrays Initializing Disks: Before creating a RAID array, the disks must be initialized. Disk initialization writes necessary RAID configuration information to the hard disks. Select the Initialize command from the toolbar, and press Enter key. Highlight the target disks using the arrow keys, then press the Enter key. A numeral will be displayed before each selected disk. Once all target disks have been selected, press ESC key. The utility will display a ... - Page 15 box will appear. Use the keyboard to input a new Array Name, and press the Enter key. 15 ...
- Page 16 Note: The Array Name command is optional – it is not necessary to name the array. The array can be named at a later time, and the name of the array can be changed at any time. 3. On the Create menu, use the arrow keys to highlight the Select Devices item and press Enter key. A device list will appear, and display all available hard disk drives. 4. Highlight the target disks that you want to use, and press Enter key to select them. A numeral will be displayed before each selected disk. This number designates disk order. After all of the disks have been selected and press the ESC key to return to the Create Menu. 5. Next, Use the ↓ arrow key to highlight the Capacity (GB) option and press Enter key. The total 16 ...
- Page 17 17 ...
- Page 18 available capacity will be displayed. Press Enter key if you wish to use all available space. If you wish to reserve disk space for additional arrays/single disks, use the keyboard to input the amount of space (in GB) you wish to set aside for this particular array, and press Enter key. Note: Multiple arrays can be created using the same set of hard disk drives. The Capacity option allows you to set aside disk space that be used to create another array, set as a spare disk, or partitioned to act as a single disk (by the operating system). 6. For redundant RAID arrays (RAID 5, 50), select the Cache Policy: Write Back – Provides higher write performance for redundant RAID arrays. Data is at risk when there is a power failure, system kernel panic and un‐responding abnormal conditions. Write Through – Writes directly to the disks (may reduce the risk of data loss during a critical failure, but at the cost of lower performance). 18 ...
- Page 19 7. Sector Size – Also known as “Variable Sector Size”. Use this option if you are using an older 32‐bit Windows operating system. This allows older operating systems to support volumes over 2TB in size. Do not use if the operating system already supports large volumes (such as GPT). 8. To complete the creation procedure, use the arrow key to highlight the Start Creation item and press Enter key. The Window will show 2 options if create RAID 5: Background Initialize and No initialization. Background The RAID array is accessible while disk initialization is being performed. Initialization: This option will delete all content on the disks. The initialization time will be longer when compared to "Foreground" but the logical drives can be used during the initialization process. 19 ...
- Page 20 20 ...
- Page 21 No initialization: When you select the option, will pop up the following warning window. 9. Press the Y (yes) key to create the array, or N (no) key to cancel the creation process. If you press the Y, BIOS will show the following window. 21 ...
- Page 22 22 ...
-
Page 23: Delete Arrays
5.5 Delete Arrays Highlight the Delete command from the toolbar, and press Enter key. The BIOS utility will display a list of available RAID arrays. Select the array you wish to delete, and press Enter key. The utility will display a warning message. Press Y (yes) to delete the array, or select N (no) to cancel. Warning: All data stored on the array will be lost – do not delete if the array contains critical data. 23 ... - Page 24 24 ...
-
Page 25: Add/Remove Spare Disks
5.6 Add/Remove Spare Disks This Add/Remove Spare command is used to assign a hard disk to act as a Spare Disk. Spare Disks are used to automatically rebuild Redundant RAID arrays (RAID 1, 5, 10) in the case of disk failure. As with creating RAID arrays, disks must be initialized before they can be used as spares. To set a hard disk to act as a Spare Disk, use the arrow keys to select the target disk from the list of initialized disks, and press Enter key. To remove the Spare Disk setting from a hard disk, highlight the spare disk, and press Enter key. Generally, single disks are designated to act as spares (disks that are not configured into RAID arrays). However, in some instances, disks that are members of RAID arrays may also be designated to act as a spare. If the disks in question are part of a RAID array that did not utilize the full available capacity at the time of creation, these disks may be used as spares. For example: a RAID 0 array was created between two 200GB hard disks, but only 200GB of space (out of a grand total of 400GB), was assigned to that array. In this example, 200GB of disk space remains unallocated. This unallocated space would allow these disks to be set as spares for a separate redundant array that falls into the same capacity range (200GB). 5.7 Settings To access the Settings menu, highlight the Settings command from the toolbar, and press Enter key. There are Select Boot Device and Parameter Setting options in the menu. Select Boot Device: Select which disk or array will act as the boot disk, if the motherboard BIOS instructs the card to act as the boot device. 25 ... - Page 26 26 ...
-
Page 27: View
Staggered Spin up: The default value of this option is disabled. Enabling this setting will instruct the card to power up the hard disks, sequentially (one disk approximately every 2 seconds). Not all disk support this setting – consult the disk documentation for more information. Warning: Western Digital hard disks do not support this setting. Enabling this setting is not recommended. If enabled, these disks may not be detected by non‐... - Page 28 28 ...
- Page 29 RAID Array – This option will display information about each RAID array hosted by the CONTROLLER. Highlight the target device and press Enter to view details about the configuration. 29 ...
-
Page 30: Chapter 6 - Rocketraid 642L Driver Installation
Chapter 6 ‐ RocketRAID 642L Driver Installation 6.1 Driver installation ‐ Microsoft Windows Server 2012, 2008, 2003 and Windows 8, 7, Vista 6.1.1 Installing the driver for an existing Windows operating system 1. Install the RocketRAID 642L host adapter into the PC, then boot up the Windows operating system. 2. Windows will detect the RocketRAID 642L CONTROLLER and automatically search for the driver. ... - Page 31 5. The driver can also be installed manually, using Device Manager. 6. Right‐click the “RAID Controller” entry and select “Update Driver Software”. Select “Browse my computer for driver software” in the popup windows 31 ...
- Page 32 8. Browse to the following Software CD folder: CD‐ROM:\Driver\Windows Select the driver option that matches your operating system: x32 (32‐bit) and x64 (64‐bit). 9. Follow the Installation Wizard’s prompts to install the RocketRAID 642L driver. Click “Close” to exit the Wizard and reboot once the driver has been successfully installed. 10. Once complete, the interface will notify you that the driver has been successfully installed. Click “OK” to reboot the system. 32 ...
- Page 33 33 ...
- Page 34 11. After rebooting the system, the RocketRAID 642L CONTROLLER will be recognized by Device Manager, and listed under “Storage Controllers”. 34 ...
- Page 35 35 ...
-
Page 36: Installing The Driver During A Fresh Windows Os Installation
6.1.2 Installing the driver during a fresh Windows OS installation 1. Boot from the Windows Installation DVD. 2. When the following window is displayed, please insert the Sans Digital software CD into the CD/DVD drive. Select “Load Driver”. 3. Browse to the following software CD folder: CD‐ROM:\Driver\Windows Select x32 (32‐bit) or x64 (64‐bit) according with your windows OS. 36 ... - Page 37 37 ...
-
Page 38: Driver Installation -Linux And Freebsd
4. Follow the Installation Wizard’s prompts to continue the installation process. 5. Windows should display the following entry after locating the driver. Click “Next” to install the RocketRAID 642L driver. 6.2 Driver installation ‐Linux and FreeBSD Please refer to the Driver Installation Guide or README file included with the driver packages for more information. Linux driver packages are included with the Software CD: CD‐ROM:\Driver\Linux Before Installing – make sure you have the latest driver updates. Visit the Sans Digital website for the latest driver updates and documentation: http://www.sansdigital.com 38 ... - Page 39 39 ...
-
Page 40: Chapter 7 - Sans Digital Web Raid Management Software
Chapter 7 ‐ Sans Digital Web RAID Management Software The Sans Digital RAID Management Software (WebGUI) provides RAID configuration and management features. The software can be installed from the Sans Digital software CD. 7.1 Installing / Uninstall the Web RAID Management Software ‐ Microsoft Windows 7.1.1 Install the Web RAID Management Software 1. Insert the Sans Digital software CD into the CD/DVD drive. The program should start automatically. Click the Setup.exe icon. 2. The Sans Digital Software Install window should be displayed. Click the “Install WebGUI” button. And click setup icon in the window. 3. Follow the Installation Wizard’s prompts to install the Sans Digital RAID Management interface. 4. Please use the default settings. Restrict to localhost access – This setting will restrict the Sans Digital RAID Management interface to the local network (the RocketRAID CONTROLLER cannot be managed remotely). 40 ... - Page 41 5. Click the “Finish” button to complete the installation procedure. 6. Important: The interface will display the default user name and password after installation is complete. 7. To start the RAID Management Interface, double‐click the “Sans Digital RAID Management” icon that was placed on the desktop during the installation procedure. 41 ...
- Page 42 42 ...
- Page 43 8. Or, start the utility manually by opening your web browser. Enter the following URL address: http://localhost:7402 Note: If you are accessing the RAID Management interface using a remote system, please update “localhost” to the server’s address. If you are unable to connect to the local system, please make sure hptsvr.exe is running on that system (check using Windows Task Manager). If it is not running, you can start it manually using the “net start hptsvr” command from a Windows command prompt window. In addition, make sure you are able to access the remote system via a TCP/IP connection, and make sure the firewall (if configured) is not blocking TCP Port 7402. 43 ...
-
Page 44: Uninstall The Web Raid Management Software
7.1.2 Uninstall the Web RAID Management Software 1. Go to Start ‐> All Programs ‐> HighPoint RAID Management, click Uninstall HighPoint RAID Management. 2. Follow the Installation Wizard’s prompts to uninstall the Sans Digital RAID Management interface. 44 ... - Page 45 45 ...
-
Page 46: Installing / Uninstalling The Web Raid Management Software ‐ Linux
7.2 Installing / Uninstalling the Web RAID Management Software ‐ Linux 7.2.1 Install the Web RAID Management Software Please refer to the Web RAID Management Installation Guide or README file under the following folder for the installation procedure. Software location (RocketRAID Software CD): CD‐ROM:\Management_Software \Linux And the location of CLI is as the follow. CD‐ROM:\ Management Software\Command Line Interface\Linux Before Installing – make sure you have the latest driver updates: Visit the Sans Digital website for the latest driver updates and documentation: http://www.sansdigital.com 7.2.2 Uninstall the Web RAID Management Software Open a terminal, and use the following command: # rpm ‐e hptsvr‐https 7.3 Using the Web RAID Management Software 46 ... - Page 47 Please refer to the online help of “How to Use Web RAID Management Software”: http://www.Sans Digital‐tech.com/help/ 47 ...
- Page 48 48 ...
- Page 49 Chapter 8 ‐ BIOS Update The BIOS update utility must be run while the system is operating in a pure DOS environment. The update utility cannot be run from a DOS‐prompt window. Visit the www.Sans Digital‐tech.com website to download the latest firmware. Extract the download to a bootable DOS USB drive. Boot the system using the bootable USB drive. At the command prompt, access the BIOS update’s directory: 49 ...
- Page 50 The following command line is used to launch the flash utility: load.exe After the BIOS has been successfully updated, the following information will be displayed: 50 ...
Need help?
Do you have a question about the Towerraid 6G series and is the answer not in the manual?
Questions and answers