Table of Contents
Advertisement
Quick Links
Advertisement
Table of Contents

Summary of Contents for HiTV Belva 40
- Page 1 Belva 40 Powered by HiTV Communications INNOVATION, INTEGRATION, SOLUTIONS...
-
Page 2: Table Of Contents
Table of Contents Precaution ................... 3 Getting Started................4 I.1. Supplied Accessories..............4 I.2. Parts and Controls ............... 4 I.3. Key Functions ................6 II. Charging the Battery ............... 7 III. Using the Menu ................7 IV. Quick Guide for First-time User ............8 IV.1. -
Page 3: Precaution
Precaution On Safety Do not use wet hands to pull out the plug. It may cause electrical shock. If the player does not work, please pull out the plug for safety. Contact us for further technical support. Before moving the player, please make sure the power adapter is disconnected from the wall outlet. -
Page 4: Getting Started
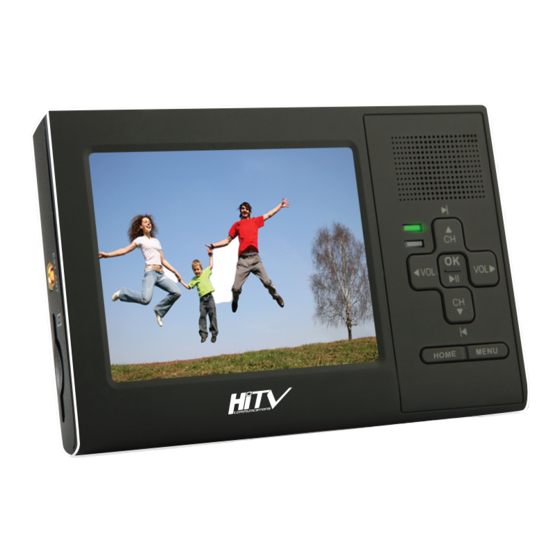
I. Getting Started Supplied Accessories I.1. Please check the following accessories are included in the package: ○ AC power adapter(with mini USB connector) x 1 ○ Portable external digital TV antenna x 1 ○ Black carry case x 1 ○ User manual x 1 Parts and Controls I.2. - Page 5 Rear Side [1] Built-in Antenna [2] Portable Antenna Connector [3] SD/MMC Card Slot [4] Back Holder...
-
Page 6: Key Functions
Key Functions I.3. Belva 40 Channel Up/Down Keys Press [CH+]/[CH-] buttons to tune up or down channels. Option/Service Selection Press this button to select the Volume Adjustment service or the option. Press [VOL+]/[VOL-] buttons adjust volume. Menu Press this button to enter the... -
Page 7: Charging The Battery
II. Charging the Battery It’s easy to recharge the battery by the following steps: 1. Connect the power adapter to the DC power-in jack. 2. The charging indicator will be turned on as RED light. 3. When the battery is fully charged, the charging indicator will be changed to GREEN light. -
Page 8: Quick Guide For First-Time User
IV. Quick Guide for First-time User TV Watching IV.1. Step 1: Turn on the unit (Power switch is on the right side of the unit) Step 2: Press [VOL+]/[VOL-] buttons to select “TV” option and press [OK] button to enter the TV mode. Step 3: Press [OK] button to enter the scan setup. -
Page 9: Iv.2. Dvb-T Radio Listening
Step 5: Perform auto search to find available TV DVB-T channels. 1. Use [CH+]/[CH-] buttons to highlight the Auto Search item. 2. Press [OK] button to start. Step 6: Job well-done! You can now sit back and enjoy your mobile TV. DVB-T Radio Listening IV.2. -
Page 10: Iv.3. Music Listening
Music Listening IV.3. Belva 40 allows you to play mp3 format audio file. The section below will explain you how to quickly play a music file stored on SD/MMC Card. 1. After selecting music playback mode on the home screen, the file browser screen will appear. -
Page 11: Technical Settings
Technical Settings System Settings V.1. This is the system settings menu screen. Users can adjust the regional/language setting, the music setup, display setting, time setting, and proceed to a software upgrade. Use [VOL+] and [VOL-] buttons to highlight the desired item and press [OK] button to select one. - Page 12 V.1.3. Sound Setup To select an equalizer effect or the play mode during listening. 1. Press [CH+]/[CH-] buttons to highlight the item you want to adjust. 2. Press [VOL+] button [CH+]/[CH-] to scroll up and down the options. 3. Select one by pressing the [OK] button or exit the setting by pressing the [MENU] button.
- Page 13 V.1.5. Region & Language Settings To set up the OSD language and DVB-T regional settings. 1. Press [CH+]/[CH-] buttons to highlight the item you want to adjust. 2. Press [VOL+] button and use [CH+]/[CH-] to scroll up and down the options. 3.
-
Page 14: Dvb-T Tv/Radio Menu
V.1.7. Reset Default Select the item to reset all system settings to default values at manufacture time. DVB-T TV/Radio Menu V.2. After entering the DVB-T TV or Radio service, press [MENU] button to make the menu appear. By navigating the different options, you can have access to the program list, the channel management, the automatic channel search function, the audio settings, the channel info,... - Page 15 V.2.2. Channel Management To rearrange and to edit the TV channel listing using skip, move, lock, and delete functions. 1. Select “Channel Management” in the TV Menu and press [OK] button. The management screen will appear as on the picture on the right. 2.
- Page 16 V.2.3. Automatic Search To search the available channels automatically. 1. Browse menu screen using [CH+]/[CH-]/[VOL+][VOL-] buttons highlight the automatic search option. 2. Press [OK] button to start the channel search. V.2.4. Audio Settings To select master or secondary language when service available. 1.
- Page 17 V.2.5. Channel Information To display the channel broadcasting parameters and signal information. 1. Browse the TV menu screen using [CH+]/[CH-]/[VOL+]/[VOL-] buttons to highlight the channel information option. 2. Press [OK] button to display the channel information. 3. Press [MENU] button to exit V.2.6.
-
Page 18: Trouble Shooting Q&A
VI. Trouble Shooting Q&A Most of the troubleshooting issues can be easily solved. The common cases and their respective solutions are listed in the table below. If the problem persists, please contact the after sales service. Problem Possible Reason Solution battery totally Connect the unit to an external power... -
Page 19: Specification
VII. Specification Antenna Built-in rod Antenna (UHF and VHF band reception) Antenna Type Support external antenna input Display Panel Type / Resolution 3.5” Color TFT-LCD / 320RGB(W) x 240(H) pixels Brightness / Contrast 250 nits / 400:1 (Horizontal) / 105 (Vertical) View Angle System... - Page 20 W: www.hitv.com.au INNOVATION, INTEGRATION, SOLUTIONS E: support@hitv.com.au...
Need help?
Do you have a question about the Belva 40 and is the answer not in the manual?
Questions and answers