Kodak PLAYTOUCH ZI10 Extended User Manual
Kodak camcorder user manual
Hide thumbs
Also See for PLAYTOUCH ZI10:
- Manual (28 pages) ,
- User manual (5 pages) ,
- Quick start manual (6 pages)

Related Manuals for Kodak PLAYTOUCH ZI10


Summary of Contents for Kodak PLAYTOUCH ZI10
- Page 1 KODAK PLAYTOUCH Video Camera Extended user guide Model Zi10 www.kodak.com For interactive tutorials: www.kodak.com/go/howto For help with your camera: www.kodak.com/go/support...
- Page 2 Eastman Kodak Company Rochester, New York 14650 © Kodak, 2010 All screen images are simulated. Kodak and PlayTouch are trademarks of Eastman Kodak Company. HDMI, the HDMI Logo, and High-Definition Multimedia Interface are trademarks or registered trademarks of HDMI Licensing LLC. 4H7217_en...
-
Page 3: Front View
Front view Microphone Lens IR receiver, for optional remote control www.kodak.com/go/support Focus switch (Close-up/Normal) Product features Jack for external microphone, headphones Video Recording LED A/V Out HDMI™ Out Micro USB, for 5V DC In USB Release USB arm... -
Page 4: Accessing The Usb Arm
Product features Accessing the USB arm Open the door. Pull down the USB arm. www.kodak.com/go/support Slide the USB lock. -
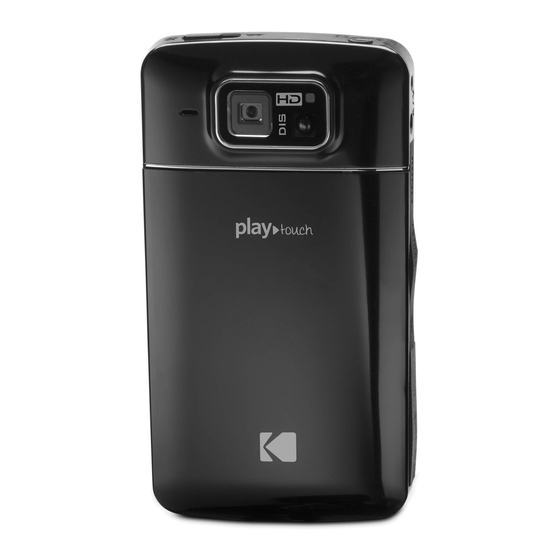
Page 5: Back View, Touchscreen Gestures
Back view, touchscreen gestures Tap (or tap and hold) www.kodak.com/go/support Power button Battery compartment, SD/SDHC Card slot Speaker Battery charging light Record/OK button Strap post Tripod socket Swipe Product features Drag... -
Page 6: Understanding The Status Icons
Understanding the status icons www.kodak.com/go/support... -
Page 7: Table Of Contents
Applying an LCD Glare Shield filter ... 12 Editing videos ... 12 Viewing on a TV... 14 Using the optional remote control ... 15 4 Sharing videos and pictures ...16 Sharing via social networking sites ... 16 Marking videos/pictures for emailing ... 16 www.kodak.com/go/support... - Page 8 5 Getting help ...18 6 Appendix ...20 Specifications... 20 Safety ... 21 Care and maintenance ... 22 Limited warranty ... 23 www.kodak.com/go/support...
-
Page 9: Setting Up Your Camera
Turn off the camera, then connect it. Your adapter differ. See other charging solutions www.kodak.com/go/support KODAK Camera USB Cable, Micro B / 5-Pin Do not plug this cable into a computer. Notched corner Charging light: • Blinking = charging • Off = charged (approx. -
Page 10: Charging Using An External Charger
Setting up your camera Charging using an external charger A charger may be an optional accessory and differ from the one pictured. www.kodak.com/go/support... -
Page 11: Inserting An Sd Or Sdhc Card
A card can only be inserted one way; forcing it may cause damage. Inserting or removing a card while the camera is on may damage the video/s, the card, or the camera. Purchase accessories www.kodak.com/go/support Setting up your camera 1 Turn off the camera. 2 Insert the card until it clicks. -
Page 12: Connecting The Strap
Setting up your camera Connecting the strap Turning on the camera www.kodak.com/go/support... -
Page 13: Setting The Language, Date/Time
The first time you turn on the camera, you’re prompted to choose your language and set the date/time. (To change your language or date/time in the future, www.kodak.com/go/support To set the language: 1 Swipe up/down to view your language (For more... -
Page 14: Using Your Camera
NOTE: To apply an LCD Glare Shield, the feature must be turned on in the Settings menu (see page ■ Adjust LCD brightness Plug in headphones or an external microphone, ■ then tap Headphone or Microphone. www.kodak.com/go/support . (When (page 12). 10). (see page 11). -
Page 15: Reviewing Videos/Pictures
Plug in headphones, then tap Headphone. Access the Volume controls, tap the volume icon ■ NOTE: To switch to recording mode, press the Record/OK button. www.kodak.com/go/support You can rotate the camera right or left, according to your preference. 1 Tap the Review icon 2 Tap or swipe the left/right side of the LCD to find a video/picture. -
Page 16: Deleting Videos/Pictures
2 To see a single video/picture, tap it. NOTE: To switch to recording mode, press the Record/OK button. to zoom 1X, 2X, 4X, 6X, and 8X. to quickly zoom to 8X. to view videos/pictures as thumbnails. to see Share options (see page 16). www.kodak.com/go/support... -
Page 17: Downloading Software, Transferring Videos/Pictures To The Computer
Downloading software, transferring videos/pictures to the computer To use the sharing and social networking features, you must download KODAK Software. NOTE: If a USB extension cable was included, you can use it to connect the camera USB arm to the computer. -
Page 18: Doing More With Your Camera
You can turn on the camera, but you cannot change or reset the settings. Microphone Choose the sensitivity of the internal or external microphone (if one is Gain connected). Sounds and LED Turn camera sounds and video recording light on/off. , then tap a setting. www.kodak.com/go/support... - Page 19 Set the date and time. (See Language Choose your language. Format SD Card Delete everything on the card and format the card. About View firmware and software version. Reset Settings Reset all settings to factory defaults. www.kodak.com/go/support Doing more with your camera page page 12.)
-
Page 20: Applying An Lcd Glare Shield Filter
To play a video, tap the Play icon. 3 Tap the Edit icon The Editing menu appears. 4 Tap a choice: Trim Video—See page 13. Single Frame Extraction—See page 13. NOTE: To switch to recording mode, press the Record/OK button. www.kodak.com/go/support , then tap LCD Glare... -
Page 21: Trimming A Video
You can remove an unwanted section from a video, saving only the desired portion. Extracting a single video frame You can create a picture from a single video frame. www.kodak.com/go/support Doing more with your camera 1 Tap the Review icon 2 Tap or swipe the left/right side of the LCD to find a video/picture. -
Page 22: Viewing On A Tv
For stereo playback, use the HDMI cable and stereo speakers on your TV or ■ receiver. HDMI Cable Set Video Out (NTSC/PAL) Use the remote control (optional accessory) Purchase accessories page AV Cable see page 11 see page 14 www.kodak.com/go/playtouchaccessories www.kodak.com/go/support... -
Page 23: Using The Optional Remote Control
Doing more with your camera Using the optional remote control Use the remote control (an optional accessory) to start/stop recording and to review videos/pictures. Go to www.kodak.com/go/playtouchaccessories. www.kodak.com/go/support... -
Page 24: Sharing Videos And Pictures
It’s never been easier to share videos and pictures on your favorite social networking sites. IMPORTANT: To use the camera social networking features, you need to download KODAK Software 1 Tap the Review icon 2 Tap or swipe the left/right side of the LCD to find a video/picture. - Page 25 Sharing videos and pictures Add a new email address 1 Tap the icon. 2 Tap Sharing Settings. 3 Tap Manage Email. 4 Tap New Email. 5 Tap each letter. When finished, tap Save. www.kodak.com/go/support...
-
Page 26: Getting Help
■ LCD is B&W. Choose a different effect page ■ Videos are choppy Use ARCSOFT MEDIAIMPRESSION for KODAK Software for video playback or jumpy when played on a ■ Ensure that the computer system requirements are met. Go to www.arcsoft.com/support. - Page 27 See online demonstrations of your camera Register your camera Get help using ARCSOFT Software Get help installing software and transferring videos/pictures to the computer Chat, email, write, or phone Kodak (Chat not available in all languages.) www.kodak.com/go/support Getting help (see page 14).
-
Page 28: Appendix
Focusing System—Fixed Focus Range—Normal: 1 m (3.3 ft)–infinity; Macro: 0.15 m (0.5 ft) White Balance—Auto Exposure—Auto File Format—Still: JPEG with Kodak EXIF; Video: H.264 (.mp4); Audio: MPEG-4 AAC LC HD 1080p (16:9) 30 fps: 1920 x 1080 @ 30 fps ■... -
Page 29: Safety
If the LCD breaks, do not touch the glass or liquid. Contact Kodak customer support. The use of an accessory that is not recommended by Kodak may cause fire, electric ■ shock, or injury. For approved accessories, go to www.kodak.com/go/playtouchaccessories. -
Page 30: Care And Maintenance
■ Remove the batteries when the product is stored. In the unlikely event that battery fluid leaks inside the product, contact Kodak customer support. In the unlikely event that battery fluid leaks onto your skin, wash immediately with ■... -
Page 31: Limited Warranty
If Kodak is unable to repair or replace a Product, Kodak will, at its option, refund the purchase price paid for the Product provided the Product has been returned to Kodak along with proof of the purchase price paid. - Page 32 (such as third party ink or ink tanks), failure to follow Kodak's operation, maintenance or repacking instructions, failure to use items supplied by Kodak (such as adapters and cables), or claims made after the duration of this warranty.
-
Page 33: Regulatory Compliance
Unless a specific Kodak warranty is communicated to the purchaser in writing by a Kodak company, no warranty or liability exists beyond any minimum requirements imposed by law, even though defect, damage, or loss may be by negligence or other act. - Page 34 Russian GOST-R Eastman Kodak Company Hereby, Eastman Kodak Company declares that this KODAK Product is in compliance with the essential requirements and other relevant provisions of Directive 1999/5/EC. Waste Electrical and Electronic Equipment labeling/battery disposal In Europe: For human/environmental protection, it is your responsibility to dispose of this equipment and batteries at a collection facility established for this purpose (separate from municipal waste.) For more information, contact your retailer,...
- Page 35 Korean Li-Ion Regulatory Canadian DOC statement DOC Class B Compliance—This Class B digital apparatus complies with Canadian ICES-003. Observation des normes-Classe B—Cet appareil numérique de la classe B est conforme à la norme NMB-003 du Canada. Australian C-Tick N137 www.kodak.com/go/support...
- Page 36 Appendix MPEG-4 Use of this product in any manner that complies with the MPEG-4 visual standard is prohibited, except for use by a consumer engaging in personal and non-commercial activities. China RoHS www.kodak.com/go/support...
- Page 37 4 to a computer, 9 to a TV, 14 date, setting, 5 default settings, 11 delete pictures, videos, 8 www.kodak.com/go/support digital image stabilization, 11 disposal, recycling, 23 download software, 9 editing videos, 10 emailing pictures, videos, 16 erase card, 11...
- Page 38 Index KODAK Camera Setup App, 9 Kodak Web sites, 18 LCD brightness, 11 LCD Glare Shield filter, 12 lens, i lens, cleaning, 22 loading battery, 1 magnify a picture, 8 maintenance, camera, 22 memory card, loading, 3 microphone, i, 7...
- Page 39 & maintenance, 22 transferring videos, 9 troubleshooting, 18 turning on camera, 4 TV playback, 14 typing, 17 URLs, Kodak Web sites, 18 USB arm, ii video delete, 8 editing, 10 emailing tagged, 16 FF, rewind, slow motion, 7...
Need help?
Do you have a question about the PLAYTOUCH ZI10 and is the answer not in the manual?
Questions and answers