Advertisement
Table of Contents
- 1 Preface
- 2 Table of Contents
- 3 Userpanel
- 4 Back Panel Connections
- 5 Something You Should Know before Using the MIDI Functions
- 6 Something You Should Know before Using the USB Functions
- 7 USB Driver Software Installation
- 8 Switching on
- 9 Basic Operations
- 10 Advanced Operations
- 11 Trouble Shooting
- 12 Specifications
- 13 MIDI Implementation
- 14 Inedx
- Download this manual
Advertisement
Table of Contents

Related Manuals for Miditech MidiStudio 2


Summary of Contents for Miditech MidiStudio 2
- Page 1 Usermanual 0,',678',2 0,',678',2 0,',678',2 0,',678',2...
-
Page 2: Preface
PREFACE Congratulations on purchasing the Midistudio-2 master MIDI controller keyboard. It is one of the finest products of its kind, made after extensive research into what customers require from a MIDI Controller. When using your Midistudio-2 in conjunction with a computer and appropriate music software, you will be able to discover the wonderful world of Computer Music, with a set of complete musical instruments from your sound card or workstation. -
Page 3: Table Of Contents
TABLE OF CONTENTS Preface ................Userpanel ................Back panel connections ............4 Something you should know before using the MIDI functions . 5 Something you should know before using the USB functions .. 5 USB Driver software installation ..........6 Switching on ................ -
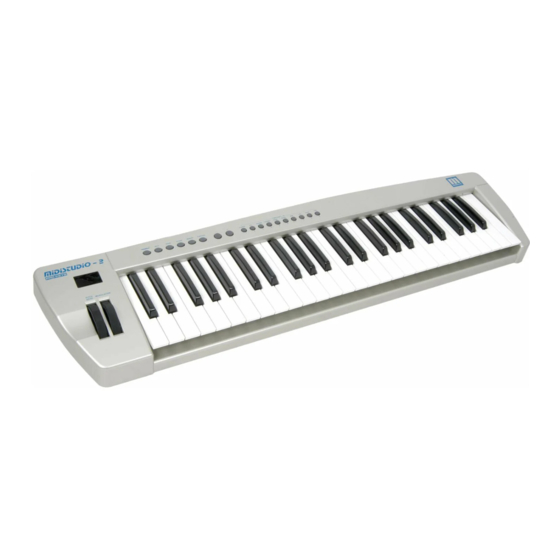
Page 4: Userpanel
User panel: 1 = Display 2 = Pitch and Modulation Wheel 3 = Basic Functions 4 = Plus/Minus Keys 5 = Advanced Functions and Ten Keys Back panel connections: 1 = Footpedal 2 = Soundmodul 3 = Computer 4 = Power supply... -
Page 5: Something You Should Know Before Using The Midi Functions
SOMETHING YOU SHOULD KNOW BEFORE USING THE MIDI FUNCTIONS MIDI is the acronym for Musical Instrument Digital Interface, which makes all digital musical instruments equipped with this standardised interface capable of exchanging their MIDI data or “talk to each other” To explain how MIDI works on your instrument in more detail, the following illustrations will outline the MIDI functions of the 0LGLVWXGLR , which allow you to connect the keyboard to other MIDI instruments. -
Page 6: Usb Driver Software Installation
USB DRIVER SOFTWARE INSTALLATION When you use this master keyboard with Windows 98 or Windows 2000, you must install USB driver software into your computer with attached CD-ROM. Put the CD-ROM in CD-ROM driver tray, then you can find there are two directories in the CD-ROM: Win98 and Win2000. -
Page 7: Basic Operations
BASIC OPERATIONS PROGRAM SETTING Press PROGRAM button, the current program number will appear on the display. Use +, - button to increase or decrease the program number you desire. You can also press numerical buttons 0 - 9 to enter the number directly ranging of 1 to 128. - Page 8 MEMORY There are 5 memory banks to save your favourite settings. It is easy for you to recall your setting by pressing one button. Press MEMORY button and hold down, display show “S-“ to prompt you to input memory code. When you press one of the 1 - 5 buttons, your settings are saved into this button.
- Page 9 PITCH BEND WHEEL Roll upward PITCH BEND wheel to increase the pitch or roll downwards the wheel to lower the pitch smoothly by transmitting pitch bend message ranging of 0 to 16383. Normally, the wheel stays on its centre position, i.e. no bending. MODULATION WHEEL Roll upward MODULATION wheel to add modulation effect ranging of 0 to 127.
-
Page 10: Advanced Operations
ADVANCED OPERATIONS Besides the basic functional operations above, you may have more features using FUNCTION button. When this function is engaged, all letters on the display will be followed by three dots for identification. Please note that there are two dots only when split feature engaged VELOCITY CURVE Press FUNCTION button, the display will show “F-“... - Page 11 REVERB LEVEL Press FUNCTION button, the display will show “F-“ to prompt you to input a function code. Then press button 3 (REVERB), current reverb level will appear on the display. Now, you can set reverb level your desire ranging from 1 to 128. You can also use + or - button to change it.
- Page 12 4: Memory Pedal - Once press down the pedal, the memory code will be increase by one and relevant settings will be recalled. About 3 seconds after you complete the operation, the display will return to indicate program number. WHEEL DEFINITION Press FUNCTION button, the display will show “F-“...
- Page 13 Press FUNCTION button, the display will show “F-“ to prompt you to input a function code. Then press button 8 (LSB), current LSB value will appear on the display. Now, you can change LSB using numerical button or + / - button to change it ranging from 1 to 128.
-
Page 14: Trouble Shooting
Trouble Shooting If anything doesn’t work . . . please check following points: Midi connection fault . . . do you have installed your midi drivers from your soundcard ? Look at START --> Settings --> Systemcontrol --> Multimedia --> Tab Midi for installed Drivers. - Page 15 If the unit isn’t powered by power-supply, try to connect by USB-Connection. If it works normal, the power-supply may be damaged. If everything doesn’t help . . . you can write an e-mail to our hotline Info@Miditech.de and we try to help you.
-
Page 16: Specifications
SPECIFICATIONS Model : 0LGLVWXGLR 0LGLVWXGLR 0LGLVWXGLR 0LGLVWXGLR Keyboard 49 touch sensitive keys Wheels Pitch Bend Wheel Modulations Wheel Function Buttons Program, Split, Transpose, Octave Memory, Function, + / - Numerical buttons x10 Velocity Curve, Volume, Reverb Channel, Pedal, Wheel, MSB LSB, M.RST, C.RST Connectors MIDI OUT (DIN) -
Page 17: Midi Implementation
MIDI IMPLEMENTATION: Function Transmitted Remark Format Program Default Cn, pp Change 0 - 127 Channel Default Change 0 - 15 Note Default 36 - 84 Change 0 - 120 Velocity Key down 0 - 127 Key up 0 - 127 Volume Default Change... -
Page 18: Inedx
INDEX Advanced Operations 10 Programm setting 7 Bank select (MSB/LSB) 12 Reverb Level select 11 Basic Operations 7 Specification 16 Connections 4 Split point select 8 Controller reset 13 Store settings 8 Display 4 Switch on 6 Function keys 4 Ten keys 4 LSB select (Bank) 13 Transpose select 7...
Need help?
Do you have a question about the MidiStudio 2 and is the answer not in the manual?
Questions and answers