Table of Contents
Advertisement
Available languages
Available languages
Use and care instructions / Instrucciones de uso y mantenimiento / Notice d'emploi
Be careful ! (depending on the model) Remove the soleplate protection before heating the iron.
ENG
¡ Cuidado ! (segun el modelo) Retire el protector de la suela antes de calentar la plancha.
ESP
Attention ! (selon modèle) Retirez le protecteur de semelle avant de faire chauffer le fer.
FR
L
K
J
I
H
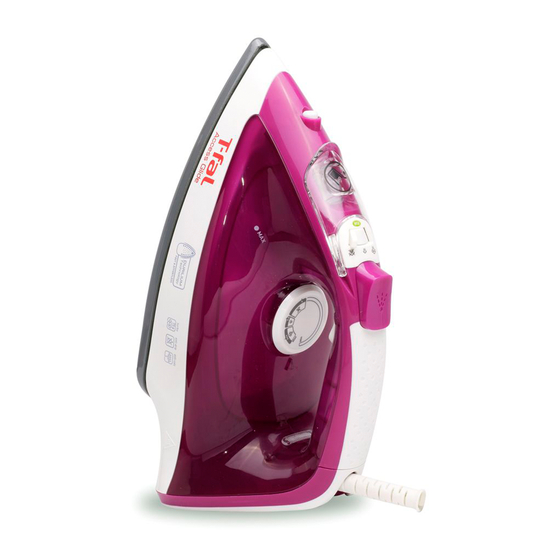
ENGLISH
A. Spray Button
To moisten fabrics
B. Burst of Steam Button
(depending on model)
To remove wrinkles
C. Auto Shut off indicator light
(depending on model)
D. Electric power cord
E. Thermostat indicator light
Goes out when the correct
temperature has been reached.
F. Thermostat control
For choosing the ironing temperature
G. Water reservoir maximum fill line
Do not exceed this limit
H. Sole plate
I. Spray nozzle
J. Anti-scale valve
To be cleaned once per month
K. Steam control
L. Express refilling drawer
Mod. : 1549-1559-1569-1579
1749-1759-1769
C
B
A
G
ESPAÑOL
A. Botón del rocío
Para humedecer la ropa
B. Botón de extra vapor
(según el modelo)
Para quitar las arrugas
C. Indicador luminoso autoapagado
automático (según el modelo)
D. Cordón de suministro eléctrico
E. Indicador luminoso de termostato
Se apaga cuando se alcanza la
temperatura deseada
F. Control del termostato
Para elegir la temperatura de planchado
G. Nivel máximo del depósito
No exceda de ese límite
H. Suela
I. Rocío
J. Varilla anticalcárea
Límpiese una vez al mes
K. Control de vapor
L. Tapa de llenado del depósito
D
F
A. Touche Vaporisation
B. Touche Jet de vapeur puissant
C. Voyant Arrêt automatique
D. Cordon d'alimentation
E. Voyant du thermostat
F. Commande du thermostat
G. Repère maxi du réservoir
H. Semelle
I. Vaporisateur
J. Tige anti-calcaire
K. Commande vapeur
L. Volet d'ouverture du
FRANCAIS
Pour humidifier le linge
(selon modèle)
Pour défroisser
(selon modèle)
S'éteint quand la température est
atteinte.
Pour choisir la température de
repassage
Ne dépassez pas cette limite
A nettoyer une fois par mois
réservoir
E
Advertisement
Table of Contents

Related Manuals for T-Fal 1549


Summary of Contents for T-Fal 1549
- Page 1 Mod. : 1549-1559-1569-1579 1749-1759-1769 Use and care instructions / Instrucciones de uso y mantenimiento / Notice d’emploi Be careful ! (depending on the model) Remove the soleplate protection before heating the iron. ¡ Cuidado ! (segun el modelo) Retire el protector de la suela antes de calentar la plancha.
-
Page 2: Important Safeguards
ENGLISH IMPORTANT SAFEGUARDS Read all instructions before using the iron. When using your clothes iron, basic safety precautions should always be followed, including the following : 11.1Use iron only for its intended use. 12.1To protect against a risk of electric shock, do not immerse the iron or the base of the iron in water or other liquids. -
Page 3: Steam Ironing
Warning ! Remove the sole plate protector before heating up the iron (depending on the model). Warning ! Prior to first use of your iron using steam on fabric, we recommend that you turn it on for a few seconds in the horizontal position, and press the Burst of Steam button several times. - Page 4 What temperature and which steam setting to use ? POSITION OF STEAM SETTING = STEAM ZONE FABRIC THERMOSTAT CURSOR POSITION LINEN COTTON WOOL SILK SYNTHETIC Polyester, Acetate, Acrylic, Nylon Moistening the fabric (Spray) - When steam or dry ironing, press several times on the Spray Button to moisten fabrics (H) and to remove stubborn creases.
-
Page 5: Dry Ironing
2- DRY IRONING - Set the temperature. - Set the steam control on DRY (see diagram A). - You may start ironing when the indicator light goes out. 3- MAINTAINING YOUR IRON BE CAREFUL ! Unplug your iron and let it cool off before cleaning. •... -
Page 6: For Your Security
• If an extension cord is absolutely necessary, a 13 ampere cord should be used. Cords rated for less amperage may overheat. • If the electrical cord becomes damaged, it must be immediately replaced. Please contact T-Fal’s Consumer Service Department to avoid any danger. -
Page 7: Troubleshooting
5- TROUBLESHOOTING Problems Possible Causes Solutions • Water drips from the holes • The chosen temperature does • Set the thermostat in the coloured zone (from in the sole plate. not allow for the formation of MAX). steam. • You are using steam while the •... - Page 8 ESPAÑOL RECOMENDACIONES IMPORTANTES Lea todas las instrucciones antes de utilizar su aparato. Cuando utilice su plancha respete las siguientes consignas elementales de seguridad : 11.1Utilice su aparato sólo para la aplicación para la que ha sido creado. 12.1No sumerja su aparato o su caja en agua o cualquier otro líquido para evitar cualquier riesgo de descarga eléctrica.
-
Page 9: Planchar Con Vapor
¡ Cuidado ! Quite el protector de la suela antes de calentar la plancha (según el modelo). ¡ Cuidado ! Antes de utilizarla por primera vez en posición vapor, le aconsejamos que la haga funcionar algunos momentos en posición horizontal y sin ropa debajo. En estas mis- mas condiciones, accione varias veces el botón de extra vapor. - Page 10 ¿ Qué temperatura y qué vapor hay que utilizar ? POSICIÓN DEL CURSOR POSICIÓN DE AJUSTE DEL = ZONA VAPOR TEJIDO DEL TERMOSTATO TERMOSTATO DEL VAPOR LINO ALGODÓN LANA SEDA SINTÉTICOS SECO Poliéster, Acetato,Acrílico, Poliamida Humedecer la ropa (rociador) - Cuando plancha con vapor o en seco, pulse varias veces seguidas el botón de rocío para humedecer la ropa (H) y eliminar las arrugas más resistentes.
-
Page 11: Planchado En Seco
2- PLANCHADO EN SECO - Ajuste la temperatura. - Coloque el mando vapor en SEC (véase dibujo A) - Puede empezar a planchar cuando el indicador luminoso se haya apagado. 3- MANTENIMIENTO DE LA PLANCHA ¡ CUIDADO ! Desenchufe la plancha y deje que se enfríe antes de limpiarla. •... -
Page 12: Para Su Seguridad
PARA SU SEGURIDAD • ¡ Cuidado ! La tensión de la instalación eléctrica debe corresponder con la de la plancha (120V a.c). Cualquier error de conexión puede causar daños irreversibles en la plancha y esto no está cubierto por la garantía •... - Page 13 5- PROBLEMAS CON LA PLANCHA Problemas Causas posibles Soluciones • El agua sale por los agujeros • La temperatura elegida no permite • Coloque el termostato en la zona coloreada (de a MAX) de la suela crear vapor. • Espere a que el indicador luminoso •...
- Page 14 FRANÇAIS RECOMMANDATIONS IMPORTANTES Lisez toutes les instructions avant d’utiliser votre appareil. Lorsque vous utilisez votre fer à repasser, veuillez observer les consignes de sécurité élémentaires suivantes : 11.1N’utilisez votre appareil que pour l’application pour laquelle il a été conçu. 12.1Afin d’éviter tout risque de décharge électrique, n’immergez pas votre appareil ou son boîtier dans l’eau ou dans un autre liquide.
- Page 15 Attention ! Retirez le protecteur de semelle avant de faire chauffer le fer (selon modèle). Attention ! Avant d’utiliser votre fer en position vapeur pour la première fois, nous vous recomman- dons de le faire fonctionner quelques instants en position horizontale sans le placer sur le vêtement, et d’actionner à...
- Page 16 Le réglage de la température et le réglage de la vapeur POSITION DU CURSEUR POSITION RÉGLAGE = ZONE VAPEUR TISSUS DU THERMOSTAT VAPEUR COTON LAINE SOIE SYNTHETIQUE Polyester, acétate, acrylique, polyamide Humidifiez le linge (spray) - Quand vous repassez à la vapeur ou à sec, appuyez plusieurs fois sur le bouton Vaporisation pour humidifier le linge (H) et enlever les plis résistants.
- Page 17 2- REPASSER A SEC - Réglez la température. - Placez la commande vapeur sur SEC (voir dessin A) - Vous pouvez repasser lorsque le voyant est éteint. 3- ENTRETENIR VOTRE FER ATTENTION ! Débranchez et laissez refroidir votre fer avant de le nettoyer. •...
-
Page 18: Pour Votre Securite
POUR VOTRE SECURITE • Attention! la tension de votre installation électrique doit correspondre à celle du fer (120 V). Toute erreur de branchement peut causer un dommage irréversible au fer et annule la garantie. • Si vous devez absolument employer une rallonge, utilisez un cordon de 13 ampères, les cordons d’ampérage inférieur pouvant surchauffer. - Page 19 5- UN PROBLEME AVEC VOTRE FER Problèmes Causes possibles Solutions • Placez le thermostat sur la zone • L’eau coule par les trous de • La température choisie ne permet la semelle. pas de faire de la vapeur. colorée (de à...
Need help?
Do you have a question about the 1549 and is the answer not in the manual?
Questions and answers