Table of Contents
Advertisement
Advertisement
Table of Contents

Related Manuals for ezee Sprint 2008


Summary of Contents for ezee Sprint 2008
- Page 1 All bikes model year 2008 user manual...
-
Page 2: Table Of Contents
Contents: 1. Introduction Read me first! Approval and bike conformities 2. Getting to know your bike Box contents Technical specifications Bike overview Battery and charger Handlebar and stem Position of serial numbers Filling out your warranty information 3. Setting up and safety 3.1 bike assembly 3.2 Fit 3.3 Saddle position... -
Page 3: Introduction
1.0 Kwh for 100 km (62 miles) on e-bike mode. While cycling an eZee will be simple to use, fun and works much like a standard bike. Please remember it is also a sophisticated commuting and electronic machine. It is unique, if you haven’t ridden a bicycle in ages…... -
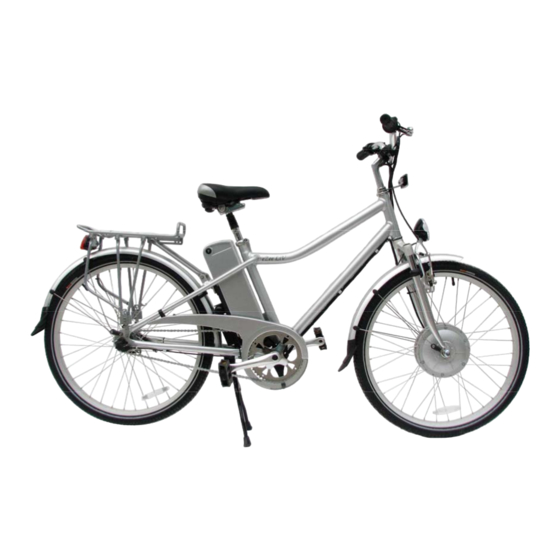
Page 4: Getting To Know Your Bike
GETTING TO KNOW YOUR BIKE Take your time to understand what makes up your bike, what are its components, what they do and where they are located. The more you know your bike, the better you’ll be able to get the most out of it. -
Page 5: Battery And Charger
Battery and charger operation... - Page 6 Do not attempt to disassemble or modify the charger. There are no parts inside that you should attempt to service, if you suspect a problem, take the charger back to your authorized eZee dealer. Do not use the charger to charger batteries other than genuine eZee batteries. Overheating,...
- Page 7 Do not subject the charger to shocks, e.g. by dropping. Do not expose the charger to liquids. Do not use a damaged charger or components (e.g. charger casing, cable, plug). Do not touch a plug with wet hands (electric shock may be the result). Do not apply too much pressure to the cables or the plugs.
-
Page 8: Handlebar And Stem
2.5 Handlebar and stem 2.6 Position of serial numbers 2.7 Filling out your warranty information 3. Setting up and safety How to assemble Please read instructions carefully before proceeding. Do not attempt to fix the bicycle until you are sure. Any damage on the bicycle resulting from proper assembly will not be covered under our warranty scheme. -
Page 9: Fit
3.1.5 Installing handlebar / stem / threadless headset The handlebar and stem comes pre-assemble. Remove packaging material, loosen all 3 bolts on the stem, turn the handle bar assembly so that it is perpendicular to the frame. Tightening the stem bolt located at the top with hex key, then tighten the 2 side bolts. Wrong or reversed procedure will not enable the fork to be securely seated on the crown / bearings. -
Page 10: Handlebar Height And Angle
Your leg length determines the correct saddle height. To check for correct saddle height: - sit on the saddle - place one heel on a pedal - rotate the crank until the pedal with your heel on it is in the lowest positions and the crank is parallel to the seat tube. - Page 11 Try to find the source of noise or any obvious loose components and secure them. Ask someone with experience, or check with your authorized eZee dealer. 3.5.2 Tyres & Wheels Check proper tyre inflation by placing your hand directly on top of each tyre individually.
-
Page 12: Power Assisted Cycling
Make sure that the brake’s brake shoes are contacting the rim’s braking surface. Also check the shoes are not rubbing the tyre’s side wall whilst applying the brake. Do not ride the bike until the brakes are properly adjusted. Safe and Responsible Riding Like any sport, bicycling involves risk of injury and damage. -
Page 13: Loading The Battery
0.25 kW, of which the output is progressively reduced and finally cut off as the vehicle reaches a speed of 25 km/h or if the cyclist stops pedaling. eZee bikes also conforms to EN 14764 for safety requirements. USA regulations allows a power assisted maximum speed of 20 mph. -
Page 14: Gear Changing
To park the eZee LiV, step down on the support’s stand toe until the support locks. To ride the eZee LiV again, place your foot in front of the kick stand and move it backwards. -
Page 15: Transporting Your Ezeebike
4.9.1 Transporting your eZeebike Remove your battery first, this makes the bike lighter for you to maneuvers. There are many companies that make special carriers for all sorts of bicycles, be sure to consult with the dealer before purchasing one to attach your eZeebike. Always be sure that the bike during transportation is secure and stable. - Page 16 • Clean and lightly oil the chain. • Wipe of excess oil. Lubrication is a function of climate. Talk to your dealer about the best lubricants and the recommended lubrication frequency for your area. D) After every long or hard ride or after 10 to 20 hours of riding: •...
-
Page 17: Battery Disposal
Think to the environment when you dispose of your battery. As regulations for battery disposal may differ from place to place. Check with your local town council or eZee dealer. Precautions and procedures Emergency equipment and knowledge Its always a good idea to go for a bike ride with the following emergency equipment and knowledge. -
Page 18: Spoke Breakage
Inflate the tube gently to the recommended pressure (see section). WARNING: Riding your eZee LiV with a flat or under-inflated tyre can seriously damage the rim, tyre, tube and bicycle, and can cause you to lose control and fall. -
Page 19: Self Diagnostic System
There is a wide range of accessories available for you bike. However, before you install them be sure to read any instructions enclosed with the product. Be sure to read and understand, the instructions that accompany the accessories you purchase for your bike. If you have doubts as to your ability to install them correctly, ask your dealer for assistance. -
Page 20: Guarantee Regulations
GUARANTEE REGULATIONS The guarantee regulations of eZee bikes are exclusively valid for the first owner of the eZee bicycle. In case of a guarantee claim according to the guarantee regulations, the owner is obligated to bring forth the proof of purchase and/or the eZee guarantee card. - Page 21 Battery warranty claims must be tested with eZee authorized equipment. 1 year 70% DOD for Sanyo Li+ batteries. 6 months 80% DOD for Phylion Li+ and NiMH batteries...
Need help?
Do you have a question about the Sprint 2008 and is the answer not in the manual?
Questions and answers