Table of Contents
Advertisement
Advertisement
Table of Contents

Summary of Contents for Tetra MTH650
- Page 1 MTH650 TETRA Portable Terminal Basic User Guide 6866537D41-A...
- Page 2 17 (b) 17 (a) 15 (a and b)
-
Page 3: Table Of Contents
Powering On with Transmit Inhibit Active ....18 Unlocking the MTH650 ....... 18 Selecting TMO or DMO Operation . - Page 4 Receiving a TMO Broadcast Call ....20 Calls (Direct Mode Operation) ......20 DMO Group Calls .
-
Page 5: Safety Information
Accordingly, any copyrighted Motorola computer programs contained in the Motorola products described in this manual may not be copied or reproduced in any manner without the express written permission of Motorola. Furthermore, the purchase of... -
Page 6: Mth650 Overview
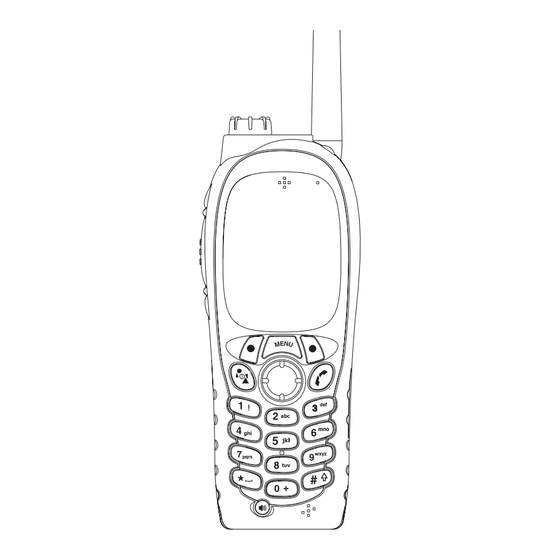
Activated during half-duplex calls such as Group. External Antenna Connector. Used with the digital car kit to connect the RF signal to the external antenna. (At the back of the MTH650) Alphanumeric Display. Provides four lines of 14 characters with backlighting. Send/End Key. - Page 7 When the MTH650 is off, press and hold to power on in Emergency mode. LED (Indicator) Before using your MTH650 for the first time, remove the plastic lens protec- tor from the display, and charge the battery overnight to ensure battery is initialised to its full capacity.
-
Page 8: Audio Signal Tones
• Back to coverage • Back to full service Clear-to-send. Once • Bad key press Once • Good key press Once • MTH650 self-test fails at power up • From out-of-service to in-service In Call Call clear warning Once Call waiting tone while... - Page 9 Status message sent to Twice the dispatcher or failed. Incoming Calls Status message Four times acknowledged by the dispatcher. Your MTH650 received a Once Group Call without gateway. (setup only) High Priority Group Call Once received Emergency Alarm sent or...
- Page 10 Description Type Repeated Private Call received Until the call is answered Private Call ringing to the Until the call is caller answered Half-duplex Private PPC Every 4 seconds ring. until the call is answered or rejected. Full-duplex Private PPC Every 4 seconds ring.
-
Page 11: Key, Knob, And Button Overview
Key, Knob, and Button Overview Mode/On-Off Key The MTH650 has four call modes when operating in Trunked Mode (TMO): • Group mode — to send and receive Group Calls. • Private mode — to send and receive Private Calls. • Phone mode — to send and receive Phone Calls. -
Page 12: Emergency Button
Press and hold this key from any mode to enter the Emergency mode. When the MTH650 is powered down, press and hold this button to power On in Emergency mode. The required time you need to press the Emergency button is set as default to 0.5 seconds. -
Page 13: To Enter The Menu Options
3. Alternatively, key the numbers of the required option, typically 2 2 4 to reach 4 Mem Usage. To exit the Menu Options Press Back or Your MTH650 may exit if no key presses are detected for a time-out period. -
Page 14: List Of Menu Options
List of Menu Options 1 Messages 1 Send Status 2 Inbox 1 New 2 Templates 3 Send Msg 3 Predefined 1 Add ID 2 Address Book 1 Private 1 Add Phone 1 Add Ext. 2 Phone 3 PABX 2 abc Order 3 By Locat’n 4 Mem Usage 1 Select... - Page 15 List of Menu Options (Cont’d) 7 Backlight 1 Auto 2 Disable 1 On 8 Tones 2 Off 1 Keypad Tone 2 All Tones 1 On 2 Off 3 Talk Permit 1 No Tone 2 Short Tone 3 Normal Tone 9 Flip Display 5 Own Number 1 Private Num 2 Phone Num...
-
Page 16: The Display
The Display Display Icons When you turn on your MTH650, icons appear along the top of the display to indicate the following conditions: Display Icon Description Trunked Mode Operation Signal Strength (TMO) Allows you to check signal strength. More bars indicate a stronger signal. -
Page 17: Displaying Long Numbers Or Messages
Your Inbox could not open due to an on-going activity. The icon remains to remind you of new messages in your Inbox. Low Audio Indicates that the MTH650 is in Low Audio mode. During Private Calls, the audio will sound through the earpiece. Battery Strength Shows the charge in your battery. -
Page 18: Getting Started
Then plug the charger into a suitable mains socket. 2. The MTH650 displays the Charger Connected message only if the MTH650 is On when connecting the charger. The Battery icon shows the charging status (see below). Empty... -
Page 19: Removing The Battery
3. Replace the battery cover. RETAINING CLIP Attaching the Antenna Turn the MTH650 off before installing or removing the antenna. Insert the bottom of the antenna into the screw-in base on the top of the MTH650. Turn clockwise until snug. Do not force. -
Page 20: Powering The Mth650 On/Off (Mode Key)
Ensure you have left the restricted area before deactivating Transmit Inhibit. Warning Press the Yes soft key to deactivate the TXI Mode. If the MTH650 was previously used in Trunked Mode (TMO), it will register to the network. If the MTH650 was previously used in Direct Mode it will remain in Direct Mode. -
Page 21: Selecting Tmo Or Dmo Operation
Entering TMO or DMO Enter TMO or DMO in one of the following ways: • Press 6 2 1 (TMO) if the MTH650 is in DMO. • Press 6 2 2 (DMO) if the MTH650 is in TMO. • Press the TMO/DMO one-touch button (configured by your Service Provider). -
Page 22: Receiving A Tmo Group Call
At the end of a call received through the earpiece, a low pitch tone is emitted alerting you that the next incoming Group call will be received through the speaker. At this alert, you are advised to hold the MTH650 at a comfortable distance away from the speaker. -
Page 23: Making A Dmo Group Call
Release the PTT button to listen. Receiving a DMO Group Call You can receive a DMO Group Call only when your MTH650 is in DMO. Your MTH650 will display the caller’s private number or alias, and the talkgroup name. -
Page 24: Calls (Private And Phone Calls)
If the Service Provider configured the MTH650 to Manual Mode Switch: 1. If the MTH650 is NOT in Private Mode, a Prvt Call message and the caller ID is displayed momentarily. The display returns to the mode it was in before the incoming call arrived. -
Page 25: Phone And Pabx Calls
2. To answer the call, press , and then the PTT key. 3. To end the call, press If the called person ends the call, the Call Ended message is displayed. For call alert, see settings in the Vibrate menu option and the Tones menu option Phone and PABX Calls The Phone Mode allows you to call a landline telephone number or... -
Page 26: Emergency Mode
Emergency mode. This is sent: • automatically, upon entering Emergency mode • if you press the Emergency key again while the MTH650 is in Emergency mode. After sending the alarm, the screen will show one of the following delivery reports: •... -
Page 27: Hot Microphone Feature
Some systems do not support the Emergency Alarm feature when the user is in a “Local Area Service” area. Pressing the Emergency button, even if Transmit Inhibit is activated, causes the MTH650 to radiate immediately. The MTH650 must NOT be within the RF Warning sensitive area when entering Emergency mode.
Need help?
Do you have a question about the MTH650 and is the answer not in the manual?
Questions and answers