Table of Contents
Advertisement
Advertisement
Table of Contents

Subscribe to Our Youtube Channel
Related Manuals for Onyx MedPC-5500


Summary of Contents for Onyx MedPC-5500
- Page 1 M e d P C M e d P C - 5 5 0 0 MedPC-5500 Intel dual core i7 Processor Multiple display output support System chassis of easy clean design (no airhole) Isolated I/O interface (COM, USB, LAN) CE/FCC Class B Passed 18...
-
Page 2: Copyright Notice
ONYX Healthcare Inc., assumes no liabilities resulting from errors or omissions in this document, or from the use of the information contained herein ONYX Healthcare Inc. reserves the right to make changes in the product design without notice to its users... - Page 3 M e d P C M e d P C - 5 5 0 0 Acknowledgments ® ® Intel Core i7 is registered trademarks of Intel Corporation. IBM, PC/AT, PS/2 are trademarks of International Business Machines Corporation. ® ®...
-
Page 4: Packing List
Screws bag x 1 (HDD screw x 4) Rubber foot x 1 Utility CD-ROM (Please insert the MedPC-5500 CD-ROM into external CD-ROM drive.) which Contains User’s Manual (in PDF format), Drivers and Utilities If any of these items are missing or damaged, you should contact your distributor or sales representative immediately. - Page 5 M e d P C M e d P C - 5 5 0 0 Worldwide Offices: Onyx Healthcare, USA Inc. 2663 Saturn street, Brea, CA 92821, USA Tel : +1-714-996-1800 Fax: +1-714-996-1811 usasales@onyx-healthcare.com Email: Onyx Healthcare EUROPE B.V. Ekkersrijt 4002, 5692 DA Son, The Netherlands...
- Page 6 M e d P C M e d P C - 5 5 0 0 Onyx Healthcare (SU ZHOU) INC. Room 12, 2F, Building B, No.5 Xing Han Street, Suzhou Industrial Park, Jiang Su Province, China Tel: +86-512-67625700 Fax: +86-512-67617337 cnsales@onyx-healthcare.com...
- Page 7 M e d P C M e d P C - 5 5 0 0 Safety & Warranty 1. Read these safety instructions carefully. 2. Keep this user's manual for later reference. 3. Disconnect this equipment from any AC outlet before cleaning. Do not use liquid or spray detergents for cleaning.
- Page 8 M e d P C M e d P C - 5 5 0 0 13. Never pour any liquid into an opening. This could cause fire or electrical shock. 14. Never open the equipment. For safety reasons, only qualified service personnel should open the equipment.
- Page 9 M e d P C M e d P C - 5 5 0 0 with the standard IEC 60601-1-1, Safety requirements for medical electrical systems. Equipment not complying with UL 60601-1 shall be kept outside the patient environment, as defined in the standard. Caution: It may cause the danger of explosion if battery is incorrectly replaced.
- Page 10 M e d P C M e d P C - 5 5 0 0 UL Module Description MEDPC-5500 modules are developed to suitable for the Classification Mark requirement Safety Symbol Description The following safety symbols are the further explanations for your reference.
-
Page 11: Table Of Contents
1.3 Specification ..............15 1.4 Dimension ..............17 Chapter 2 Hardware Installation 2.1 Safety Precautions ............19 2.2 A Quick Tour of the MEDPC-5500 ........ 19 2.3 Turn On and Boot up into Windows…………………….20 2.4 Turn off……………………………………………………….20 2.5.1 Overview…………………………………………………...21 2.5.2 Memory Configurations…………………………………21 2.5.3 Installing a SO-DIMM………………………………….…22... - Page 12 M e d P C M e d P C - 5 5 0 0 3.4 Sub-menu……………………………………………..33 Chapter 4 Driver Installation 4.1 Installation…………………………………………….36 Appendix A Miscellanea A.1 General Cleaning Tips ........... 39 A.2 Cleaning Tools ............... 40 A.3 Scrap Computer Recycling ......... 42...
- Page 13 M e d P C M e d P C - 5 5 0 0 Chapter General Information...
-
Page 14: Introduction
The fanless solution, integrated multimedia functions and extensive expansion options make them the perfect platform upon which to build comprehensive lifestyle computing applications. The MedPC-5500 includes all the features of a powerful computer into a slim and attractive chassis. Combining the MEDPC-5500 into your... -
Page 15: Feature
M e d P C M e d P C - 5 5 0 0 1.2 Feature ® Intel Core i7 Dual Core processor Multiple display output support System chassis of easy clean design (no airhole) Top cover with IPX1 water proof protection ... - Page 16 M e d P C M e d P C - 5 5 0 0 Metal chassis with fanless system design Construction 283mm(W) x 64.95mm(H) x 242mm(D) Dimension 400mm x 350mm x 210mm Carton Dimension 4.5Kg Net Weight Gross Weight PE foam Packing Filler Power Supply Specifications...
-
Page 17: Dimension
M e d P C M e d P C - 5 5 0 0 1.4 Dimension... - Page 18 M e d P C M e d P C - 5 5 0 0 Chapter Hardware Introduction...
-
Page 19: Safety Precautions
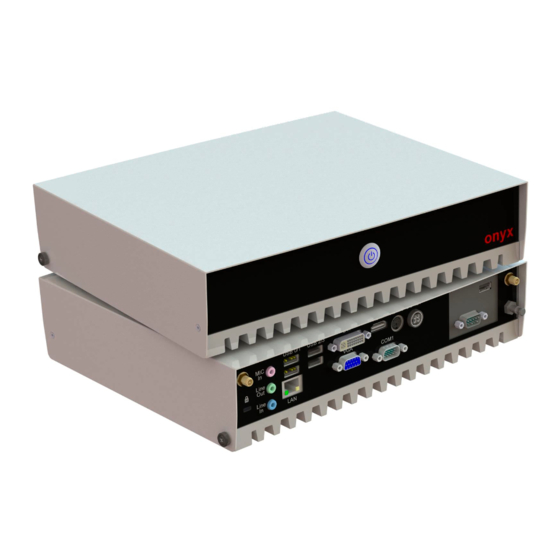
2.2 A Quick Tour of the MEDPC-5500 Before you start to set up the MEDPC-5500, take a moment to become familiar with the locations and purposes of the controls, drives, connections and ports, which are illustrated in the figures below. -
Page 20: Turn On And Boot Up Into Windows
M e d P C M e d P C - 5 5 0 0 When you turn the 5500 around and look at its rear side, as shown in Picture 2-2. Picture 2.2: Rear view of the Zeus Series 2.3 Turn On and Boot up into Windows OS This section is for Windows operating system only. -
Page 21: Overview
M e d P C M e d P C - 5 5 0 0 automatically 2.5.1 Overview The motherboard comes with four 204-pin Double Data Rate 3 (DDR3) SO Dual Inline Memory Modules (DIMM) sockets. DDR3 SODIMMs are notched differently to prevent installation on a DDR2 SODIMM socket. -
Page 22: Memory Configurations
M e d P C M e d P C - 5 5 0 0 2.5.2 Memory Configurations You may install 1 GB and 2 GB unbuffered ECC or non-ECC DDR3 SODIMMs into the SODIMM sockets using the memory configurations in this section. ... - Page 23 M e d P C M e d P C - 5 5 0 0 Align a SO-DIMM on the socket such that the notch on the SO-DIMM matches the break on the socket. (simulative sample) Firmly insert the SO-DIMM into the socket until the retaining clips snap back in place and the SO-DIMM is properly seated.
-
Page 24: Removing A So-Dimm
M e d P C M e d P C - 5 5 0 0 socket. Make sure to unplug the power supply before adding or removing SO-DIMMs or other system components. Failure to do so may cause severe damage to both the motherboard and the components. -
Page 25: Clear Cmos9Cltrc1
M e d P C M e d P C - 5 5 0 0 2.7 Clear CMOS9CLTRC1 This jumper allows you to clear the Real Time Clock (RTC) RAM in CMOS. You can clear the CMOS memory of date, time, and system setup parameters by erasing the CMOS RTC RAM data. - Page 26 M e d P C M e d P C - 5 5 0 0 Clear Normal(Def You do not need to clear the RTC when the system hangs due to overclocking. For system failure due to overclocking, use the C.P.R. (CPU Parameter Recall) feature.
-
Page 27: Rear Panel Connectors
M e d P C M e d P C - 5 5 0 0 2.8 Rear Panel Connectors DC-in 1. DC-in power jack This port is for 24V DC power. 2. COM These 9-pin COM port is for serial devices. 3. - Page 28 M e d P C M e d P C - 5 5 0 0 9. Line In port (light blue). This port connects a tape, CD, DVD player, or other audio sources. 10 Line Out port (lime). This port connects a headphone or a speaker.
-
Page 29: Mount Kit
M e d P C M e d P C - 5 5 0 0 2.9 Mount kit The mount kit screw hole and screw type as below... -
Page 30: Chapter 3 Bios Setup
M e d P C M e d P C - 5 5 0 0 Chapter BIOS Setup... -
Page 31: Bios Setup Program
M e d P C M e d P C - 5 5 0 0 3.1BIOS Setup Program This motherboard supports a programmable firmware chip that you can update using the provided utility. Use the BIOS Setup program when you are installing a motherboard, reconfiguring your system, or prompted to “Run Setup.”... -
Page 32: Legend Box
M e d P C M e d P C - 5 5 0 0 <Ctrl + Alt + Delete>, or by pressing the reset button on the system chassis. You can also restart by turning the system off and then back on. -
Page 33: List Box
M e d P C M e d P C - 5 5 0 0 Change Option / Field Enter Go to Sub Screen PGDN Next Page PGUP Previous Page General Help Previous Values Optimized Defaults Save & Exit Exit 3.3 List Box This box appears only in the opening screen. -
Page 34: Chapter 4 Driver Installation
M e d P C M e d P C - 5 5 0 0 Chapter Driver Installation... - Page 35 M e d P C M e d P C - 5 5 0 0 There are several installation ways depending on the driver package under different Operating Systems. Please follow the sequence below to install the drivers: Step 1 – Install INF Driver Step 2 –...
-
Page 36: Installation
M e d P C M e d P C - 5 5 0 0 4.1 Installation Insert the MedPC-5500 CD-ROM into the CD-ROM drive. And install the drivers from Step 1 to Step 5 in order. ® Step 1 – Install Intel INF Driver 1. - Page 37 M e d P C M e d P C - 5 5 0 0 the setup.exe Follow the instructions that the window shows The system will help you install the driver automatically Step 6 – Install Me Driver Click on the Me Driver folder and and select the Intel_Management_Engine_Interface_v7.0.0.1144 folder and double click on the setup.exe Follow the instructions that the window shows...
-
Page 38: Appendix A Miscellanea
M e d P C M e d P C - 5 5 0 0 Appendix Miscellanea... -
Page 39: General Cleaning Tips
Try not to put any food, drink or cigarette around the computer. ONYX Healthcare Inc. has tested and verified these cleaning disinfectants, CIDEX, Viraguard, Control III Disinfectant Germicide, Caviwipes, Dispatch Disinfectant Cleaner CLH69101, Puregreen 24 Disinfectant, can be used with the ONYX-175/195. -
Page 40: Cleaning Tools
M e d P C M e d P C - 5 5 0 0 disinfectants will void the warranty. A.2 Cleaning tools Although many companies have created products to help improve the process of cleaning your computer and peripherals users can also use household items to clean their computers and peripherals. - Page 41 M e d P C M e d P C - 5 5 0 0 these items can restrict the airflow in a computer and cause circuitry to corrode. Cotton swabs - Cotton swaps moistened with rubbing alcohol or water are excellent tools for wiping hard to reach areas in your keyboard, mouse, and other locations.
-
Page 42: Scrap Computer Recycling
For the computers that are no longer useful or work well, please contact with worldwide distributors for recycling. The worldwide distributors show on the following website: http://www.onyx-healthcare.com.tw/Contact.php Note: Follow the national requirement to dispose unit...
Need help?
Do you have a question about the MedPC-5500 and is the answer not in the manual?
Questions and answers