
Summary of Contents for Dolby Laboratories DSS100
- Page 1 ® Dolby Digital Cinema Presentation System User’s Manual Issue 2 Part Number 91916 Models DSS100, DSP100...
- Page 2 Dolby Laboratories, Inc. Corporate Headquarters Dolby Laboratories, Inc. 100 Potrero Avenue San Francisco, CA 94103‐4813 USA Telephone 415‐558‐0200 Fax 415‐863‐1373 www.dolby.com European Headquarters Dolby Laboratories, Inc. Wootton Bassett Wiltshire SN4 8QJ England Telephone 44‐1793‐842100 Fax 44‐1793‐842101 DISCLAIMER OF WARRANTIES: EQUIPMENT MANUFACTURED BY DOLBY LABORATORIES IS WARRANTED AGAINST DEFECTS IN MATERIALS AND WORKMANSHIP FOR A PERIOD OF ONE YEAR FROM THE DATE OF PURCHASE. THERE ARE NO OTHER EXPRESS OR IMPLIED WARRANTIES AND NO WARRANTY OF MERCHANTABILITY OR FITNESS FOR A PARTICULAR PURPOSE, OR OF NONINFRINGEMENT OF THIRD‐PARTY RIGHTS (INCLUDING, BUT NOT LIMITED TO, COPYRIGHT AND PATENT RIGHTS). LIMITATION OF LIABILITY: IT IS UNDERSTOOD AND AGREED THAT DOLBY LABORATORIES’ LIABILITY, WHETHER IN CONTRACT, IN TORT, UNDER ANY WARRANTY, IN NEGLIGENCE, OR OTHERWISE, SHALL NOT EXCEED THE COST OF REPAIR OR REPLACEMENT OF THE DEFECTIVE COMPONENTS OR ACCUSED INFRINGING DEVICES, AND UNDER NO CIRCUMSTANCES SHALL DOLBY LABORATORIES BE LIABLE FOR INCIDENTAL, SPECIAL, DIRECT, INDIRECT, OR CONSEQUENTIAL DAMAGES (INCLUDING, BUT NOT LIMITED TO, DAMAGE TO SOFTWARE OR RECORDED AUDIO OR VISUAL MATERIAL), COST OF DEFENSE, OR LOSS OF USE, REVENUE, OR PROFIT, EVEN IF DOLBY LABORATORIES OR ITS AGENTS HAVE BEEN ADVISED, ORALLY OR IN WRITING, OF THE POSSIBILITY OF SUCH DAMAGES. Dolby and the double‐D symbol are registered trademarks of Dolby Laboratories. ...
- Page 3 Regulatory Notices CAUTION RISK OF ELECTRIC SHOCK DO NOT OPEN TO REDUCE THE RISK OF ELECTRIC SHOCK, DO NOT REMOVE THE COVER (OR BACK). NO USER‐SERVICEABLE PARTS INSIDE. THESE SERVICING INSTRUCTIONS ARE FOR USE BY QUALIFIED SERVICING PERSONNEL ONLY. WARNING TO REDUCE THE RISK OF FIRE OR ELECTRIC SHOCK, DO NOT EXPOSE THIS EQUIPMENT TO RAIN OR MOISTURE WARNING TO PREVENT INJURY, THIS EQUIPMENT MUST BE SECURELY RACK‐MOUNTED IN ACCORDANCE WITH THE INSTALLATION INSTRUCTIONS. Definitions of Graphical Symbols This symbol is intended to alert the user to the presence of uninsulated “dangerous voltage” within the product’s enclosure that may be of sufficient magnitude to constitute a risk of electric shock to persons This symbol is intended to alert the user to the presence of important operating and maintenance (servicing) instructions. PRODUCT END‐OF‐LIFE INFORMATION This product was designed and built by Dolby Laboratories to provide many years of service, and is backed by our commitment to provide high‐quality support. When it eventually reaches the end of its serviceable life, it should be disposed of in accordance with local or national legislation. http://www.dolby.com/environment. For current information please visit our website: ® Dolby Digital Cinema Presentation System User’s Manual...
- Page 4 Regulatory Notices Important Safety Instructions Read These Instructions. Keep These Instructions. Heed All Warnings. Follow All Instructions. Do not use this apparatus near water. Clean only with a dry cloth. Do not block any ventilation openings. Install in accordance with the manufacturer’s instructions. Do not install near any heat sources such as radiators, heat registers, stoves, or other apparatus (including amplifiers) that produce heat. Do not defeat the safety purpose of the polarized or grounding‐type plug. A polarized plug has two blades, with one wider than the other. A grounding‐type plug has two blades and a third prong. The wide blade or the third prong are provided for your safety. If the provided plug does not fit into your outlet, consult an electrician for the replacement of the obsolete outlet. 10. Protect the power cord from being walked on or pinched, particularly at plugs, convenience receptacles, and the point where they exit the apparatus. 11. Only use attachments/accessories specified by the manufacturer. 12. Unplug this equipment during lightning storms or when unused for long periods of time. 13. On some equipment, the appliance coupler (power cord) is used as the mains disconnect device and should be readily accessible and free from obstacles. 14. Refer all servicing to qualified service personnel. Servicing is required when the apparatus has been damaged in any way, such as the power‐supply cord or plug is damaged, liquid has been spilled or objects have fallen into the apparatus, or the apparatus has been exposed to rain or moisture, does not operate normally, or has been dropped. 15. CAUTION: This equipment contains a lithium battery NOT for service or replacment by the user. Danger of explosion if the battery is incorrectly replaced. Do not disassemble, crush, puncture, short external contacts, or dispose of in fire or water. ® The Dolby Show Store complies with the EMC requirement of EN55022 and EN55024 when operated in accordance with this manual. ...
- Page 5 Regulatory Notices Dolby Show Store Safety Notice IMPORTANT SAFETY NOTICE This unit complies with safety standard EN60950-1 as appropriate. The unit shall not be exposed to dripping or splashing and no objects filled with liquids, such as coffee cups, shall be placed on the equipment. To ensure safe operation and to guard against potential shock hazard or risk of fire, the following must be observed: Ensure that your mains supply is in the correct range for the input power requirement of the unit.
- Page 6 Regulatory Notices Dolby Show Player Safety Notice IMPORTANT SAFETY NOTICE This unit complies with safety standard EN60065 as appropriate. The units shall not be exposed to dripping or splashing and no objects filled with liquids, such as coffee cups, shall be placed on the equipment. To ensure safe operation and to guard against potential shock hazard or risk of fire, the following must be observed: Ensure that your mains supply is in the correct range for the input power requirement of the unit.
-
Page 7: Table Of Contents
Contents List of Figures ..........................ix List of Tables ..........................xi Chapter 1: Introduction 1.1 Dolby Digital Cinema Network Overview ..................1 Chapter 2: Show Store and Show Player 2.1 Dolby Show Store ...........................3 2.1.1 Product Configuration ......................3 2.1.2 What’s Included ........................3 2.1.3 Show Store Front Panel...................... - Page 8 Contents Chapter 4: System Maintenance 4.1 Maintaining the Show Store Internal Hard Drives ................43 4.1.1 Replacing a Drive........................43 4.1.2 Rebuilding an Internal Drive....................47 4.2 Replacing a Show Store Power Supply ..................48 4.3 Replacing a Show Player Power Supply..................51 4.3.1 Installing the Show Player Power Supply Blanking Plate ............
-
Page 9: List Of Figures
List of Figures Dolby Digital Cinema Network....................2 Figure 1-1 Dolby Show Store Front Panel ....................4 Figure 2-1 Dolby Show Store Rear Panel....................6 Figure 2-2 Dolby Show Player Front Panel..................... 8 Figure 2-3 Dolby Show Player Rear Panel ..................... 9 Figure 2-4 Show Player Controls ...................... - Page 10 List of Figures Audio Status Screen......................36 Figure 3-42 Auditorium Status Screen....................36 Figure 3-43 Show Player System Status Screen..................37 Figure 3-44 Show Store System Status Screen ..................37 Figure 3-45 System Menu........................38 Figure 3-46 Brightness Screen ....................... 38 Figure 3-47 Time Format Menu ......................
-
Page 11: List Of Tables
List of Tables Show Player/Show Manager Feature-by-Feature Comparison..........20 Table 3-1 Show Player Diagnostic LEDs and Test Points................55 Table 4-1 Troubleshooting Quick Reference ....................57 Table 4-2 Dolby ® Digital Cinema Presentation System User’s Manual... -
Page 13: Chapter 1: Introduction
Chapter 1 Introduction ® Welcome to Dolby Digital Cinema! The Dolby Digital Cinema presentation system is a direct result of Dolby Laboratories’ continued leadership in the development of innovative cinema technologies. Dolby Digital Cinema provides a flexible system designed to deliver the best possible cinema experience. In creating this new system, Dolby utilized its vast experience with production and exhibition, processing systems, and cinema equipment design. Designed from the ground up, Dolby Digital Cinema serves the exhibition and production communities equally well, ensuring that the cinema continues to provide the optimum environment for experiencing the director’s vision. Building on the company’s unique experience as a pioneer in entertainment technologies and as a leading supplier of cinema audio equipment, Dolby Digital Cinema provides reliability, flexibility of operation, adaptability for the future, and system security. Containing both image and sound components, it incorporates the open standards specified by Digital Cinema Initiatives (DCI). The Dolby Digital Cinema presentation system consists of the following components: • Dolby Show Store, high reliability storage • Dolby Show Player, secure high‐quality digital content decoder • Dolby NA10 Network Automation Interface • Dolby DMA8Plus Digital Media Adapter and a cinema sound processor or a Dolby CP650 Digital Cinema Processor • Dolby Show Manager theatre management software • 1000BASE‐T Ethernet Switches • User‐provided USB keyboard, USB mouse, and computer monitor (minimum 1,024 × 768 resolution at 60 Hz) • User‐provided digital cinema projector (can also include a film projector) Dolby Digital Cinema Network Overview Figure 1‐1 shows a typical Dolby Digital Cinema network. In this example, a Dolby Show ... -
Page 14: Figure 1-1 Dolby Digital Cinema Network
Introduction You can start and stop shows and perform many other functions using the Show Player’s User Control screen. For complete details on the Show Manager software, please refer to the Show Manager online Help system. The following chapters in this manual show you how to use a Dolby Digital Cinema system. Theatre Network Switch USB Port Removable Removable Hard Drive Drive Activity RAID Array Indicator Drive Activity Indicators CP650 Digital Cinema P roce sso r Mono Digital format 10 dolby digital format menu mute Dolby DMA8Plus Digital Media Adapter Dolby CP650 cinema processor (with Cat. -
Page 15: Chapter 2: Show Store And Show Player
Chapter 2 Show Store and Show Player ® This chapter describes the Dolby Show Store and its companion unit, the Dolby Show Player. These are the core components in Dolby’s complete digital cinema presentation system. The system also includes Dolby Show Manager theatre management software, a Dolby NA10 Network Automation Interface, a Dolby cinema sound processor, and a Dolby DMA8Plus Digital Media Adapter (or a properly equipped Dolby CP650 Digital Cinema Processor). Dolby Show Store The Dolby Show Store runs the Dolby Show Manager theatre management software, reads audio and video content files, and serves an A/V bitstream to its associated Dolby Show Player. The Dolby Show Player decodes and decrypts the bitstream, sending the video to the associated screen’s projector and the audio to the associated screen’s Dolby DMA8Plus (or a similarly equipped Dolby CP650). 2.1.1 Product Configuration • 3‐U (5.25‐inch), 19‐inch rack‐mounted custom chassis • Internal hard drive storage (multiple size options) • CD/DVD‐ROM drive (does not play consumer CDs or DVDs) • Three copper gigabit Ethernet ports. An optional fiber‐optical Ethernet port can replace one of the copper Ethernet ports (for connection to a larger Ethernet network) • Removable hard drive (optional) • Power supply and local storage LED indicators • Three USB 2.0 ports •... -
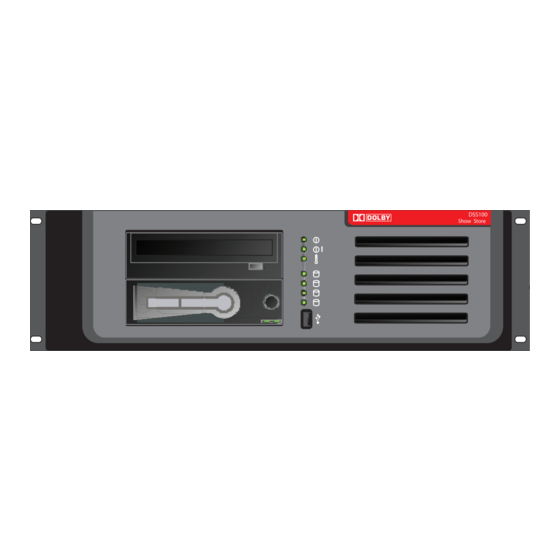
Page 16: Show Store Front Panel
Show Store and Show Player 2.1.3 Show Store Front Panel The Show Store’s front‐panel components include a CD/DVD drive, three power supply LED indicators, four local storage LED indicators, a USB 2.0 port, and an optional removable hard drive, as shown in Figure 2‐1. Following is a description of each of the Show Store’s front‐panel components. CD/DVD-ROM drive Power/internal temperature indicators DSS100 USB Port Removable Removable Hard Drive Show Store Show Store Drive Activity RAID Array Indicator Drive Activity Indicators Local storage Removable hard drive USB 2.0 port... - Page 17 Dolby Show Store Local Storage LED Indicators The Show Store front panel has four bicolor LEDs—one for each of the internal hard drives. Each LED may be non‐illuminated, green, or red. They indicate all activity for each of the corresponding units. Off (non‐illuminated): Indicates a functional drive with no current disk access activity. Green: Indicates normal drive activity. Red: Indicates a drive failure. For details, see Maintaining the Show Store Internal Hard Drives on page 43. Note: If a problem occurs that interrupts a show, the Show Store can communicate with the theatre automation system to perform the desired functions (for example, to turn the house lights on). For more information on implementing this function, contact your Dolby authorized service representative. USB 2.0 Port The unit’s front panel USB 2.0 port is provided for reading and moving files to and from a USB memory device (for example, loading content or licenses to the Dolby Show Store’s internal drives). Removable Hard Drive (optional) The optional removable hard drive (Cat. No. 892) is a 3.5‐inch serial ATA drive. Removable drives can be inserted or removed at any time (except when reading or writing data), which does not require a power cycle or a reboot of the Dolby Show Store. (The Show Store detects a removable hard drive and configures itself so that the content on the drive is visible). An LED, which is located next to the removable hard drive, indicates any drive activity. Caution: Do not remove the drive when it is reading or writing data. You can use the removable drive to load content and licenses on the Show Store’s internal drives. You can also use the drive to offload content from one Show Store and transfer it to another Show Store.
-
Page 18: Show Store Rear Panel
Show Store and Show Player 2.1.4 Show Store Rear Panel The Show Store’s rear‐panel components include Ethernet ports, a monitor port, USB 2.0 ports, an RS‐232 serial port, and dual redundant power supplies with LED status indicators, as shown in Figure 2‐2. Following is a description of each of the Show Store’s rear‐panel connectors. GPI/O connector RS-232 serial port VGA monitor port Copper port USB 2.0 ports Dual redundant power supplies (for serial automation local to theatre (to USB To Show Player (with LED st atus indicators) connection) -
Page 19: Launching Show Manager
Dolby Show Store Monitor and USB 2.0 Ports The monitor and USB 2.0 ports are provided to connect a user‐supplied computer monitor, USB mouse, and USB keyboard to the Show Store. These components must be connected to run the Show Manager theatre management software on the Show Store. You can also use these ports to load content or licenses to the Dolby Show Store’s internal drives. For more information on Show Manager, please refer to the online Help system. Caution: When starting up the Show Store, if a keyboard is connected and any key is accidently pressed, the unit will not boot up. For this reason, you may want to disconnect the keyboard when it is not in use. RS-232 Serial Port This port is provided to connect to a theatre automation system that can utilize a serial connection. For this type of configuration, an additional unit, such as a programmable logic controller (PLC), is required. You can turn on the Serial Automation function and enter the command strings within Show Manager (as described in that application’s online Help system). For information on connecting to a PLC or another device, contact your Dolby authorized technical representative. Additional Automation Capabilities If a problem occurs in the Show Store or Show Player that interrupts playback, the Dolby Digital Fail Safe feature can detect the problem and communicate with the theatre automation system to perform the desired function (for example, to turn the house lights on). For more information on implementing this function, contact your Dolby authorized service representative. 2.1.5 Launching Show Manager When you start up a Show Store, the Show Manager software launches automatically and appears on a connected monitor. You can use Show Manager to build and schedule shows and perform other theatre ... -
Page 20: Dolby Show Player
Show Store and Show Player Dolby Show Player The Dolby Show Player receives an encrypted and encoded audio/video bitstream from a dedicated Dolby Show Store. The Show Player decrypts and decodes the bitstream using encrypted content keys. The Show Player then reencrypts the video and sends it to the associated screen’s digital projector. The Show Player also sends eight channels of digital audio to the associated screen’s Dolby DMA8Plus Digital Media Adapter (or a similarly equipped Dolby CP650 Cinema Sound Processor). The Dolby Show Player features a user interface screen that provides easy access to many of the same functions as the Dolby Show Manager theatre management software. 2.2.1 What’s Included The Dolby Show Player is housed in a 2‐U (3.5‐inch), 19‐inch rack‐mounted custom chassis. The unit ships with all the required software installed. The system parameters are installed on one of the Flash ROM drives. 2.2.2 Dolby Show Player Front Panel The Show Player’s front‐panel components include the User Control screen, menu navigation buttons, an auto on/off button, transport control buttons, an audio/video mute button, status indicators, and a USB 2.0 port (for use by Dolby authorized technicians only), as shown in Figure 2‐3. You can control the system from the Show Player front panel. Note: For a detailed description of all the front‐panel controls, see Show Player Controls on page 11. User control screen Menu navigation buttons Status indicators Auto on/off button... -
Page 21: Dolby Show Player Rear Panel
Dolby Show Player 2.2.3 Dolby Show Player Rear Panel The Dolby Show Player rear‐panel components include dual HD‐SDI outputs, AES outputs, a 1000BASE‐T port, screen number selectors, dual redundant power supplies with LED status indicators, and (linear time code) and (video reference) VIDEO REF connectors, as shown in Figure 2‐4. Following is a description of each of the Show Player’s rear‐panel connectors. AES BNC connectors Dual HD-SDI Outputs (audio out to CP650 (to digital projector) with Cat. No. 790 option and version 2.3 or higher software) HD-SDI LINK A OUT HD-SDI LINK B OUT Linear timecode output... - Page 22 Show Store and Show Player LTC Port The LTC port allows an authorized installer to output linear timecode in order to synchronize external equipment to the Show Player. Video Ref Port The Video Reference port allows an authorized installer to synchronize the Show Player to an externally provided analog video reference. Dolby ® Digital Cinema Presentation System User’s Manual...
-
Page 23: Chapter 3: Using The System
Chapter 3 Using the System ® This chapter explains how to operate a Dolby Digital Cinema system using the Dolby Show Player and its associated Dolby Show Store. It begins with a full description of all the Show Player controls, continues with Getting Started on page 14, and concludes with a detailed description of all the Show Player Menus and Functions on page 20. Before following any of the procedures in this chapter, be sure the system is powered on and ready to use. You may also find it helpful to review Chapter 2 for an overview of the Dolby Digital Cinema system core components. Show Player Controls This section describes the Show Player front‐panel controls. You control the Show Player through its User Control screen and related buttons that are located on the unit’s front panel, as shown in Figure 3‐1. User control screen Menu navigation buttons Status indicators Auto on/off button DSP100 DSP100 Show Player Show Player input audio auto... -
Page 24: Navigation Buttons
Using the System Menu Bar The Show Player User Control screen provides a graphical interface with a menu bar. The menu bar displays a system clock and selectable options represented by icons, as shown in Figure 3‐2. System Clock Status Content Monitor Schedule System Figure 3-2 Show Player Menu Bar Icons and System Clock 3.1.2 Navigation Buttons The following navigation buttons move you through the User Control screen’s various menus and perform other tasks. enter scrolls up in a menu to move to another option (or show any additional options that precede the first displayed option) scrolls down in a menu to move to another option (or show any additional options that follow the last displayed option) navigates left to a menu, or selects a different tab in a special menu navigates right to a menu, or selects a different tab in a special menu enter enter opens a submenu or accepts a selection enter closes a submenu or rejects a selection... -
Page 25: Transport Control Buttons
Show Player Controls 3.1.3 Transport Control Buttons The transport control buttons allow you to control a show during playback. Most of the buttons perform different actions, depending on the playback status. These buttons are active in all modes if the system is working properly and content is available, that is, if a valid show or clip is selected and the local Show Store is detected. The buttons allow you to control a show’s playback in the same manner as a VTR, as described below: Play/Pause: plays/pauses the currently selected show/clip. Pause freezes the screen image. Stop: pressing once stops playback of the currently selected show/clip. Pressing while already stopped goes to the beginning of the show/clip. Rewind: rewinds the currently playing show/clip. Fast Forward: moves forward through the currently playing show/clip. Pressing once moves forward at 2x the playback rate, while pressing twice moves forward at 8x the playback rate. Next: skips to the next clip in the currently playing show, or to the end of the last clip. Previous: skips to the previous clip in the currently playing show, or to the beginning of the first clip. 3.1.4 Auto Button The button allows you to enable/disable automatic playback of the show auto auto schedule within the local Show Store. You can press this button at any time to disable automatic playback of a scheduled show, and start the show manually with the Play button. Pressing the auto button again reenables automatic show playback. The auto button operates independently of the playback state and is available only if a Show Store is detected. If automatic playback of the current show schedule is enabled, the button is green. If it is disabled, the button is not lit. You can also perform the auto button functions using the Show Manager software. For more information on Show Manager, please refer to the online Help system. -
Page 26: Getting Started
Using the System Getting Started This section provides quick start instructions to help you begin using the system. It includes the basic steps required to load and play content on a Dolby Digital Cinema system. In addition to this quick start, a full description of all the Show Player functions is provided in Show Player Menus and Functions on page 20. When the Show Player is up and running, a show or clip may already be selected for playback, as indicated on the User Control screen. If the Show Player is in this state, you can either play that content (see Transport Control Buttons on page 13 and Auto Button on page 13) or play some other content. If you want to load and play new content, follow all the instructions in this section. If you want to select from a list of loaded content, and then play that content, go to Select and Play Content on page 18. 3.2.1 Load Content You can load content on the Show Store from the removable drive option (Cat. No. 892) using the Show Player User Control screen. Insert the Removable Drive in the Show Store The removable drive is hot‐pluggable and you can insert it at any time (with the power on or off), but do not remove the drive when the Activity LED is illuminated (see Figure 3‐3). To insert the removable drive in the Show Store, line up the drive with its Show Store slot, and insert it by pushing on its handle until the drive snaps into place (see Figure 3‐3). The Activity LED turns green when you insert the drive, and then turns off. Activity LED Push on drive handle Figure 3-3... -
Page 27: Figure 3-4 Load Content Using Show Player
Getting Started Load Content Using the Show Player To load content using the Show Player User Control screen: 1. Press the right arrow navigation button ( ) on the Show Player’s front panel to move to the Content icon on the menu bar, then press the button. enter 2. Choose in the Show Player’s Content menu, and select the desired Load Content package or clip, as shown in the example in Figure 3‐4 (for loading a clip). To display all available packages, select the tab. To display all available clips, select the Packages tab. The terms package and clip are defined in the Glossary on page 61. Clips 3. Press the Show Player button to load the selected content. enter Figure 3-4 Load Content Using Show Player The name of the selected content appears and a progress bar indicates the percentage ... -
Page 28: Figure 3-6 Do Not Remove Drive When Flashing Red Icon Appears
Using the System Remove the Drive from the Show Store You can safely remove the drive when it is not loading content (when the Activity LED is not lit) and a flashing red drive icon does not appear at the upper right corner of the Show Player User Control screen, as shown in Figure 3‐6. Figure 3-6 Do Not Remove Drive when Flashing Red Icon Appears When it is safe to proceed, remove the drive by grasping the drive’s handle and pulling it out to the left on a 90‐degree angle. Pull the drive out of its slot, as shown in Figure 3‐7, and then push the handle back in place. Handle Figure 3-7 Pulling the Removable Drive Out of the Show Store Dolby ®... -
Page 29: Load Licenses
Getting Started 3.2.2 Load Licenses Licenses are required to play back encrypted content on a Dolby Digital Cinema system. An authorized user must obtain the required licenses and load them on the system. Authorized users can obtain licenses in the following ways: • Email from distributor • Removable media from distributor (CD/DVD, USB device, or removable drive) Note: Licenses are valid only for specific Show Players and correspond to each unit’s serial number. If a Show Player is replaced, new licenses must be obtained for the replacement unit. Load Licenses Using the Show Player To load licenses stored on any removable media, proceed to step 1. For licenses sent by email, unzip the zipped file(s), and transfer the licenses to a USB device, CD/DVD, or removable drive, then proceed to step 1. Insert the respective media into the Show Store’s front USB port, CD/DVD drive, or removable drive slot. The option in the Show Player’s Content menu is highlighted (and Load Licenses selectable). 2. Choose in the Show Player’s Content menu, as shown in Figure 3‐8, Load Licenses then press . enter Figure 3-8 Load Licenses for Selected Content... -
Page 30: Select And Play Content
Using the System message at the top of the Content menu indicates that no new licenses are available. Figure 3‐9 shows some of these licenses‐related screens. Note: The system rejects any expired or improperly formatted licenses. Figure 3-9 License Loading Screens 3. Press to return to the Content menu. enter 3.2.3 Select and Play Content To select content for playback: Disable auto playback (if enabled) by pressing the Show Player button (green auto light goes off). With auto playback disabled, the Show Manager schedule is ignored. 2. Choose in the Show Player Content menu, as shown in Figure 3‐10. Select Content Figure 3-10 Select Content Dolby ®... -
Page 31: Figure 3-11 Select A Clip For Playback
Getting Started 3. Select the desired show or clip, as shown in the example in Figure 3‐11 (for a clip), and press . Encrypted clips without a valid license appear in red. To play such clips, enter first obtain and load the respective license, as described in Load Licenses on page 17. You can toggle between clips and shows by selecting the corresponding tab using the and navigation buttons. Figure 3-11 Select a Clip for Playback The monitor screen appears and confirms that the show or clip is ready to play, as shown in the example in Figure 3‐12 (for a clip). Note: Licenses and content are date and time sensitive. A valid license may already be loaded, but if the date and time of a license are in the future, the content appears in red. Figure 3-12 Clip is Ready to Play 4. Press the Show Player button ( ) to play the selected show or clip. Play Dolby ®... -
Page 32: Show Player Menus And Functions
Using the System Show Player Menus and Functions The Show Player User Control screen and the Show Manager theatre management software provide access to many of the same functions, while each includes its own unique capabilities, as shown in Table 3‐1. This section provides a complete description of all the Show Player’s menus and functions. For detailed information on Show Manager, please refer to its online Help system. Table 3-1 Show Player/Show Manager Feature-by-Feature Comparison Function Show Player Show Manager Load/delete/offload content Move and delete (clips) loaded content only Load licenses Select/start/rewind/fast Select/start/pause/ forward/pause/stop a clip (or stop a show only show) Play previous/next clip Build a show Schedule a show Check the schedule in an Single day only auditorium Monitor multiple auditoriums at ... -
Page 33: Monitor Screen
Show Player Menus and Functions 3.3.1 Monitor Screen The Show Player user interface starts up with the Dolby logo, while the system loads the firmware (indicated by a progress bar), and then the Monitor screen appears, as indicated by the highlighted Monitor icon. If the local Show Store has not completed its startup cycle, or is disconnected from the system, the Monitor screen indicates that the system is searching for the Show Store. This screen also displays the elapsed time while completing the startup sequence, as shown in Figure 3‐13. When the local Show Store completes its startup cycle and is connected to the Show Player (with no show or clip currently selected for playback), the Monitor screen prompts you to select a show or a clip, as shown in Figure 3‐14. If a show or clip is already selected for playback, the Monitor screen displays that status, as shown in the example in Figure 3‐15. Figure 3-13 Monitor Screen If Startup is in Progress (or disconnected) Figure 3-14 Monitor Screen (select a show or clip) Dolby ®... -
Page 34: Figure 3-15 Ready To Manually Play Show
Using the System Monitor Playback State When a show or clip is selected for playback, the Monitor screen verifies that the content is ready to play and displays the content’s duration, time remaining for the currently playing clip, and the next cue (for example, lights down), as shown in Figure 3‐15. If the selected content contains unlicensed clips, the Monitor screen displays this information. Note: You can display the playback state of a show or a clip in both Auto mode, when a schedule is active, or when Auto mode is disabled and you are starting a show manually, as described in this example. Figure 3-15 Ready to Manually Play Show Press the ( ) button on the front panel to play the show or clip. The Monitor screen Play indicates that the content is running and displays the current clip’s remaining time and the next cue time (in this example, lights), as shown in Figure 3‐16. If you play a show containing clips that require licences, the Monitor screen Note: indicates this state and ... -
Page 35: Figure 3-17 Paused Show
Show Player Menus and Functions During playback, you can pause or stop a show or clip by pressing the or button on the front panel. The Monitor screen displays the current status, as shown in the examples in Figure 3‐17 and Figure 3‐18. Figure 3-17 Paused Show Figure 3-18 Stopped Show Dolby ® Digital Cinema Presentation System User’s Manual... -
Page 36: Content Menu
Using the System 3.3.2 Content Menu In the content menu, you can select content for playback, load content from removable media to the system, delete content from the system or removable media, offload content from the system to removable media, and load licenses. Content Menu/Select Content To select a clip, press the right arrow navigation button ( ) on the front panel to move to the Content icon on the menu bar. The Content menu appears, as shown in Figure 3‐19. In the Content menu, use the navigation buttons to choose the Select option, then press Content enter Figure 3-19 Content Menu (Select Content) Note: If a show is scheduled and Auto mode is enabled, or the system is in playback mode, the appropriate message prompts you to disable auto mode (by pressing the button on the Show Player front panel) or press the Stop ( ) button before Auto you select content for playback, as shown in Figure 3‐20. If you see either of these messages, press the Auto or Stop button, then press . enter Figure 3-20 Disable Auto Button/Stop Playback to Select Content Dolby ®... -
Page 37: Figure 3-21 Content Menu (Select A Show)
Show Player Menus and Functions After you press , the Clip menu appears with a list of the currently available clips, as enter shown in the example in Figure 3‐21. Select the desired clip using the navigation buttons, and then press . To select a show, use the navigation button to move to the tab. enter Show Figure 3-21 Content Menu (Select a Show) If a show or clip is incomplete, corrupted, or missing licenses, it appears in red. When you select a show or clip under any of these conditions, a message appears with a prompt (see Figure 3‐22 and Figure 3‐23). For information on loading licenses, see “Content Menu/Load Licenses” on page 32. Figure 3-22 Clips Without Licenses Listed in Red (selecting not allowed) Note: If you play a show containing unlicensed clips, the system skips the unlicensed ... -
Page 38: Figure 3-23 Show Has Clips With No Licenses
Using the System Figure 3-23 Show Has Clips with No Licenses If you highlight a clip and perform no other action, a pop‐up message appears, indicating that the clip is either licensed or not licensed, as shown in Figure 3‐24. Figure 3-24 Licenses Pop-Up Messages Dolby ® Digital Cinema Presentation System User’s Manual... -
Page 39: Figure 3-25 Content Menu/Load Content
Show Player Menus and Functions Content Menu/Load Content To load packages or clips from a Show Store’s removable hard drive, CD/DVD drive, or USB device, to the Show Store’s internal storage: Use the navigation buttons to select the Content icon in the menu bar, then choose , as shown in Figure 3‐25. Load Content Figure 3-25 Content Menu/Load Content Press to display a list of all the available content on the local Show Store’s enter removable media. To display all available packages, select the tab. To display Packages all available clips, select the tab, as shown in the example in Figure 3‐26. Also Clips displayed is the available free space on the Show Store, the location of the available content indicated by an icon (removable hard drive in this example), and the size of the available content. Note: Previously loaded content is unloadable and grayed out in the list of content. If you need to reload content for any reason, you must first delete that content (see Content Menu/Delete Content on page 29) and then load it again. Figure 3-26 Available Clips on the Show Store Dolby ®... -
Page 40: Figure 3-27 Load Content Confirmation Dialog Box
Using the System 2. Use the navigation buttons to select the content you want to load, then press . enter A confirmation dialog box appears, as shown in Figure 3‐27. A option allows Cancel you to abort the content loading process. If you select , the Content menu Cancel reappears. If you try to load a clip that is already loaded on the Show Store, a message indicates that loading is not allowed. Figure 3-27 Load Content Confirmation Dialog Box 3. Select in the confirmation dialog box, then press the button to confirm the enter content loading operation. The name of the selected content appears and a progress bar indicates the percentage of content loaded, as shown in Figure 3‐28. When the loading process is complete, the Content menu reappears. Figure 3-28 Loading Content Progress Screen Dolby ®... -
Page 41: Figure 3-29 Content Menu/Delete Content
Show Player Menus and Functions Content Menu/Delete Content To delete content on the Show Store‘s drives: Use the navigation buttons to select the Content icon in the menu bar, then choose , as shown in Figure 3‐29, and press Delete Content enter. Figure 3-29 Content Menu/Delete Content Two selection tabs appear, represented by their respective icons (from left to right): . Internal Drive Removable Drive 2. Select the tab that corresponds to the location of the content you want to delete. A list of content at the selected location appears, as shown in the examples in Figure 3‐30 for the Show Store’s internal and removable drives. The name, type, and size of the content and the free space in the respective storage location are also displayed. Figure 3-30 Delete Content from Show Store Internal and Removable Drives Dolby ®... -
Page 42: Figure 3-31 Delete Content Confirmation Screen
Using the System 3. Use the navigation buttons to select the content you want to delete, and then press enter A confirmation dialog box appears, as shown in the examples in Figure 3‐31. A Cancel option allows you to abort the content deletion process. If you select , the Cancel Content menu reappears. Figure 3-31 Delete Content Confirmation Screen If the content selected for deletion is part of a show, a message appears, as shown in Figure 3‐32. If you delete content that is part of a show, the system skips that content when the show is played. If you delete content that is currently selected for playback, the system deselects that content for playback. Figure 3-32 Deleted Content Is Part of a Show 4. Select and press to confirm the deletion of the selected content. enter A progress bar indicates the percentage of content deleted. This screen is similar to the example shown in Figure 3‐28 for loading content. -
Page 43: Figure 3-33 Content Menu/Offload Content
Show Player Menus and Functions Content Menu/Offload Content You can offload clips from the Show Store’s internal storage to its removable drive, and then load it on another Show Store in a different auditorium. Use the navigation buttons to select the icon in the menu bar, then choose Content Offload , as shown in Figure 3‐33, and press Content enter. Figure 3-33 Content Menu/Offload Content To offload content to the removable drive, reverse the procedure for loading content on the internal drives (see Content Menu/Load Content on page 27). Dolby ® Digital Cinema Presentation System User’s Manual... -
Page 44: Figure 3-34 Content Menu/Load Licenses
Using the System Content Menu/Load Licenses If licenses for this Show Player are available on any removable media connected to the Show Store, the option in the Content menu is selectable. If no Load Licenses new licenses are available, the option is grayed out (and Load Licenses nonselectable). To load licenses from a connected Show Store: Use the navigation buttons to select the Content icon in the menu bar, then choose , as shown in Figure 3‐34, and press . Load Licenses enter Figure 3-34 Content Menu/Load Licenses A progress bar appears, which displays the license loading progress. Figure 3-35 License Loading Progress Screen If you try to load licenses from a removable device after loading all the available licenses on that device, a message informs you that the licenses are already loaded. When you disconnect the removable media after the system accepts all the licenses, a message at the top of the Content menu indicates that no new licenses are available. Figure 3‐36 shows some of these license‐related screens. -
Page 45: Figure 3-36 License Loading Screens
Show Player Menus and Functions Figure 3-36 License Loading Screens If you try to load licenses that are not valid for this Show Player, a message asks whether you want to load these licenses, as shown in Figure 3‐37. Figure 3-37 Licenses Not Valid for This Show Player 2. Press to return to the Content menu. enter Dolby ® Digital Cinema Presentation System User’s Manual... -
Page 46: Schedule Screen
Using the System 3.3.3 Schedule Screen The Schedule screen displays the current day’s schedule for the auditorium in which the Show Player is located. The next pane displays either the rest of the current day’s schedule or the next day’s schedule. Use the navigation buttons to select the Schedule icon in the menu bar. The Schedule screen lists the current day’s shows, as shown in Figure 3‐38. You can use the navigation button to scroll through the current schedule. Any currently scheduled show missing content or missing licenses is listed in red. Note: The Show Player User Control screen is synchronized with the Show Manager clock. The schedule references this clock. Auto Figure 3-38 Schedule Screen (current day’s shows) If no schedule is available or no show is scheduled for the current day, a message appears, as shown in Figure 3‐39. Figure 3-39 Schedule Screen (no schedule available) Dolby ® Digital Cinema Presentation System User’s Manual... -
Page 47: Status Menu
Show Player Menus and Functions 3.3.4 Status Menu The Status menu displays an overview of the main system parameters and verifies correct system operation. To check the system status: Use the navigation buttons to select the Status icon in the menu bar. The Status menu displays five system parameters: , , , Video Audio Auditorium Show Player , and , as shown in Figure 3‐40. In this example, the system status System Show Store System is for all the displayed parameters. Figure 3-40 Status Menu (all parameters OK) If a system problem occurs, is displayed in red next to the corresponding ERROR parameter. If an appears, please refer to Troubleshooting on page 57. -
Page 48: Figure 3-42 Audio Status Screen
Using the System Status Menu/Audio Status To display the audio parameters, navigate to and press the button. Audio enter Figure 3‐42 shows all the audio parameters that appear as you scroll down the list using the up/down navigation buttons. Figure 3-42 Audio Status Screen Status Menu / Auditorium Status To display the auditorium parameters, navigate to and press the Auditorium enter button. The Auditorium Status screen appears, which displays the screen (auditorium) number and the Show Player’s IP address, as shown in Figure 3‐43. Figure 3-43 Auditorium Status Screen Dolby ® Digital Cinema Presentation System User’s Manual... -
Page 49: Figure 3-44 Show Player System Status Screen
Show Player Menus and Functions Status Menu/Show Player System Status To display the Show Player system status, navigate to in the Show Player System Status menu, and press the button. Figure 3‐44 shows the status of all the Show enter Player system parameters that appear as you scroll down the list using the up/down navigation buttons. Figure 3-44 Show Player System Status Screen Status Menu/Show Store System Status To display the Show Store system status, navigate to in the Status Show Store System menu, and press the button. The Show Store System Status screen appears, enter which displays all the Show Store parameters, as shown in Figure 3‐45. -
Page 50: System Menu
Using the System 3.3.5 System Menu The System menu allows you to adjust some of the Show Player’s internal settings. To display this menu, use the navigation buttons to select the System icon in the menu bar. The System parameters appear, as shown in Figure 3‐46. Figure 3-46 System Menu System Menu/Brightness To adjust the brightness of the Show Player’s User Control screen, navigate to the option in the System menu and press . The Brightness screen Brightness enter appears, as shown in Figure 3‐47. Use the navigation buttons to increase/decrease the menu brightness, select , and press enter Figure 3-47 Brightness Screen Dolby ® Digital Cinema Presentation System User’s Manual... -
Page 51: Figure 3-48 Time Format Menu
Show Player Menus and Functions System Menu/Time Format To set the Show Player’s time display to 24‐hour or 12‐hour format, navigate to the option in the System menu and press . The Time Format menu Time Format enter appears, as shown in Figure 3‐48. Use the navigation buttons to change the format, select , and press enter Figure 3-48 Time Format Menu System Menu/Video Reference To set the Show Player’s video reference to use the internal sync pulse or an external source, navigate to the option in the System menu and press . Video Reference enter The Video Reference menu appears, as shown in Figure 3‐49. The default is . Internal Use the navigation buttons to change the format, select , and press enter Caution: Do not select ... -
Page 52: System Menu/Playback Mode
Using the System 3.3.6 System Menu/Playback Mode To set the Show Player mode, navigate to the option in the System Playback Mode menu and press . The Playback Mode menu appears, as shown in Figure 3‐50. enter If the digital projector is installed with a Dolby Digital Cinema 3D system, select (to ensure that the system uses the correct processing). For any other 3D Dolby 3D projection system, select . To switch back to 2D, change the to . Playback Mode If you select the incorrect mode for the content to be played, an error message appears on the Show Player User Control screen. Be sure the digital projector is also set for the selected mode. Figure 3-50 Playback Mode Menu System Menu/Timecode Output To enable or disable the Show Player’s linear timecode output, navigate to the option in the System menu and press . The ... -
Page 53: Figure 3-52 Timecode Offset Menu
Show Player Menus and Functions System Menu/Timecode Offset To set the Show Player’s timecode offset, navigate to this option in the System menu and press . The menu appears, as shown in Figure 3‐52. enter Timecode Offset This option allows you to mark a position in a show with a timecode of 00:00:00:00 (zero), which is the default, 01:00:00:00 (1 hour), or 10:00:00:00 (10 hours). The Show Player’s linear timecode output (LTC) is then offset accordingly. With this feature, you can use a timecode slave device with nonlinked media (for example, an independent audio track), and play it back in synchronization at the specified point in a show (for example, the start of a feature). Use the navigation buttons to change the offset, select , and press . enter Figure 3-52 Timecode Offset Menu System Menu/Video Playback Rate To set the Show Player’s video playback rate, navigate to this option in the System menu and press . The menu appears, as shown in enter Video Playback Rate Figure 3‐53. This option allows you to adjust to cases where there is a mixture of ... -
Page 55: Chapter 4: System Maintenance
Chapter 4 System Maintenance ® This chapter explains how to maintain the Dolby Show Store and Dolby Show Player. The sections that follow show you how to diagnose and repair hard drives and power supplies. Maintaining the Show Store Internal Hard Drives If one of the Show Store’s internal hard drives fails, its corresponding front‐panel LED turns from green to red, as shown in the example in Figure 4‐1. Failed drive LED Failed drive LED (Drive 1) (Drive 1) Figure 4-1 Identifying a Failed Drive in the Show Store If a drive fails while a show is running, the show continues to run without interruption. If one drive fails, no information is lost. If a second drive fails before you replace the first failed drive, all information is lost (and any show in progress stops running). For this ... -
Page 56: Figure 4-2 Removing The Show Store Front Panel
System Maintenance D S S 1 0 0 S t o S t o Figure 4-2 Removing the Show Store Front Panel 3. Use a Phillips screwdriver to remove the six screws that secure the retaining bracket covering the internal drives, then remove the bracket as shown in Figure 4‐3. Figure 4-3 Removing the Show Store Retaining Bracket A drive LED may turn from green to red if one or more of the Show Store internal Note: hard drives is dislodged during shipment or relocation. -
Page 57: Figure 4-4 Removing The Failed Drive From The Show Store
Maintaining the Show Store Internal Hard Drives 4. Match the failed drive’s number (noted in step 1) with the corresponding numbered internal drive, then grasp the drive’s top and bottom finger tabs and slide it out of its slot, as shown in the example in Figure 4‐4. The drives are numbered from left to right (1, 2, 3, 4). Finger tabs Figure 4-4 Removing the Failed Drive from the Show Store 5. Be sure that no show is running, then grasp the replacement drive’s top and bottom finger tabs, and firmly but gently slide the drive into its slot (see Figure 4‐5) until you feel resistance, which indicates that the drive is seated in its socket. You can replace a drive with a higher capacity unit but not with a lower capacity unit. Note: To insert properly, position the drive in the top guide rail first, and then slide the drive into its slot. -
Page 58: Figure 4-6 Reinstalling The Show Store Retaining Bracket
System Maintenance 6. Position the retaining bracket in front of the internal drives, lining it up with the screw holes, then use a Phillips screwdriver to reinstall its six screws and secure the drives, as shown in Figure 4‐6. Figure 4-6 Reinstalling the Show Store Retaining Bracket 7. Grasp the front panel on its left and right sides, line up its four mounting studs with the main unit’s four holes (one in each corner), then push until it snaps into place, as shown in Figure 4‐7. D S S 1 0 0 S t o S t o Figure 4-7 Reinstalling the Show Store Front Panel Rebuild the replacement drive, as described in Rebuilding an Internal Drive on ... -
Page 59: Rebuilding An Internal Drive
Maintaining the Show Store Internal Hard Drives 4.1.2 Rebuilding an Internal Drive The Show Store must have four internal drives installed before initiating a rebuild operation. This can take 2.5 hours or longer, so be sure no show is scheduled during this time (if possible, rebuild in the morning or overnight). If a single internal drive fails, and a user removes the wrong drive (with power on), all internal drives fail completely. In such a case, contact your Dolby authorized service representative. To rebuild a Show Store internal hard drive: Place the Show Store in an idle state by stopping playback of any shows, and waiting for the completion of any file transfers or other operations. 2. Note the number of the hard drive that failed (1, 2, 3, or 4) by checking the internal drive LEDs on the front panel for the corresponding red warning light. 3. Shut down the unit by disconnecting the power, then remove the failed drive from its slot following the instructions in Replacing a Drive on page 43. If a replacement drive is available, follow the instructions to replace the drive. If a replacement drive is not available, or the drive has not permanently failed, you can rebuild the system without replacing the “failed” drive. In this case, you can rebuild with all four original drives in place. 4. Be sure a monitor and keyboard are connected to the Show Store, then reconnect the power. 5. Ignore the initial prompt to press <ALT> + <3> until the system recognizes the RAID drives, as displayed on the screen. ® At this point, the 3ware Disk Array Configuration Utility launches and a warning message informs you that the internal drives (RAID) are now operating in a degraded ... -
Page 60: Replacing A Show Store Power Supply
System Maintenance Replacing a Show Store Power Supply The Show Store requires only one power supply; a second unit is provided for backup. If a problem occurs with either of these redundant power supplies, the power failure indicator LED on the front panel flashes red (see Figure 4‐8) and a warning buzzer sounds. You can replace a failed power supply during a show, but to avoid accidentally removing the wrong unit, wait until the theatre is empty (as the system continues operating with one power supply). The Dolby Cat. No. for each of your Show Store’s power supplies is identified by a label affixed to the right side of each unit. Failed power supply Failed power supply (Red LED) (Red LED) Figure 4-8 Show Store Front-Panel Power Supply Indicator To replace a power supply: Identify the failed unit in the rear panel by its non illuminated LED, as shown in Figure 4‐9. Failed power supply Figure 4-9 Show Store Rear-Panel Failed Power Supply Dolby... -
Page 61: Figure 4-10 Turn Off Buzzer And Disconnect Ac Power
Replacing a Show Store Power Supply 2. Press the red button to turn off the buzzer, and disconnect the failed power supply’s AC power, as shown in Figure 4‐10. Disconnect AC power from failed power supply Red buzzer button Figure 4-10 Turn Off Buzzer and Disconnect AC Power 3. Use a Phillips screwdriver to remove the retaining clip’s two screws, then pull the clip away from the rear panel to remove it, as shown in Figure 4‐11. Figure 4-11 Removing the Retaining Clip 4. Grasp the pinch lever at the top of the failed power supply, then pull the unit out of the Show Store, as shown in Figure 4‐12. Each unit is labeled with its Dolby Cat. No. -
Page 62: Figure 4-13 Inserting The Replacement Power Supply
System Maintenance 5. Position the replacement power supply squarely within its slot, as shown in Figure 4‐13, then push it along the guiding surface until it snaps into place. You should hear a click when it seats properly in the rear panel. Figure 4-13 Inserting the Replacement Power Supply 6. Use a Phillips screwdriver to reinstall the retaining clip with its two screws, as shown in Figure 4‐14. Figure 4-14 Reinstalling the Retaining Clip Dolby ® Digital Cinema Presentation System User’s Manual... -
Page 63: Replacing A Show Player Power Supply
Replacing a Show Player Power Supply 7. Connect AC power to the replacement power supply, as shown in Figure 4‐15. The replacement unit’s LED turns green and the front panel’s red LED turns off to verify that the new unit is functioning correctly. Figure 4-15 Reconnecting AC Power Replacing a Show Player Power Supply Like the Show Store, the Show Player has two power supplies installed in its rear panel. Only one power supply is required, but a second unit is provided as a backup. If one of these redundant power supplies fails, a red alert message appears on the Show Player LCD and the green LED on the failed unit goes off, as shown in Figure 4‐16. The Dolby Cat. No. for each of the Show Player’s power supplies is identified by a label affixed to each unit. Failed unit LED off Figure 4-16 Failed Power Supply with LED Off The power supplies are hot‐pluggable and you should replace the failed unit as soon ... -
Page 64: Figure 4-17 Disconnect Power, Loosen Screws, Remove Failed Unit
System Maintenance Disconnect the AC power cable from the failed power supply, then use a Phillips screwdriver to release the two screws securing the failed unit, and grasp the unit’s handle to pull the unit out of the Show Player, as shown in Figure 4‐17. Handle Figure 4-17 Disconnect Power, Loosen Screws, Remove Failed Unit 2. Align the replacement unit with the two small openings at the lower left and right sides of the power supply slot, then push the new power supply into its slot until it snaps into its connector, as shown in Figure 4‐18. Figure 4-18 Inserting the Replacement Unit Warning: To prevent the risk of electrical shock and maintain proper airflow, a removed Show Player power supply must be replaced either with another unit or the provided blanking plate. For details, see “Installing the Show Player Power Supply Blanking Plate” on page 53. Dolby ® Digital Cinema Presentation System User’s Manual... -
Page 65: Installing The Show Player Power Supply Blanking Plate
Replacing a Show Player Power Supply 4.3.1 Installing the Show Player Power Supply Blanking Plate If you remove a power supply from a Show Player and do not replace it with another unit, you must install the provided blanking plate as follows: Line up the blanking plate with the empty power supply slot and screw the blanking plate into place, as shown in Figure 4‐19. This procedure is similar to installing a replacement power supply, as described in the previous section. Figure 4-19 Installing the Blanking Plate Dolby ® Digital Cinema Presentation System User’s Manual... -
Page 66: Show Player Diagnostics And Testing
System Maintenance Show Player Diagnostics and Testing A Dolby authorized technician can perform a number of tests by checking the Show Player’s diagnostic LEDs and probing the test points, which are located in the hidden diagnostics compartment under the unit’s front panel. You can view the Show Player’s diagnostics compartment as follows: Use both hands to grasp the left and right sides of the Show Player’s front panel, and then pull it away from the unit to remove it, as shown in Figure 4‐20. D S P 1 0 0 P la P la Figure 4-20 Removing the Show Player Front Panel With the Show Player’s front panel removed you can view the diagnostics compartment, as shown in Figure 4‐21. Diagnostic LEDs T est points Figure 4-21 Show Player Hidden Diagnostics Compartment Dolby ®... - Page 67 Show Player Diagnostics and Testing The Show Player’s diagnostics compartment has six LEDs and five test points, which are defined in Table 4‐1. Table 4-1 Show Player Diagnostic LEDs and Test Points LEDs and Test Points Function Turns green if all power rails, both those from the power supply and those derived from them, are within tolerance. If they are not within tolerance, the LED is not illuminated. Indicate whether the four cooling fans are working. The upper LED represents the front two fans and the lower LED represents the rear two fans. Each of the LEDs glows in green when the fans are operating properly and glows in red if they are not. Fault Indicates any catastrophic hardware errors, which can include a power hardware diagnostics failure, the failure of both fans, or the resetting of any of the processors. If a processor resets, the system reboots and the LED turns off after a short time. PSU1 Indicates the status of the two power supplies. PSU2 The Show Player has dual redundant power supplies (only one is required for operation). PSU1 is the power supply located in the upper slot and PSU2 ...
-
Page 68: Figure 4-22 Reinstalling The Show Player Front Panel
System Maintenance 2. When you are done viewing the hidden diagnostics compartment, replace the Show Player’s front panel. Align the four mounting studs (located at each corner on the back of the panel) with the holes in the main unit, and then push the front panel back in place, as shown in Figure 4‐22. D S P D S P 1 0 0 1 0 0 P la P la Figure 4-22 Reinstalling the Show Player Front Panel Dolby ® Digital Cinema Presentation System User’s Manual... -
Page 69: Troubleshooting
Troubleshooting Troubleshooting If you experience any problems with the Dolby Digital Cinema system, check Table 4‐2 and for possible solutions. If you cannot resolve your problem using the table, contact your Dolby authorized service representative. Table 4-2 Troubleshooting Quick Reference Problem Verify Action No sound in auditorium * Show is playing by checking Select content and press play button to start show. If LED is unlit but Show Player monitor screen input and video LEDs are green, clip has no audio. and Play button. * Show Player audio LED is Select a different show or clip. green. Select assigned Digital Cinema format. * Processor is set to the assigned Digital Cinema format. Press mute button to unmute processor and set fader * Processor is not in mute and to 7.0. fader is at 7.0. *Amplifiers are switched on. Power on amplifiers. No picture on screen * Projector is on. Turn projector on. * Show Player is connected to Authorized technician connect Show Player to projector. projector. * Show Player video LED is Authorized technician secure Show Store to Show Player connection. green. - Page 70 System Maintenance Table 4-2 Troubleshooting Quick Reference Problem Verify Action Red alert appears on Show *Problem on Show Player If status screen indicates a Show Player power supply needs Status screen. replacement, follow the instructions in Replacing a Show Player Player User Control screen Power Supply on page 51. Unable to transmit or receive *Fiber Ethernet cables are Authorized technician secure connections to theatre network switch. on theatre network using fiber properly connected to Show Authorized technician reverse the two fiber Ethernet cables and Ethernet ports Store and theatre network reconnect to fiber Ethernet ports on Show Store. switch. Dolby ® Digital Cinema Presentation System User’s Manual...
-
Page 71: Chapter 5: Dolby Na10
Chapter 5 Dolby NA10 ® The Dolby NA10 Network Automation Interface integrates the Dolby Digital Cinema presentation system with existing cinema hardware. The unit provides the vital link between the Dolby Show Manager theatre management software and the existing theatre automation equipment through a 10BASE‐T Ethernet connection. The NA10 provides a bridge between a 10Base‐T Ethernet port and a general purpose I/O interface. Taking cues from the Dolby Show Store through its Ethernet port, the NA10 activates cinema functions, such as machine start/stop, house lighting control, curtain motor control, and other theatre assets. The NA10 also accepts film‐based cues from existing equipment. The NA10 reports these cues to the Dolby Show Manager software, which enables remote monitoring. The NA10 is not meant to replace existing film‐based automation equipment. In a hybrid film and Dolby Digital Cinema system, the NA10 is connected in parallel with the existing automation controller. This configuration eases digital cinema system integration and allows the Dolby Show Store and the Dolby Show Manager software to control the required automation functions during a presentation. By simplifying the communication between the Dolby Digital Cinema system and the existing cinema automation, the NA10 allows you to monitor and control a film projection system and other theatre assets. This is especially useful if your show content contains both film and digital media. A Dolby authorized service representative uses the NA10 setup software to configure the I/ O interface. No direct user intervention is required. NA10 Network Automation Interface input input output output power power network network online online offline offline Figure 5-1... -
Page 73: Glossary
Glossary actual duration The actual length or run time of a digital show computed by summing the duration data of each clip in the show. alert ® A warning or error message within the Dolby Digital Cinema system. auditorium An individual screen in a theatre complex. For example, a 12‐plex has 12 individual auditoriums. automation system A device responsible for handling the electrical interface to auditorium equipment such as lights and masking. clip A single piece of digital content such as a trailer, policy (for example, a no‐smoking reminder), advertisement, or feature. Clips are assembled in a sequence to create a show. Clips can be any length. clip type Describes the type of content within a clip (for example, feature, trailer, policy, advertisement, test, transition, or PSA). composition list A list of the raw clips in a distribution package with instructions describing how to play these files, along with a means for authentication. A content‐synchronized event, such as “lights down” or “masking scope,” that can be inserted in a digital show. The cue is implemented by automation equipment in the auditorium. The cues in the Show Manager show element library represent the cues available in the network automation system (such as a Dolby NA10) in the auditorium. Dolby ® Digital Cinema Presentation System User’s Manual... - Page 74 Glossary D-cinema Digital cinema: the production and exhibition of theatrical content using digital audio and video for presentation, projected digitally. distribution package A package that contains one or more pieces of content (clips) often delivered on physical means such as a hard drive, DVD‐R, or via a network connection such as satellite. It contains the physical data files and a list or lists describing how to play these files, along with a means for authentication. The distribution package is delivered from the distributor to the exhibitor. estimated duration An estimate of the total run time of a show as input by the user. This is required for film type shows and is used when scheduling. It could also be used for digital shows created before all the content is available to facilitate scheduling show times in the future. feature A type of clip containing the main presentation, such as the movie itself. intermission The time between the end of one scheduled show and the start of the next. note A descriptive text element that can be attached to a show, clip, or auditorium. A note can be used as a reminder to check something or to provide information to the next person coming on shift about a particular show, clip, or auditorium (for example, “Change the trailer package after Friday’s show”). packing list A list of all the content in a distribution package. show The entire program that is to be played in a theatre auditorium: typically one or more trailers, advertisements, and policies (for example, no smoking) and the main feature. There are two types of shows: digital and film. A digital show contains digital content (clips) and cues in a specific sequence. A film show does not contain clips or cues; it is created to represent film content. theatre The collection of auditoriums in a cinema complex managed by Show Manager. theatre assets The physical facilities in an auditorium such as lights, curtains, and masking. Dolby ®...
-
Page 75: Index
Index 2D playback mode............ 40 drive 3D playback mode............ 40 activity ..............5 a/v mute button ............13 CD ................4 AES connectors ............9 DVD .................4 audio status ............13 internal auditorium failure ............5 schedule..............34 rebuilding ............47 screen number ............9 replacing ............43 status ..............36 removable auto button ..............13 inserting ............ - Page 76 Index playback described ..............3 automatic.............. 13 drive – controlling ............13 internal..........43 interrupted ............. 7 removable..........14 – selecting content for........18 front panel – playback mode............40 components ............ 4 power supply removing ............43 LEDs................ 4 USB port...............5 Show Player keyboard, connecting to ........7 blanking plate, installing ........ 53 LEDs – replacing .............
Need help?
Do you have a question about the DSS100 and is the answer not in the manual?
Questions and answers