Table of Contents
Advertisement
Advertisement
Table of Contents
Troubleshooting

Related Manuals for TeleAdapt TA-7650 MediaHUB HD


Summary of Contents for TeleAdapt TA-7650 MediaHUB HD
- Page 1 MediaHub...
-
Page 2: Table Of Contents
Table of Contents Product Introduction ..............3 Safety Precaution Information ............4 Definitions ..................6 Electrical Requirements .............7 Care and Maintenance ..............7 Installation and Usage ...............8 Packing List ................8 Standard Installation Instructions ..........9 Configuring the Guest-Access Technique ......... 9 Standard Auto-Sensing Feature ..........10 Using MediaHub HD .............. -
Page 3: Product Introduction
Product Introduction Thank you for choosing the TeleAdapt MediaHub for your in-room entertainment or conference room connectivity needs. MediaHub allows business and leisure travellers to use the in-room TV display as their personal entertainment or projection screen for enjoying their personal standard- and high-definition (HD) video games, music playlists, movies, TV shows, photos, business presentations and more from their portable electronic devices. -
Page 4: Safety Precaution Information
Safety Precaution Information When used in the directed manner, this unit has been designed and manufactured to ensure your personal safety. However, improper use can result in potential electrical shock or fire hazards. Please read all safety and operating instructions carefully before installation and use. Be sure to keep these instructions handy for future reference. - Page 5 Protect the power cord from being walked on or pinched particularly at plugs, convenience receptacles and the point where they exit from the apparatus. Only use attachments/accessories specified by the manufacturer. Use only with the cart, stand, tripod, bracket or table specified by the manufacturer, or sold with the apparatus.
-
Page 6: Definitions
Definitions A2DP – Advanced Audio Distribution Profile, the Bluetooth ® protocol that is built into MediaHub HD for streaming high quality audio wirelessly between devices. For example, music can be streamed from a mobile smartphone to an in-room stereo/TV speaker using MediaHub HD as the receiver. Auto-Sensing –... -
Page 7: Electrical Requirements
TA-7650 plus TA-7500L. Care and Maintenance Though TeleAdapt MediaHubs are designed for durability, they still remain complex electronic devices. As such, care needs to be taken with how they are handled. The following are tips to care for your system: ... -
Page 8: Installation And Usage
Disposal The crossed-out wheeled-bin symbol on your product, literature, or packaging reminds you that in the European Union all electrical and electronic products must be taken to separate collection at the end of their working life. Do not dispose of these products as unsorted municipal waste. -
Page 9: Standard Installation Instructions
DTH-xxx Desktop Mount Kit also includes: A Desktop Housing DTH-HD01 for MediaHub HD DTH-EXT for MediaHub HD with PowerHub Extender B 90º HDMI Replacement Cable CAB-40683D5A C Rear Door Screws D Rubber Tabs See Assembling Desktop Housing section for assembly instructions. Standard Installation Instructions (for Manual Switch) Figure 1: Desktop Mount Kit While unplugged, ensure MediaHub rear DIP Switches are set to the following... -
Page 10: Standard Auto-Sensing Feature
Option 3: Program the PPV/VOD GUI to offer the in-room TV’s HDMI AUX through an on-screen prompt. Using the guest remote control, guests simply follow the on-screen prompts to play content from the MediaHub HD. Standard Auto-Sensing Feature MediaHub HD has been engineered with a built-in auto-sensing audio/video function. -
Page 11: Using Stereo Bluetooth
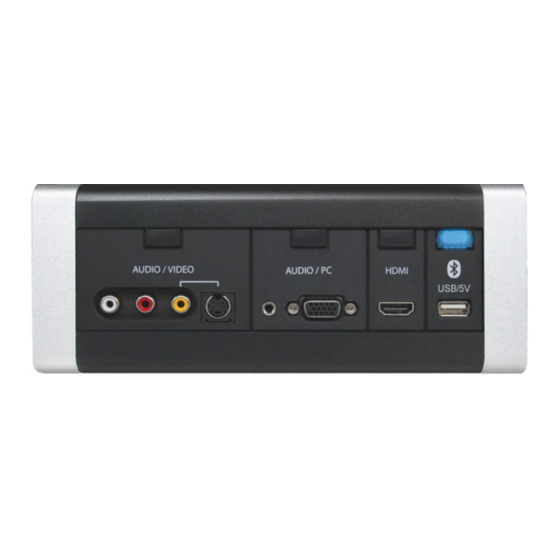
C Mini-Stereo Jack: This 3.5mm stereo jack will provide audio playback through the in-room TV speakers. Compatible with any electronic media player with a headphone jack. Use a male-to-male audio cable. D VGA (RGB): Using a VGA cable, converts the in-room TV into a secondary or mirror display option for laptop computers. - Page 12 The pairing session will hold until your player is turned off. If you connect another media device to the MediaHub HD, the new audio/video source will begin to play through the TV. MediaHub HD will maintain the Stereo Bluetooth pairing. When done using the second device, simply press the MediaHub HD Bluetooth LED button to resume playing your Stereo-Bluetooth-enabled player or smartphone.
-
Page 13: Tv/Stb Supported Installation
INPUT button, channel map or on-screen prompts. This configuration requires a serial control connection to a hospitality TV or Tuner Card/Set Top Box that has firmware integrated with the TeleAdapt MediaHub HD. The following pages outline instructions are for installing MediaHub HD with a specific brand TV/STB supported serial control installation. -
Page 14: Samsung North America
Samsung North America What You Will Need: - TA-7650 or TA-7650/TA-7500L MediaHub HD Connectivity Panel Power Supply Cable (Note: MediaHub with Power/Data Extender model includes TWO power supplies – one for media panel and one for power panel) Ethernet Cable (for MediaHub with Power/Data Extender model only) - MediaHub Cable Kit HDMI Cable (3m) RS-232 Cable... - Page 15 Samsung 2009/2010 continued: For Samsung LED Series 4, LED Series 6, LCD Series 3, LED Series 4, LED Series 5 models with EXLINK serial port (factory-level firmware) MediaHub HD DIP Mode B7: UP-DWN-UP-UP -- DWN-UP-UP-UP MediaHub HD Firmware Version: 1.23+ MediaHub HD Video Driver Firmware: 3.26+ Configure TV: Using Samsung remote control, enter the menu by pressing <MUTE>, <1>, <1>, <9>, <ENTER>.
-
Page 16: Panasonic North America
Panasonic North America What You Will Need: - TA-7650 or TA-7650/TA-7500L MediaHub HD Connectivity Panel Power Supply Cable (Note: MediaHub with Power/Data Extender model includes TWO power supplies – one for media panel and one for power panel) Ethernet Cable (for MediaHub with Power/Data Extender model only) - MediaHub Cable Kit HDMI Cable (3m) CONTROL... - Page 17 Panasonic North America Series 20 ProDisplay Models For Series 20 Professional Display moels with an IMP2000 tuner card and serial control (factory-level firmware on TV, IMP2000 card requires Enseo firmware patch v.24) Connect MediaHub HDMI to TV’s native HDMI port, connect RS232/DB9 adapter to IMP’s 3.5mm serial control port.
- Page 18 Panasonic Series 10/11 with IMP- Tuner Card This installation requires an IMP- Tuner Card in Slot 2/3 and the Panasonic TY-FB10HMD Dual HDMI Terminal Card in Slot 1. (Figure 1) MediaHub HD DIP Mode 52: DWN-UP-DWN-UP -- DWN-DWN-UP-DWN MediaHub HD Firmware Version: 1.23+ MediaHub HD Video Driver Firmware: 3.26+ Configure TV: Go into HOTEL MODE (using Panasonic remote, press <MENU>, Slot 1...
-
Page 19: Philips North America
Philips North America What You Will Need: - TA-7650 or TA-7650/TA-7500L MediaHub HD Connectivity Panel Power Supply Cable (Note: MediaHub with Power/Data Extender model includes TWO power supplies – one for media panel and one for power panel) Ethernet Cable (for MediaHub with Power/Data Extender model only) - MediaHub Cable Kit HDMI Cable (3m) RS-232 Cable... - Page 20 Philips HFL Models with an External PPV STB Follow Philips Direct-to-TV installation instructions according to instructions above. Connect the PPV STB AV Out to TV’s HDMI1 port. Connect MediaHub HD’s HDMI to TV’s HDMI2. Philips HFL 2009 Models with an Enseo HD3000/2000 Follow instructions for Philips Direct-to-TV Installation according to the model/year of your Philips display.
-
Page 21: Lg North America
LG North America Direct-to-TV installations with LG displays requires a TeleAdapt Protocol Converter Dongle (PCD), part number TA-8700-A01. What You Will Need: - TA-7650 or TA-7650/TA-7500L MediaHub HD Connectivity Panel Power Supply Cable (Note: MediaHub with Power/Data Extender model includes TWO power supplies –... - Page 22 For LG hospitality displays using the LG Serial Control Port* To install MediaHub and PCD using the Serial Control interface, follow the cable connection diagram in Figure 1 to the left. MediaHub DIP Mode B0: UP-DWN-UP-UP DWN-DWN-DWN-DWN PCD DIP Mode: UP-UP Configure TV**: With LG remote control, enter the menu by pressing <PWR>...
-
Page 23: Enseo Set Top Box
Enseo Set Top Box What You Will Need: - TA-7650 or TA-7650/TA-7500L MediaHub HD Connectivity Panel Power Supply Cable (Note: MediaHub with Power/Data Extender model includes HDMI 1 HDMI 2 DATA TWO power supplies – one for media panel and one for power panel) Ethernet Cable (for MediaHub with Power/Data Extender model only) HDMI OUT - Cable Kit... - Page 24 Panasonic North America Series 20/12 + Enseo HD2000/3000 Configure TV: Go into HOTEL MODE (using Panasonic remote, press <MENU>, <G>, <Y>, <0>), select the following: MODE = ON TA Control = EXTERNAL BUTTON LOCK = OFF Philips North America, LG North America, Sharp North America + Enseo HD2000/3000 No TV configuration needed.
-
Page 25: Lodgenet Ppv System
LodgeNet PPV System (with ANY TV) Installing MediaHub HD to auto-switch a TV in a LodgeNet environment requires a TeleAdapt Protocol Converter Dongle (PCD), part number TA-8700-A01. What You Will Need: - TA-7650 or TA-7650/TA-7500L MediaHub HD Connectivity Panel Power Supply Cable (Note: MediaHub with Power/Data Extender model includes TWO power supplies –... -
Page 26: Troubleshooting Mediahub Hd
Troubleshooting MediaHub HD Troubleshooting If the MediaHub HD does not seem to be working properly, lights are not illuminating and TV is not auto-swtiching, try these troubleshooting procedures: A Fully remove AC power to the TV. Power cycle the MediaHub HD. Then re-apply power to the TV and use the remote control to turn the TV on. -
Page 27: Troubleshooting Protocol Converter Dongle
Protocol Converter Dongle Troubleshooting If the MediaHub HD was installed using a Protocol Converter Dongle and it does not seem to be working properly, lights are illuminating but TV is not auto-switching, try these troubleshooting procedures: A Fully remove AC power to the TV. Then re-apply power to the TV and use the remote control to turn the TV on. -
Page 28: Technical Support
If problem persists, please contact one of our regional technical support teams: For North and South American 24/7 Technical Support Toll-Free: 1 877 835 3232 x319 (in US and Canada) Main: 1 775 232 5044 Email: ric.jones@us.teleadapt.com For EMEA Technical Support Main: +44 1923 810235 Email: info@teleadapt.com... -
Page 29: Flush-Mount Cut Measurements
Flush-Mount Cut Measurements TA-7650 | MediaHub HD Click here to download 100% scale cut sheets. Drawing below is not to scale. 7.84” (199.2 mm) 3.622” (92 mm) min 7.244” (184 mm) min 3.661” (93 mm) max 7.322” (186 mm) max TA-7650/TA-7500L | MediaHub HD with Power/Data Extender Click here to download 100% scale cut sheets. -
Page 30: Assemble Flush-Mount Mediahub Hd With Power/Data
Assemble Flush-Mount MediaHub HD with Power/Data Extender If you are installing MediaHub HD with PowerHub Extender as a Desktop model, refer to the Assemble Desktop Housing section of this manual. DO NOT follow instructions below. Ensure DIP switches on back of MediaHub are set according to your MediaHub installation instructions and cables are in place with any mini connectors positioned toward the MediaHub panel location. -
Page 31: Assemble Desktop Housing (Dth-Hd01 Or Dth-Ext)
Assemble Desktop Housing What You Will Need: TA-7650 Desktop Housing Kit Add for TA-7650/TA-7500L Desktop Kit: A TA-7650 MediaHub panel J TA-7500L with power supply B MediaHub Power Supply K Extender Trim C RS-232/DB9, if installing serial control L Cat5 Ethernet Cable D 90º... - Page 32 7 | Secure rear door onto MediaHub HD. 8 | Slide desktop housing onto MediaHub HD, secure with trim using mounting screws in corners. (See Figure 3) Figure 3: Secure panel into housing using four corner screws. See note regarding Extender units. Note: For MediaHub HD with PowerHub Extender, slide power/date panel into the right side of housing and secure panels into the housing using the four CENTER screw holes first.
-
Page 33: Add-On Accessories
HD. It has been specially designed to connect to the MediaHub HD’s “IPOD” port located on the rear of the unit. Choose to install one of TeleAdapt’s iPod docking products or choose any third party iPod dock and install it with MediaHub HD using this adapter. - Page 34 If problem persists, please contact one of our regional technical support teams: For North and South American 24/7 Technical Support Toll-Free: 1 877 835 3232 x319 (in US and Canada) Main: 1 775 232 5044 Email: ric.jones@us.teleadapt.com For EMEA Technical Support Main: +44 1923 810235 Email: info@teleadapt.com...
Need help?
Do you have a question about the TA-7650 MediaHUB HD and is the answer not in the manual?
Questions and answers