Arkray Glucocard Vital User Instruction Manual
Arkray glucocard vital blood glucose monitoring system
Hide thumbs
Also See for Glucocard Vital:
- User instruction manual (72 pages) ,
- Quick reference manual (2 pages) ,
- Quick reference manual (1 page)
Table of Contents
Advertisement
Advertisement
Table of Contents

Related Manuals for Arkray Glucocard Vital


Summary of Contents for Arkray Glucocard Vital
- Page 1 User Instruction Manual...
-
Page 2: Table Of Contents
TABLE OF CONTENTS INTRODUCTION . . . . . . . . . . . . . . . . . . . . . . . . . . . . . . . . . . . . 5 Intended Use . -
Page 3: Introduction
From an Alternate Site . . . . . . . . . . . . . . . . . . . . . . . . .39 questions, call ARKRAY’s Customer Service at 800 .566 .8558 ®... -
Page 4: Important Information
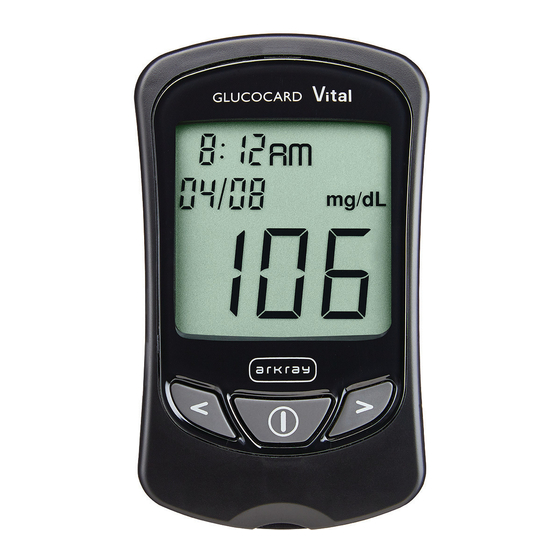
Important Information The GLUCOCARD ® Vital™ System Includes: ® • Test results below 70 mg/dL indicate low blood glucose • GLUCOCARD Vital™ Meter (hypoglycemia) • Carrying Case • Test results above 240 mg/dL indicate high blood glucose (hyperglycemia) • User Instruction Manual • If results are below 70 mg/dL or above 240 mg/dL, • Self-testing Logbook repeat the test... - Page 5 ® GETTING TO KNOW THE GLUCOCARD VITAL™ BLOOD GLUCOSE METER The GLUCOCARD Vital™ Meter Explanation of the Full Display Screen ® Front Control Solution Test Battery Display Screen Time Memory Mode Date Back Button Unit of Measurement On/Off Button Average Test Reading Forward Button Error Code...
-
Page 6: Meter Set Up
Meter Set Up Step 3 – Set the time format The time can be displayed in either 24-hour format or ® Before using the GLUCOCARD Vital™ Meter for the first 12-hour format with AM and PM . The meter displays the time, you must set the time and date . - Page 7 Step 5 – Set the hour Step 8 – Set the day (If day/month format is selected then Press and release the Back or Step 8 will set month) Forward buttons to change the hour . Press and release the Back or Hold the Back or Forward button down Forward buttons until the correct day When the...
-
Page 8: Display Screen Messages
USA and Canada only) . If the display screen shows , you should be able to clear the error message yourself . Do not send your meter to ARKRAY or your local dealer without authorization from a company A used strip has been inserted representative . - Page 9 The battery power is low . Thermometer flashing . There is only enough power for The meter and test strips are about 20 more tests . Replace with outside the optimum temperature a new CR2032 battery as soon as range of 50°F - 104°F (10°C - 40°C) . possible .
-
Page 10: Meter Memory
Corrupted memory . Meter Memory Call Customer Service at 800 .566 .8558 . Marking Results in the Memory You can mark results in the meter memory in two ways . Marking Control Solution Tests You must mark results with the control bottle symbol Insert test strip into the meter . -
Page 11: Recalling Results
To mark a result , press the Back or Forward button BEFORE testing with control solution . (See page 43 for detailed instructions on testing with control solution) . Step 2 Marking Other Results Press the Back or Forward NOT want You can also mark results with an when you do button to display the average... - Page 12 If a test has not been performed Results marked with when the test in the last 14 days the meter was performed are not included in will display the 14-day average the average . The marked results can screen with 3 bars . This means be seen when you scroll through the there are no results stored to results saved in the memory .
-
Page 13: Cleaning The Meter
Caring for Your GLUCOCARD Vital™ Blood Changing the Battery ® Glucose Meter Note: Cleaning the Meter Changing the battery should only take a few seconds . ® The GLUCOCARD Vital™ Blood Glucose Meter is a precise If the battery is changed within 30 seconds, the meter instrument . -
Page 14: The Lancing Device
How to Change the Battery Blood Glucose Testing Step 1 The Lancing Device Turn the meter off . The battery cover is on the back of the meter . Step 2 Removable cap Lancing Button Adjustment dial Multilet (lancet) Pull the battery cover up with your finger or fingernail . Remove battery cover . -
Page 15: Obtaining A Drop Of Blood
Obtaining a Drop of Blood Step 3: Twist off the protective cap . Step 1: Wash hands with soap and warm water . Dry hands thoroughly . If you use alcohol wipes to cleanse fingers, make sure the area is dry before lancing finger . -
Page 16: Testing With Glucocard ® Vital™ Test Strips
® TESTING WITH GLUCOCARD VITAL™ WARNING: DO NOT share used lancets with another TEST STRIPS person . To prevent possible infection, a used lancet should not be touched by another person . The GLUCOCARD Vital™ Blood Glucose Monitoring ® System works with the GLUCOCARD ®... -
Page 17: Vital™ Test Strips
® GLUCOCARD Vital™ Test Strips Performing a Blood Glucose Test Note: For Instructions on Alternate Site Testing, refer These capillary action test strips require only 0 .5 µl of blood to pages 37-43 . and provide an end-fill sample application tip for easy ®... - Page 18 IMPORTANT: The meter will start to count down when The strip and flashing blood drop tells you the meter is ready for it detects that blood has been applied . Discard strip if meter does not start to count down after blood drop you to apply a drop of blood to the sample application tip at the is applied .
-
Page 19: Alternate Site Testing (Ast)
Alternate Site Testing (AST) Step 3 Always record your results in your self-testing logbook along with other information such as insulin dosage, Important Information About AST diet, and exercise . The result is automatically stored in Sites other than your fingertip may have fewer nerve memory with the time and date . -
Page 20: Preparing To Test Your Blood Glucose
Use Fingertip When Testing: Prepare Your Lancing Device: To order an AST Lancing Kit • W ithin two hours after a meal containing the lancing device, lancets, and instructions, • W ithin two hours after insulin dosing please call 800 .566 .8558 . • W ithin two hours after physical activity Performing a Blood Glucose Test • I f you have a history of hypoglycemia, are From an Alternate Site experiencing low blood sugar, or suffer from... - Page 21 c) Press the release button on the lancing device to lance the skin . Continue to hold the lancing device firmly against b) Wait until strip with flash- the skin until a 0 .5 µL blood ing blood drop appears . drop forms .
-
Page 22: Using Assure ® Dose Control Solution
If the repeated alternate site result is still not consistent with how you feel, confirm your blood glucose level with IMPORTANT fingertip testing . • Was the sample free of clear or watery fluid? Enough Blood Step 6 • Was the drop large enough Always record your results in your self-testing log book (at least 0 .5 µL)? along with other information such as insulin dosage, diet, • Did the reaction site fill with... -
Page 23: Performing A Control Solution Test
Compare the control solution test results with the range Performing a Control Solution Test printed on the test strip bottle label . Before performing a control solution test, always check Call your local supplier or pharmacy if you need to order the expiration date ( ) of the control solution . - Page 24 Step 2 Note: Dye added to control solution may You must press the Back or Forward stain surfaces or fabric . Use with care . button BEFORE performing control solution test . Hold the Back or Forward button until appears in the upper right Verify that corner of the screen .
-
Page 25: Comparing Control Solution Results
Comparing Control Solution Results NOTE: If your control solution result continues to fall If the result is outside the range printed on the test strip outside the required range, the system may not be bottle, repeat the test . One or more of the following may DO NOT USE the system to test your working correctly . -
Page 26: Understanding Test Results
When at the Laboratory Circulating blood glucose fluctuates naturally over time . Test results can vary over time and can be affected by The capillary samples for both tests must be taken and tested within 15 minutes of each other . The sample must several factors . -
Page 27: Low Blood Glucose Readings
Low Blood Glucose Readings Frequency of Testing How often you need to test your blood glucose will vary If your blood glucose is below 20 mg/dL, you will receive a according to your age, the type of diabetes you have, “Lo .”... -
Page 28: Specifications
SPECIFICATIONS WARNINGS, PRECAUTIONS, & LIMITATIONS Test Strips: GLUCOCARD ® Vital™ • The GLUCOCARD ® Vital™ Blood Glucose Monitoring System is not designed to substitute for pathology laboratory equipment and Result range: 20 to 600 mg/dL should not be used for the diagnosis of diabetes . Calibration: Plasma referenced • Severe dehydration (excessive water loss) may cause false low... -
Page 29: Warranty
3 years from the date of purchase . A malfunctioning device should not be You are a valued customer of ARKRAY . It is important to us returned to your supplier or to ARKRAY unless you receive ®... - Page 30 Notes Notes...
- Page 31 TEL 800.566.8558 FAX 952.646.3110 www.arkrayusa.com ©2009 ARKRAY, Inc . P/N 1850-00 Rev 3/09...
Need help?
Do you have a question about the Glucocard Vital and is the answer not in the manual?
Questions and answers