Table of Contents
Advertisement
Quick Links
Advertisement
Table of Contents

Related Manuals for Arturia Jupiter-8V


Summary of Contents for Arturia Jupiter-8V
- Page 1 USER’S MANUAL...
- Page 2 Information contained in this manual is subject to change without notice and does not represent a commitment on the part of Arturia. The software described in this manual is provided under the terms of a license agreement or non-disclosure agreement. The software license agreement specifies the terms and conditions for its lawful use.
- Page 3 Thank you for purchasing the ARTURIA Jupi Jupi ter ter - - Thank you for purchasing the ARTURIA In this package you will find: This paper manual for the Jupiter-8V • One CD-ROM containing the Jupiter-8V installer for MAC OSX and Windows •...
- Page 4 New features in Jupiter - - 8V 2.0 8V 2.0 New features in Jupiter If you already own Jupiter-8V, version 2 includes the following changes: “Sound Map” graphical preset browser added • RPN “pitch bend range” message is now recognized •...
-
Page 5: Table Of Contents
3.1.1 Selecting the presets 3.1.2 Editing the presets The 4 main parts of the Jupiter-8V Overview of the Jupiter-8V user interface The (Advanced) Modulations section 3.4.1 Creating a melodic sequence with the SEQUENCER ... - Page 6 VST 3 RTAS 64 bit compatibility Use in Cubase/Nuendo (VST) 8.7.1 Instrument use in VST mode 8.7.2 Rescan the plug-in directory in Cubase ARTURIA – JUPITER-8V – USER’S MANUAL...
- Page 7 Saving the presets 8.8.3 Automation under Pro Tools Using in Logic, Mac OS X (AU) 8.10 Using in Ableton Live (AU and VST) ARTURIA JUPITER-8V - LICENSE AGREEMENT ARTURIA – JUPITER-8V – USER’S MANUAL...
-
Page 8: Introduction
1 It is remarkable that a man named Mr Torakusu Yamaha had also started out as a watch repairer. In fact the same is true of Matthias Hohner, the founder of Hohner. Even the Hammond Organ Company started out as a sub-division of the Hammond Clock Company. ARTURIA – JUPITER-8V – USER’S MANUAL... - Page 9 Jupiter-4 Compuphonic polysynth. The Jupiter-4 was the company's first true polysynth. It used Roland's trademark chorus and three Unison options that made it a powerful monosynth. There also was an excellent arpeggiator. ARTURIA – JUPITER-8V – USER’S MANUAL...
- Page 10 The path to classic status of the Jupiter started there. Other artists that have used The Jupiter-8 include: Tangerine Dream, Underworld, Jean Michel Jarre, Depeche Mode, Prince, Gary Wright, Adrian Lee, Heaven 17, Kitaro, Elvis ARTURIA – JUPITER-8V – USER’S MANUAL...
- Page 11 In 1984 there was the introduction of three synthesizers: the Juno 106, the JX8P and the JX10P. The last one was the replacement for the Jupiter-8. Unfortunately, the JX10 was never destined for the same success as the Jupiter 8. ARTURIA – JUPITER-8V – USER’S MANUAL...
-
Page 12: Tae
When implemented in software code, TAE®’s algorithms guarantee authentic emulation of hardware specifications. This is why the Jupiter-8V, and all of Arturia’s virtual synthesizers, offer an unparalleled quality of sound. - Page 13 Roland Jupiter 8 waveform, and that of the Jupiter-8V. They are both equally deformed by the low-pass and high-pass filtering. Temporal representation of a “saw tooth” waveform of the Jupiter 8 Temporal representation of a “saw tooth” waveform reproduced by the Jupiter-8V...
-
Page 14: Direct Filter Circuit Modeling
As a result of the direct recreation of this analog circuitry, the same characteristics of the sound are present, thus giving the user a truly analog sound. Comparison of Harmonics generated by the filter circuits of the Arturia Jupiter-8V and the Roland Jupiter-8 ARTURIA – JUPITER-8V – USER’S MANUAL... -
Page 15: Activation & First Start
In order to proceed, go to this web page and follow the instructions: http://www.arturia.com/register Note: If you don’t have an Arturia account yet, you will need to create one. The process is quick, but it does require that you can access your e-mail address during the registration process. -
Page 16: Quick Start
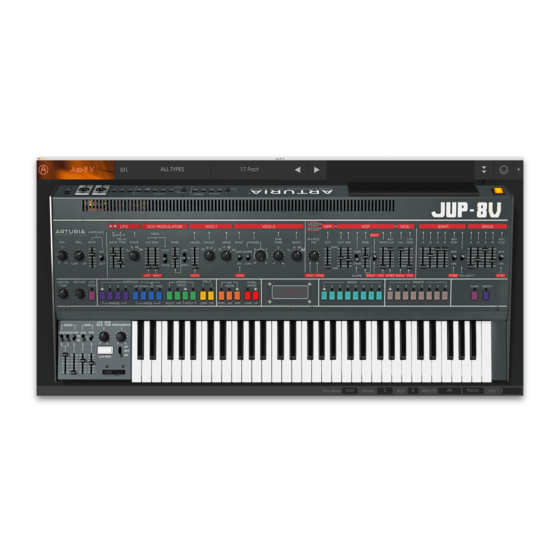
The Jupiter-8V interface TRUCTURE OF THE UPITER The structure of the Jupiter-8V allows you to play two tones at once (called “Lower” and “Upper” Programs in the terminology of the Jupiter-8). You can play the keyboard in three different ways: “DUAL”:... -
Page 17: Using The Presets
• The setting of the master effect (delay, chorus). • 3.1.1.2 The Programs The “PROGRAM” presets are the composed sounds of the Jupiter-8V. They contain: All the synthesis parameters, • All the parameters of the Galaxy module and the sequencer. - Page 18 To familiarize yourself with the different included sounds of The Jupiter-8V, we will select the preset “Full_Pad” situated in the bank “JMB / Pads/ JMB_Full_Pad”. First, click on the button, on the toolbar, to open the expansion interface. Then, click on the button “Presets” situated above the programming interface of the Jupiter-8V.
-
Page 19: Editing The Presets
Choose a preset patch from the toolbar The Jupiter-8V is delivered with 400 factory presets that will allow you to become familiarized with the tones of the synthesizer. It is also possible to show all the presets when choosing the option “All” in the bank. For example, to see the bass presets, click on “All”... -
Page 20: The 4 Main Parts Of The Jupiter-8V
The “SEQUENCER / GALAXY” interface to access the SEQUENCER and GALAXY • modules; The “EFFECTS” interface to access the effects; • To open the extension panel of the Jupiter-8V, click on the then choose one of the 3 tabs available. ARTURIA – JUPITER-8V – USER’S MANUAL... -
Page 21: Overview Of The Jupiter-8V User Interface
See how to quickly create a polyphonic sound with the Jupiter-8V: To be able to understand the principle of how to program the Jupiter-8V, we will take a very simple sound. Select the preset “UJ Brass« in the bank “KUJIIE” / “Brass”. The synthesis structure of this sound is relatively simple: the sawtooth waveforms of VCO 1 are 2 are active and their signals are directed through the low pass filter. - Page 22 “ring”. Increase the value of the resonance Change the length of the attack of this envelope (“Attack time” ENV1) so that filter rise time increases more or less quickly when a note is played. ARTURIA – JUPITER-8V – USER’S MANUAL...
-
Page 23: The (Advanced) Modulations Section
In the “MODULATIONS” section, there are sources of additional modulations allowing an extension of the playing possibilities and of the synthesis. This section offers two types of interfaces: SEQUENCER is accessible while clicking on the “SEQ” button. ARTURIA – JUPITER-8V – USER’S MANUAL... -
Page 24: Creating A Melodic Sequence With The Sequencer
Click on the “SEQUENCER” button Connect the frequency of VCO1 to the first modulation output and click the “Q” button to activate the quantize factor by half-tones for the frequency values. Set Sequencer Output 1 ARTURIA – JUPITER-8V – USER’S MANUAL... - Page 25 Set the value of each step by clicking and dragging the 16 bars up or down to create your melody. Set the value of each step Set the speed of the sequencer with the “Rate” knob. ARTURIA – JUPITER-8V – USER’S MANUAL...
-
Page 26: Create Progressive Modulations With The Galaxy Unit
They are represented on the graphical interface of the unit. A third LFO allows modifying the alpha angle between the 2 X and Y axes. The «GALAXY« module Click on the “MODULATIONS” tab then on the “GALAXY” tab to show the interface. ARTURIA – JUPITER-8V – USER’S MANUAL... - Page 27 You will obtain unusual and very progressive modulations thanks to this unit. You also can modify this angle manually thanks to the “ANGLE” knob. Choose the triangle waveform then adjust the speed parameter of the LFO to your liking. ARTURIA – JUPITER-8V – USER’S MANUAL...
-
Page 28: Control Parameters With The Keyboard Unit
Customize how velocity modifies the selected parameters thanks to a curve. The X axis represents the amount of velocity while the Y axis represents the amount sent to the parameters. This curve can be controlled thanks to 3 points. ARTURIA – JUPITER-8V – USER’S MANUAL... -
Page 29: The Effects
3.5 T FFECTS The “EFFECTS” interface of the Jupiter-8V offers unique signal processing possibilities, allowing you to insert effects in the synthesis chain, between the VCO and the VCF and between the VCF and the VCA. These combinations allow you to create a wide variety of new sounds. - Page 30 “Band 1/2/3/4” buttons. Adjust the volume of the frequency of “band 3” with the knob “G” (GAIN) or simply • modify the point in the gain curve Set the volume of the frequency for “band 3” ARTURIA – JUPITER-8V – USER’S MANUAL...
-
Page 31: The "Patch" Section Of The Effects
Three types of stereo chorus are available, from simple to very wide. Activate the “ON/OFF” button of the Chorus in the effects section, placed to right of the tool bar. ARTURIA – JUPITER-8V – USER’S MANUAL... -
Page 32: The Delay
Turn next the 2 knobs “TIME L / TIME R” to set the speed of the repetitions for the right and left side. It is also possible to set the number of repetitions (Feedback) for each stereo side (“Feedbk R” and “Feedbk L”). ARTURIA – JUPITER-8V – USER’S MANUAL... -
Page 33: Realtime Controllers And Midi Assign
EALTIME CONTROLLERS AND ASSIGN As its brilliant sounding ancestor, The Jupiter-8V is particularly adapted for playing in real time. One of the big evolutions in comparison with the original is the possibility to assign any knob of the Jupiter-8V to an external midi controller. - Page 34 To save the setting that we have just carried out during this chapter, click on the button “Save” situated on tool bar. The MIDI settings will only be saved when you quit the application of the Jupiter-8V. This is the same with the stand alone version and the plug-in version as well.
-
Page 35: Unique Synthesizer, Why
UPITER Aside from recreating the original in every aspect, the Jupiter-8V adds many new functions which make it even more attractive to use. The Jupiter-8V offers various new editing possibilities which can result in sounds that were never heard before. - Page 36 Jupiter-8. The Jupiter-8V delivers a sound that is full of character and highly editable. It can be the perfect companion on every kind of musical project, with the ease of use of the 21st century.
-
Page 37: The Interface
THE INTERFACE 5.1 T OOL BAR The tool bar consists of an ensemble of essential icons for the Jupiter-8V organized from left to right allowing you to: Access drop menus offering filters with the following criteria: • Characteristics Factory / User... -
Page 38: Using The Presets
5.2 U SING THE PRESETS The presets allow saving and recalling the sounds of the Jupiter-8V. A preset contains all the new settings of the various controllers to reproduce a sound. In the software version, just like on the original one, the presets are classified in two categories of presets: The “Patches”... - Page 39 Lower or Upper). The right portion allows searching with the help of two filter criteria. • Four buttons situated above the choice fields, allow you to create, save, save as or delete a preset. ARTURIA – JUPITER-8V – USER’S MANUAL...
- Page 40 A list of selection filters appears. After selection of the filter categories of interest, simply select the preset by clicking on the preset name. Click on the button “upper” Selection of the filter criteria ARTURIA – JUPITER-8V – USER’S MANUAL...
-
Page 41: Creating A New Preset
To save a preset PROGRAM, check “Save As”. You can fill in the name of the project and the name of the patch to define the search criteria. You can also click cancel to exit this menu without saving. “Save As” and the save menu ARTURIA – JUPITER-8V – USER’S MANUAL... -
Page 42: Delete A Preset
When this button is selected, a window appears, allowing the choice of a preset bank for the Jupiter-8V. Choose a file to import, (it will be shown as a “xxx.j8e” file) and click on “Open”. The new bank of presets will appear automatically among the available “Project”... -
Page 43: Using The Controllers
(frequency of the VCO, balance programs for Lower and Upper keyboard for example) or a set a parameter for an individual selection (choices of the wave forms of the oscillators or LFO, for example) ARTURIA – JUPITER-8V – USER’S MANUAL... -
Page 44: Buttons
VCF filters, or settings of the two ADSR envelopes, for example) A vertical slider 5.3.2 Buttons There are several types of buttons on the Jupiter-8V. Some activate or deactivate a parameter (activation of the arpeggiator, for example). A red led on the button indicates that the parameter is active. -
Page 45: Modulation Button
To choose which function to edit, click on one of the buttons situated on left top corner screen. (« PRESET « example). « SEQUENCER/GALAXY/KEYBOARD « screen has two tabs that let you edit the sequencer and the galaxy module. ARTURIA – JUPITER-8V – USER’S MANUAL... -
Page 46: Midi Control
LCD screen 5.3.8 MIDI Control Most of the knobs, sliders and switches on the Jupiter-8V can be manipulated with external MIDI controllers. Before anything else, make sure that the MIDI device is correctly connected to the computer, and that the sequencer or the standalone Jupiter- 8V application is correctly configured to receive MIDI events coming from the device. - Page 47 Support for NRPN • In addition to MIDI Control Change messages, NRPN messages are now supported: either send NRPN MIDI control messages to Jupiter-8V, or check NRPN, then manually select LSB# and MSB# numbers: MIDI assignation popup, NRPN activated Remove assignment •...
- Page 48 For each assignment, a minimum range value and a maximum range value can be set. This allows you to limit how much the controller will affect the parameter on Jupiter-8V. The assigned parameter will have the configured minimum value when the •...
-
Page 49: The Preference Screen
See the version of the software • Read the credits • Activate or deactivate the pop-up windows animations • To open this window, click on the “About” button situated on the bottom right of the Jupiter-8V interface. ARTURIA – JUPITER-8V – USER’S MANUAL... -
Page 50: The Sound Map
To open the preset morphing page, click on the COMPASS button. Open the Morphing interface To return back to the main sound map interface, click on the MAP button Return back on the map interface ARTURIA – JUPITER-8V – USER’S MANUAL... -
Page 51: The Map Main Interface
5.4.1 The MAP main interface The Sound Map main interface shows a map where all the presets of the Jupiter-8V are spread out, organized by their different types of sound and their own audio characteristics. The Map interface The types of presets are represented by different geometrical symbols and colors for an easy way to locate them: “Bass”... -
Page 52: The Sound Map Overview
Click between several presets and drag the mouse. Four red arrows drawing a cross appear linking the group of four presets. The sound of the Jupiter-8V will modified with regards to the distance between the mouse pointer and the selected presets. - Page 53 (or to hide) on the map. By default, all types of presets are selected. The instrument type filter To select an individual or a group of instrument types: ARTURIA – JUPITER-8V – USER’S MANUAL...
- Page 54 When all memories already contain a saved preset, you can replace them with other presets. Select another preset anywhere on the Sound Map interface, click on any of the 4 snapshot buttons while pressing the [Shift] key. ARTURIA – JUPITER-8V – USER’S MANUAL...
-
Page 55: The List Preset Manager
The list preset interface is very simple; you can see four columns showing, from left to right: The preset names The instrument type The name of the sound designers A reminder of the presets added to a snapshot memory Preset list interface ARTURIA – JUPITER-8V – USER’S MANUAL... -
Page 56: The Compass Morphing Interface
The four presets are placed on the four cardinal points of the compass. The Morphing interface To open the Morphing page, click on the COMPASS button, located on the toolbar of the Sound map. ARTURIA – JUPITER-8V – USER’S MANUAL... - Page 57 The green arrow shows you the starting point of your motion. Create a new sound If you wish, you can save it on a User bank of the Jupiter-8V memory. ARTURIA – JUPITER-8V – USER’S MANUAL...
-
Page 58: The Different Modules
6.1 T HE ORIGINAL UPITER The “Jupiter-8V” interface takes on all the original parameters and characteristics of the synthesizer it is based on. Likewise, the 40 factory presets of the original machine are included (these can not be deleted). The Jupiter-8V The Jupiter-8V consists of: 2 oscillators («... -
Page 59: The Oscillators ("Vco 1 And 2")
6.1.1 The oscillators (“VCO 1 and 2”) There are two oscillators. The oscillator controls the basic frequencies and timbres of the Jupiter-8V with the frequency settings, choice of waveform, and the pulse width associated to the square waveform. These settings are made either with various knobs (static settings) or by the means of the modulation sections. - Page 60 (this signifies that it is not tuned to the same tonality!) Here are some of the representations of the different waveforms used by the oscillators of the Jupiter-8V: Saw tooth Square ARTURIA – JUPITER-8V – USER’S MANUAL...
-
Page 61: The Mixer ("Vco1 / Vco2")
Knob to set the volume for both oscillators (CENTERED) The mixer 6.1.3 The filter (“VCF”) The Jupiter-8V has a filter that is an emulation of the original Jupiter 8 filter. It is made up of two independent filter units: ARTURIA – JUPITER-8V – USER’S MANUAL... - Page 62 Non-resonant high-pass filter 6.1.3.2 A resonant 12 or 24 dB/Octave low-pass filter The low-pass filter is characteristic of the Jupiter-8V’s sound. It eliminates the frequencies situated above the frequency setting (the cut off frequency). The resonance amplifies the frequencies near the cutoff frequency. Turn this knob toward the right, and the filter will become more selective.
-
Page 63: The Amplifier ("Vca")
(see the following chapter). It can also be modulated by the LFO. The VCF 6.1.4 The Amplifier (“VCA”) The amplifier is the last step in controlling the sound. It allows setting the general volume of the Jupiter-8V. ARTURIA – JUPITER-8V – USER’S MANUAL... -
Page 64: The Adsr Envelopes
Switch to connect envelope 1 and/or 2 to the keyboard follow. When the switch is “ON”, the envelope times – “A”, “D” and “R” – will be as shorter as you will play the higher notes on your MIDI keyboard. ARTURIA – JUPITER-8V – USER’S MANUAL... -
Page 65: The Lfo
VCO 1 Selector to choose either oscillator 1, oscillator 2 or both oscillators as VCO 2 destinations for LFO / ENV modulation. Slider to set the level of modulation on the VCOs’ pulse width. ARTURIA – JUPITER-8V – USER’S MANUAL... -
Page 66: The Lfo Modulation, Portamento And Bend Section
Slider to set the level of portamento. level PORTAMENTO Switch to use the portamento: select Connection Section UPPER (« UPPER ONLY») • Connection PORTAMENTO OFF • Connection Sections LOWER et UPPER (« ON «) • ARTURIA – JUPITER-8V – USER’S MANUAL... -
Page 67: The Pitch Bend Wheel And Lfo Mod Button
The Pitch Bend wheel and the LFO mod button 6.1.10 The Master Tune section Among these parameters you will find: the general tuning of the Jupiter-8V, the detune option for the voices and a 440 Hz tone to tune the Jupiter-8V. -
Page 68: The Arpeggiator ("Arpeggio")
In the same area, you can also affect the MIDI synchronization for the arpeggiator rate (“EXT” position). The arpeggiator section The arpeggiator rate section 6.1.12 The keyboard assign section (“ASSIGN MODE”) This section allows selecting the play modes as follow: ARTURIA – JUPITER-8V – USER’S MANUAL... -
Page 69: The Play Modes Selection ("Key Mode")
Two selected programs are assigned the LOWER and UPPER part of the keyboard. The polyphony is then divided between the two selected programs. WHOLE A single program is assigned to the entire keyboard range. Key modes ARTURIA – JUPITER-8V – USER’S MANUAL... -
Page 70: Step Sequencer
SYNC Synchronization to an external MIDI clock ON/OFF Subdivision of MIDI tempo to adjust the speed of the sequencer in “MIDI Sync” mode: 1/2 ;1/4 ;1/4T ;1/8 ;1/8T ;1/16 ;1/16T ;1/32 ;1/32T ;1/64 ;1/128 ARTURIA – JUPITER-8V – USER’S MANUAL... -
Page 71: Edit The Sequence
• STEPS The steps. They contain bi-directional values (positive or negative). LENGTH To set the length of the sequence, 32 steps maximum. LINK Link the selected step with the following step, « Legato »). ARTURIA – JUPITER-8V – USER’S MANUAL... -
Page 72: Outputs
Quantification of the modulation settings by semitones. This parameter is essential to regulate the levels of each step for the creation of a melodic sequence RETRIG Automatically place a «trig» envelope on all the steps. ARTURIA – JUPITER-8V – USER’S MANUAL... -
Page 73: Galaxy
“VCF Res”: Resonance of the low pass filter • “VCA”: Volume of the VCA • A reset setting of the movements for the three LFO's by a played note is available by using the “RETRIG” button. ARTURIA – JUPITER-8V – USER’S MANUAL... -
Page 74: Voice Effects
The effects are accessible when you click on the “EFFECTS” tab, situated on the LCD screen, on the right part of the Jupiter-8V. They will be activated or deactivated when you click on the “EFFECT” button, situated on the toolbar. -
Page 75: Distortion
KEY FOLLOW • VELOCITY • AFTERTOUCH • ENVELOPE 1 • ENVELOPE 2 • GALAXY Y • GALAXY X • • ARTURIA – JUPITER-8V – USER’S MANUAL... -
Page 76: Parametric Eq
Knob to set the band of the high frequencies GAIN (G) Knob to set the gain for the band of the high frequencies DRY/WET Knob to set the balance between the original signal and the output of the effect ARTURIA – JUPITER-8V – USER’S MANUAL... -
Page 77: Phaser
Knob for the volume of the output of the phaser. The “MOD” display allows accessing the modulation connections for each of the parameters of the PHASER as well as the choice of the sources of modulation: KEY FOLLOW • VELOCITY • ARTURIA – JUPITER-8V – USER’S MANUAL... -
Page 78: Ring Mod
RING MOD as well as the choice of the sources of modulation: KEY FOLLOW • VELOCITY • AFTERTOUCH • ENVELOPE 1 • ENVELOPE 2 • GALAXY Y • GALAXY X • • SEQUENCER • The “BYPASS” button allows deactivating the RING MOD effect. ARTURIA – JUPITER-8V – USER’S MANUAL... -
Page 79: Patch Effects
Knob to set the balance between the original signal and the output of the effect OUTPUT Knob to set the output volume of the chorus The “BYPASS” button allows deactivating the “CHORUS/ FLANGER” effect. ARTURIA – JUPITER-8V – USER’S MANUAL... -
Page 80: Stereo Analog Delay
Stereo Delay 6.5.3 Reverb The reverb effect creates a very dense series of decaying echoes in the sound, simulating the sound's performance within a three-dimensional space. FEEDBACK Knob to set feedback time for the reverb ARTURIA – JUPITER-8V – USER’S MANUAL... -
Page 81: Dual Phaser
Knob to set the output volume of the DUAL PHASER SWEEP SYNC Button allows activating the synchronization of the two modulation frequencies. INVERT Button allows inverting the phase of the modulation frequencies BYPASS Button allows deactivating the “DUAL PHASER” effect. Dual Phaser ARTURIA – JUPITER-8V – USER’S MANUAL... -
Page 82: Some Elements Of Sound Design
SOME ELEMENTS OF SOUND DESIGN Here are five examples that can guide you when programming different tones on the Jupiter-8V. These tones are classified from simple to complex, and are organized in 3 parts: The first part will allow you to explore the basis of the subtractive synthesis with •... - Page 83 Lower the cut off frequency of the filter On the ADSR envelope situated to the right of the filter, increase the attack time to a value close to «100MS«. Lower the knob of the Decay (set it to a value around ARTURIA – JUPITER-8V – USER’S MANUAL...
- Page 84 At this stage, you can add a little «Stereo Delay« effect to your tone in order to make it sound wider. Open the «Effects« page situated in the top panel of the Jupiter-8V. In the first «Patch« slot (at the bottom of the connection diagram of the effects), choose the «ST Delay«.
-
Page 85: Arpeggiated Sounds
This preset will contain: Two VCO’s • An high pass filter (HPF) • A low pass filter (VCF) • An ADSR envelope connected to the filter • ARTURIA – JUPITER-8V – USER’S MANUAL... - Page 86 «INT / EXT« situated next to the «Rate« fader of the arppegiator then place it toward the bottom into the position «EXT« Click on the selector «Hold Up« if you wish to hold the arpeggio in play mode. Click on the « Hold Up « selector ARTURIA – JUPITER-8V – USER’S MANUAL...
- Page 87 We will use the Galaxy unit to modulate the width of the square wave form of the second VCO, the cut off frequency of the high pass filter and the low pass filter (VCF) Open the «Modulations« page situated in the upper panel of the Jupiter-8V. the Galaxy unit is selected by default.
- Page 88 «Sync« button. You also can adjust the numbers of repetitions («feedback«) to your convenience. Setting of the St fx Delay Now you can save your preset to be able to use it later. ARTURIA – JUPITER-8V – USER’S MANUAL...
-
Page 89: A Sequence With The Jupiter-8V
Click on the first list «Output« (situated to right of the sequencer) and choose «VCF Cutoff« Choose «VCF Cutoff« Increase the value of the intensity of this modulation while turning the knob to the right. Increase the amount of modulation ARTURIA – JUPITER-8V – USER’S MANUAL... - Page 90 Set the values of the different steps Click on the tool to create different values randomly for each note. This way, you will quickly obtain rhythmic sequences that you can edit to your liking. ARTURIA – JUPITER-8V – USER’S MANUAL...
- Page 91 The interface of the Jupiter-8V sequencer Open the Galaxy module to complete the rhythm. This will modulate the volume of the VCA to create «gate« effects that are often used in electronic music. Click on «Output X' (situated to right of galaxy) and choose «VCA« as destination of modulation controlled by LFO 1 (axis «X«).
- Page 92 These sound examples present different levels of difficulty. We hope that they have allowed you to discover a part of the possibilities that the Jupiter-8V offers. But do not hesitate to do your own experimentations. This is the fastest way to master the Jupiter- 8V and create original sounds.
-
Page 93: Modes Of Operation
MIDI keyboard. 8.1.1 Launch the application To launch the Jupiter 8V application, on Windows, go to the menu Start > Programs > Arturia > Jupiter-8V2, and • choose “Jupiter-8V2”. on Macintosh, open the finder > Applications > Arturia and double-click on the •... -
Page 94: Vst
The VST interface was updated to version 2 in 1999. One of the additions was the ability for plug-ins to receive MIDI data. This allowed for the introduction of VSTi (Virtual Studio Technology Instrument) format plug-ins. ARTURIA – JUPITER-8V – USER’S MANUAL... -
Page 95: Vst
The opening of a Jupiter 8V VST plug-in is the same as opening all other VST plug-ins. Please consult the instruction manual of your host sequencer for more specific information. Under Cubase/Nuendo, create a new “Instrument” track, and choose Jupiter-8V2 in the rack. ARTURIA – JUPITER-8V – USER’S MANUAL... -
Page 96: Rescan The Plug-In Directory In Cubase
(without saving them as a separate preset within the plug-in itself), the next time you open the project, the Jupiter 8V will load the “P1” preset plus the modifications you made previously. ARTURIA – JUPITER-8V – USER’S MANUAL... -
Page 97: Using In Pro Tools (Rtas)
Jupiter 8V future versions. 8.8 U (RTAS) SING IN OOLS 8.8.1 Opening of the plug-in Access to the Jupiter 8V plug-in is like all other plug-ins in Pro Tools, via a new Instrument Track creation: ARTURIA – JUPITER-8V – USER’S MANUAL... -
Page 98: Saving The Presets
Create a new Software Instrument track. On the channel of the mixer corresponding to the selected track, click on the button “I/O” to list the available plug-ins, then select “AU Instruments > Arturia > Jupiter- 8V2 > Stereo”. ARTURIA – JUPITER-8V – USER’S MANUAL... -
Page 99: Using In Ableton Live (Au And Vst)
MIDI track: If necessary, you can perform a rescan of the plug-in directory in the Preferences, “File Folder” tab: press the “Scan” button, or press “Scan” while holding the [Alt] key for a full rescan. ARTURIA – JUPITER-8V – USER’S MANUAL... -
Page 100: Arturia Jupiter-8V - License Agreement
The Licensee must register the Product to Arturia to get access to client support, and to activate his Product. (An internet connection is required to register and activate the Product, either on the computer on which the Product is installed, either on another device able to exchange files with the computer on which the Product is installed). - Page 101 The Licensee must register the Product to Arturia to get access to client support, and to activate his Product. (An internet connection is required to register and activate the Product, either on the computer on which the Product is installed, either on another device able to exchange files with the computer on which the Product is installed).
- Page 102 Privacy Policy at www.arturia.com/privacy. 7. Limited Warranty Arturia warrants that the physical media on which the software is provided is free from defects in materials and workmanship under normal use for a period of thirty (30) days from the date of purchase. The Licensee’s invoice shall be evidence of the date of purchase.
Need help?
Do you have a question about the Jupiter-8V and is the answer not in the manual?
Questions and answers