Table of Contents
Advertisement
Advertisement
Table of Contents

Subscribe to Our Youtube Channel
Related Manuals for Nexus C-6


Summary of Contents for Nexus C-6
- Page 1 INSTALLATION INSTRUCTIONS C-6 MULTI-ROOM CONTROLLER...
-
Page 2: Important Safety Instructions
IMPORTANT SAFETY INSTRUCTIONS Read these instructions. Keep these instructions. Heed all warnings. Follow all instructions. Do not use this apparatus near water. Clean only with dry cloth. Do not block any ventilation openings. Install in accordance with the manufacturer's instructions. Do not install near any heat sources such as radiators, heat registers, stoves, or other apparatus (including amplifiers) that produce heat. -
Page 3: System Overview
R-1 Handheld Remote for additional flexibility and armchair control. The greatest feature of the C-6 is its ‘Phantom Control’ Technology. The C-6 requires no special control wiring by integrating easily onto the same 4 wires used to drive the speakers. This makes the C-6 the perfect choice for any installation. -
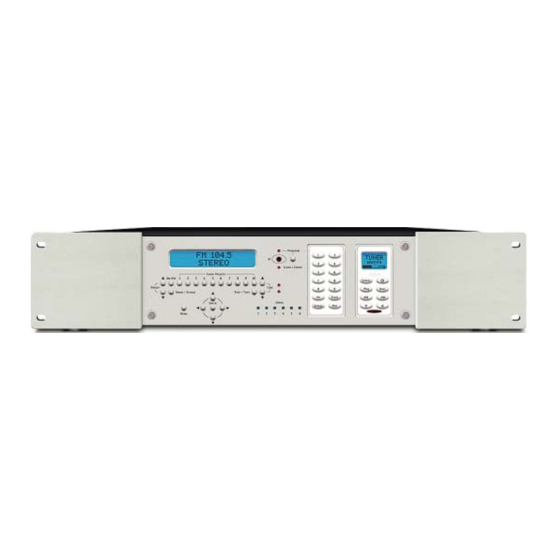
Page 4: Controller Front Panel
4. Tuner Presets – Press to program or select up to 10 AM or FM preset stations. 5. C-6 Controller Display – Backlit LCD provides information regarding: Tuner preset number, frequency, and mode. Also displays multiple screens for Controller Setup and programming modes. -
Page 5: Speaker Terminals
24. AC Power – Standard IEC 3-conductor AC line cord receptacle. 25. AC Fuse – T8A L250 26. Main Power Switch – Turns AC power to the C-6 Controller ON/OFF. 27. Zone Keypad/Speaker Terminal – Six plug-in four terminal screw connector terminals for connecting K-8, K-22 Keypads and speakers in remote zones. - Page 6 39. IR Sensor – Receives IR commands from R-1 Handheld Remote or other programmable remote with R-1 codes to control C-6. NOTE: C-6 will only respond to R-1 commands. There is no IR pass through to control source components with their native remotes.
- Page 7 IR commands must be programmed by source. Rear (K-8 and K-22 Keypads) 48. Keypad/Speaker Input Terminal – One plug-in four terminal screw connectors for connecting K-8, K-22 Keypads and speakers to appropriate zone connection on the C-6 Controller. WARNING:...
- Page 8 NOTE 2: Any Source IR commands programmed into the C-6 Controller for the Keypads will respond to button presses from the R-1 and do not need to be programmed twice. 50. Source Select Buttons - Press to select an Input on the C-6 Controller in a Zone. No programming required.
- Page 9 Figure 8. C-6 Typical System...
-
Page 10: Installation
(CD, DVD, Satellite Receiver, VCR, etc) should also be installed at this location. The C-6 and source components can be placed on shelves in a wall unit in a media room, or rack mounted in a standard 19” rack mount system. Always provide convenient access for loading CDs and DVDs. - Page 11 What this means is that the C-6 Controller with K-8 or K-22 Keypads can be used to upgrade an existing single-zone audio system with volume controls to a multi-source, multi-zone Keypad controlled A/V distribution system.
- Page 12 Audio – Use a quality audio cable from the telephone system line audio or paging output to the Page Audio IN on the C-6 Controller. Line level audio can typically be run up to about 50’. Anything beyond that should be run through an appropriate balanced line adaptor. Terminate with a quality gold plated RCA type male plug at the head end and terminate as appropriate for the paging device used.
-
Page 13: Connecting The Controller
1. Using four conductor stranded wire, strip approximately ¼” of insulation from each conductor. Twist the strands until tight. 2. Connect the bare wires to the plug-in four terminal screw connectors included with the C-6 accessories. Be sure to maintain proper polarity from the RIGHT+, CONTROL, COMMON and +LEFT terminals for each zone output. - Page 14 Audio – Connect one RCA to RCA mono audio cable from a line level audio output on the telephone system or device to be used for paging to the PAGE AUDIO IN on the C-6 Controller. Video – Connect one RCA to RCA shielded video cable from a composite video output from a security camera or other video device to be displayed in PAGE mode to the PAGE VIDEO IN on the C-6 Controller.
- Page 15 Multiple C-6 Controllers The Nexus C-6 System is expandable to up to 18 Zones. There are two Expansion Controllers that are used for expansion. The X-1 expands a C-6 system for zones 7-12 and the X-2 expands the system for zones 13-18.
- Page 16 1. Using four conductor stranded wire, strip approximately ¼” of insulation from each conductor. Twist the strands until tight. 2. Connect the bare wires to the plug-in four terminal screw connectors included with the C-6 accessories. Be sure to maintain proper polarity on the LEFT+, CONTROL, COMMON and RIGHT+ terminals for each zone output.
-
Page 17: Source Naming
PROGRAMMING C-6 Controller Setup Menu All system programming is done in the C-6 Controller using the C-6 Controller Setup Menu. No PC, no software. Other than ‘Group’ and zone treble, mid and bass adjustments, once the Controller has been programmed, the entire system is ready to go. If the system starts out in a... - Page 18 5. Press ENTER when the desired Source Name appears on the Display under NAME. e.g. CD. ‘NAME SAVED’ will appear on the Display for a couple seconds. The Display will return to the Source Naming Window with INPUT [1] now NAMEd as CD. (PRESET will always return to [00].) 6.
- Page 19 15db in 1db increments from unity gain. To properly adjust trim, all sources must be connected to their appropriate inputs on the C-6 Controller. They must all be loaded with program material (Radio station, CD, DVD, Video Tape etc.) and playing.
- Page 20 15. Press Menu to return to the default Tuner Preset Window. Zone Sharing There are two modes for linking zones with the C-6. One is GROUP and the other is ZONE SHARING. Group is a temporary linking of active zones by source and volume. Zone Sharing has two options.
- Page 21 The C-6 Controller is programmed at the factory for system functions such as ON/OFF, Source Select, Volume UP/DOWN etc. To control the common source components, IR commands for those devices must be programmed into the C-6. This is a simple process that should only take a few minutes.
- Page 22 9. Test all commands on all buttons for all sources. Replace commands as needed. NOTE 1: The R-1 Remote that comes with the C-6 has Navigation buttons not found on the keypads. These buttons are programmed using the same steps as the keypads. (Press a button on the R-1, followed by a button press on the source remote for the IR command to be associated with that button.) Once familiar with the process, it may be easier to program all IR commands...
- Page 23 7. Test power commands by turning all zones OFF. All components should be OFF. (If not, manually turn them off.) 8. Turn ON a single zone. All sources should turn ON. 9. Make changes to ON/OFF locations under the power button for sources as needed. Macros (Version IR1.7 and up) For each of the 5 external inputs on the C6, there are 17 buttons on the keypad, and an additional 9 buttons on the remote control to which macro sequences can be assigned.
-
Page 24: Erasing Macros
satellite remote to the number buttons on the C6, as these IR commands will be used in our macros. Step 2. Now that we have taught all the necessary IR commands to the C6 we can start to create the macro. - Page 25 Each command must be terminated with a carriage return: <cr>. If an invalid command is sent, the C-6 will respond with ERR. If a valid command is sent, the C-6 will respond with OK unless it is a query type command, in which case the C-6 will respond with information. Every response from the C-6 is terminated with CR/LF.
- Page 26 Zone Power Zxx?<cr> xx=zone, Ask the C-6 if a zone is on or off. The C- Query valid range 01-18 6 will respond with Zxx1 for zone on, and Zxxo for zone off. Xx is the zone number queried.
- Page 27 New RS232 commands as of Version 1.91 Command Syntax Parameters Description FM Tuner FMFxxxx xxxx=frequency, valid Set the FM frequency of the C6 internal frequency <cr> range 0875 - 1079 tuner. If the tuner is on the AM band, it leading zero required will switch to FM.
- Page 28 New RS232 commands as of Version 1.91 (continued) Command Syntax Parameters Description Query group GRS?<cr> none Ask the C6 what source the group is set source to. If there is a group, it will report back what source it is set to. If there is no group, it will report what source will be set if you create a group using RS232 group commands.
- Page 29 Applications 1&2 provide stereo line level output at the C-6 Controller from the Zone Keypad/Speaker Output Terminal. Application 3 provides stereo line level in the remote zone from the Keypad Speaker Level Output.
- Page 30 Figure 17. Application 3 Using an External High Power Amplifier Application 3 This application allows using a high power amplifier in a remote zone. The house wiring from the C-6 Controller to the zone keypad is Phantom Control configuration. The zone keypad speaker...
-
Page 31: Tone Controls
level output is adapted to line level and fed into a local amplifier. Speaker connections from the amplifier to the zone speakers are standard configuration. OPERATING INSTRUCTIONS The following describes basic system operation using K-8 and K-22 Keypads using system default programming and suggested IR programming. -
Page 32: Troubleshooting
TROUBLESHOOTING PROBLEM SOLUTION Power System will not Power up a) C-6 Controller must be plugged into an unswitched AC outlet. b) Power cord must be plugged into C-6 Controller Keypads will not power up Check connections and polarity of control and common wires from controller to Keypads. -
Page 33: Infrared Control
IR eye of the device being controlled and connected to C-6 Controller? c)Are IR commands programmed for the device being controlled? No IR output on C-6 In Expanded Systems a)Check connection of 52 pin expansion (When using X-1 and X-2 Expansion cable. Controllers) b)Are Keypads properly connected? Check polarity. -
Page 34: Specifications
SPECIFICATIONS Amplifier Output Power 20 watts per channel (20Hz to 20KHz).1% THD all zones driven. Input Sensitivity .750mV Input Voltage (max.) Video Input/Output Impedance: 75 ohms Video Bandwidth: DC to 6Mhz. Output Level: 1Vpp Tuner FM Section Frequency Range: 87.5-108Mhz. IHF Sensitivity: 20dBu (19Khz LPF On THD = 3%) IF Rejection:... -
Page 35: Warranty
Nexus Audio. 3. A returned product is to be delivered to Nexus Audio with a Nexus Audio assigned Return Authorization Number. In addition, the returned product is to be accompanied by a written description of the defect and proof of purchase. - Page 36 NEXUS AUDIO SYSTEMS INC. 20 Hamilton Road Barrie, Ontario L4N 8Y5 Canada Tel: 705.737.2629 866.303.2629 Fax: 705.792.3990 www.nexusaudiosystems.com...
- Page 37 © 2004 Nexus Audio Systems, Inc.
Need help?
Do you have a question about the C-6 and is the answer not in the manual?
Questions and answers