Table of Contents
Advertisement
Available languages
Available languages
Advertisement
Chapters
Table of Contents

Related Manuals for 4Sight 4SK606CDash Cam 2


Summary of Contents for 4Sight 4SK606CDash Cam 2
- Page 1 4SK606C 4SK606C...
-
Page 2: Table Of Contents
Contents About this manual..............1 Notices for use.................1 Know the product..............2 Using the Original Dash Cam 2..........3 Charging.................3 Inserting the microSD card............4 Powering ON/OFF the Dash Cam..........4 Installing in-vehicle bracket............5 Rotating lenses................5 Icons explained.................6 Basic operation................7 A. Switching between modes..........7 B. System settings..............7 C. -
Page 3: About This Manual
4Sight continually makes updates and improvements to their devices, thus some functions of your device may vary slightly from what is contained within this manual. 4Sight shall be entitled to modify the content or software without prior notice and the manufacturer shall be entitled to modify technical specifications without prior notice. -
Page 4: Know The Product
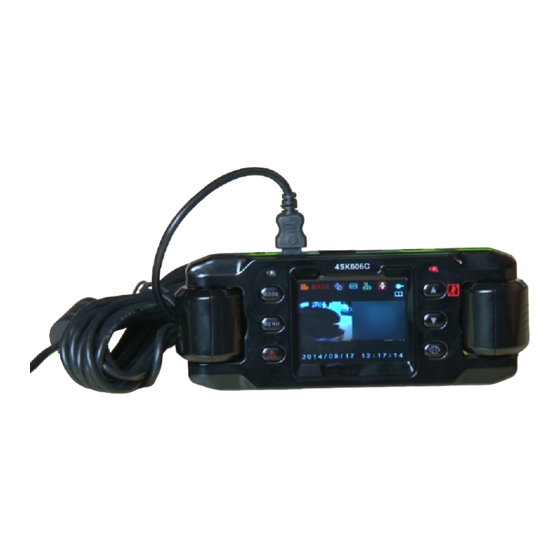
Know the product Charge indicator Power button UP button microSD card slot RESET button Menu button Emergency event button AV out LCD display DC in Bracket slide Screen switch button Microphone GPS connector Confirm button (OK key) Down button Mode button Lenses GPS indicator... -
Page 5: Charging
While recording, pressing the UP button will mute the cameras microphone. Pressing the UP button again will reactivate the microphone. Pressing the emergency event button while recording will store the currently recorded video immediately, and a protection mark will appear on the screen. The recorded video files will then be locked, stored, and not deleted as to ensure the completeness of your video. -
Page 6: Inserting The Microsd Card
Inserting the microSD card Insert the microSD card into the microSD card slot until you hear a click; the drawing outlined on the camera indicates the correct direction. SD card insert Note: You will be prompted to format the SD card when using the unit for the first time, perform this step. -
Page 7: Installing In-Vehicle Bracket
Installing in-vehicle bracket The included suction cup bracket can be affixed to the windshield to securely place the Dash Cam. Please follow these steps to mount the Dash Cam effectively: A. Insert the sliding bracket into the port on the top of the Dash Cam and slide them together until they are locked into place. -
Page 8: Icons Explained
Icons Explained 2014/02/05 15:17:16 Indicates you are in Camera Mode When this icon is blinking, you are recording When this icon appears blinking on the screen, the optional GPS accessory is connected GPS function is on, if blinking means it has GPS signal from GPS tracker G-sensor on High = 3 lightning bolts... -
Page 9: Basic Operation
Basic operation A. Switching between modes Press the MODE button to switch between video and playback modes. B. System settings Press the MENU button to enter the settings menu; press the UP or DOWN keys to scroll through menu options, select OK to enter the highlighted option. The menu is laid out in the following order: Option name Sub-menu options... -
Page 10: C-1. Operation Of The Emergency Storage Function
1. Pressing the OK button will start and stop recording 2. In video mode, pressing the UP button will turn off the camera’s microphone, pressing the UP key again will turn it back on. 3. In video mode, pressing the DOWN button will turn off the display screen to save power. -
Page 11: Video Playback And Playback Setting
F. Video playback and playback setting F-1. Video playback 1. Press the MODE button to enter video playback mode,on screen will appear the last video that you recorded. 2. Use the UP and DOWN buttons to select the video you wish to playback . -
Page 12: Using The Custom Video Player
G. Using the custom video player G-1. Minimum system requirements CPU: Pentium 4 2.4 G H z Screen: 1024* 768 resolution RAM: 1GB OS: support Windows XP, Windows Vista (32bit & 64bit), Windows 7 (32bit & 64bit) G-2. Player interface and use This player does not require installation and can be directly launched from the SD card. - Page 13 1. GPS information display area: Displays GPS coordinates and running speed of the played clip. (Optional) 2. Speed 3. Compass 4. Video display area: Displays the picture of the currently being played video. 5. Map display area: When the video has GPS information included, this interface will access Google Maps and display the driving route on the map.(Optional) 6.
- Page 14 After running the player for the first time, the player will recognize the SD card and automatically begin playing the first video file. If you do not wish to begin viewing the first video, simply stop the playback and select the video you wish to review. Operation description of button functions Display Image from both lenses Display left lens image only...
- Page 15 Snapshot button: Use this button to save a screenshot . JPG of the currently displayed video. Pressing this button will take a screenshot of the currently displayed video, whether the video is playing or stopped. The user will be free to choose the destination and name of their file.
- Page 16 If the taken video has the GPS (Optional) and G-Sensor information, the saved video will have this information as well. To view this information, open the AVI file using the video player’s “Open” function. Delete button: Use this to delete videos from your SD card The videos saved on the SD card can be deleted in two ways: 1.
- Page 17 The settings button offers some system settings as laid out below: 「Format Card」will format the SD card into the custom settings for this camera and place the custom video player on the card so that you can play your files on any computer. You must format the SD card either in this program, or on the camera before use.
- Page 18 「Password setup」 Allows for password protection of your SD card. To set a new password, type the old password into the “Old Password” box (if there is no password leave it blank) and fill in your desired password in the “New Password” and “Confirm New Password”...
- Page 19 Repair button: Use to repair broken video clips Broken videos are created by several situations including, removing the SD card while recording is taking place, the battery dying mid recording. When this happens, using this repair option will allow you to view the damaged video.
- Page 20 Switch display size: select this button to switch between the larger and smaller video player KML google earth (Optional) Using the KML google earth option requires an active internet connection as well as a downloaded and installed version of google earth. 1.
-
Page 21: Video Output
Video output Connect the AV cable according to the diagram Resetting the system RESET Note: When the machine is not functioning normally, the best first course of action is to always press the reset button. Accessories 1. In-vehicle power supply 2. - Page 22 FCC STATEMENT FCC declaration of conformity Responsible party: 4 SIGHT 3325 E. Shelby Street Ontario, CA 91764 (909) 944-5511 Fax: (866) 285-5828 This device complies with Part 15 of the FCC Rules. Operation is subject to the following two conditions: (1) This device may not cause harmful interference, and (2) This device must accept any interference received, including interference that may cause undesired operation.
- Page 23 Use of shielded cable is required to comply with Class B limits in Subpart B of Part 15 of the FCC rules. Do not make any changes or modifications to the equipment unless otherwise specified in the manual. If such changes or modifications should be made, you could be required to stop operation of the equipment.
- Page 24 4SK606C 4SK606C...
- Page 25 Table des matières À propos de ce guide d’utilisation...........1 Avis d’utilisation................1 Apprendre à connaître le produit............2 Utilisation de la caméra DASH CAM 2........3 Recharge................3 Insertion de la carte microSD............4 Mise en/hors fonction de la caméra Dash Cam......4 Installation du support pour le véhicule........5 Lentilles rotatives..............5 L’explication des icônes............6 Fonctionnement de base............7...
-
Page 26: À Propos De Ce Guide D'utilisation
À propos de ce guide d’utilisation La compagnie 4Sight fait continuellement mises à jour et des améliorations à leurs dispositifs, ainsi certaines fonctions de votre appareil peuvent varier légèrement de ce qui est contenu dans ce guide d’utilisation. La compagnie 4Sight se réserve le droit de modifier le contenu ou le logiciel sans préavis et le... -
Page 27: Apprendre À Connaître Le Produit
Apprendre à connaître le produit Voyant de charge Bouton d’alimentation Fente pour carte microSD Bouton du haut “Up” * Bouton de réinitialisation “RESET” Bouton du menu Bouton d’urgence ** Prise de sortie AV Affichage ACL Prise d’entrée CC Bouton de dégagement du support Bouton de commande de l’écran *** Microphone Connecteur du GPS... -
Page 28: Recharge
Pendant l'enregistrement, appuyez sur le bouton “UP” afin de mettre le microphone de la caméra en sourdine. Appuyez de nouveau sur le bouton “UP” pour réactiver le microphone. Appuyez sur le bouton situation d'urgence pendant un enregistrement afin de stocker immédiatement la vidéo en cours d'enregistrement, et une indication de protection apparaîtra à... -
Page 29: Insertion De La Carte Microsd
Insertion de la carte microSD Insérez la carte microSD dans la fente pour carte microSD jusqu'à ce que vous entendiez un clic, le schéma affiché sur l'appareil indique la bonne direction. Insertion de la carte SD Remarque : Vous serez invité à formater la carte SD lorsque vous utilisez l’unité... -
Page 30: Installation Du Support Pour Le Véhicule
Installation du support pour le véhicule Le support à ventouse inclus peut être fixé au pare-brise afin d’y fixer la caméra Cam Dash. Veuillez suivre les étapes suivantes pour installer efficacement la caméra Dash Cam. A. Insérez le support coulissant dans le port situé sur le dessus de la caméra Dash Cam et glissez-les ensemble jusqu'à... -
Page 31: L'explication Des Icônes
L’explication des icônes 2014/02/05 15:17:16 Une indication que vous utilisez le mode de caméra Quand cette icône clignote, vous enregistrez une vidéo Quand cette icône clignote, l’accessoire optionnel du GPS est connecté Le GPS est activé, si l’icône clignote , cela signifie que vous avez du signal venant de GPS tracker. -
Page 32: Fonctionnement De Base
Fonctionnement de base A. Permutation entre les modes Appuyez sur le bouton “MODE” afin de permuter entre la vidéo et les modes de lecture. B. Réglages du système Appuyez sur le bouton “MENU” afin d’accéder au menu des réglages. Appuyez sur la touche “UP” ou “DOWN” pour défiler à travers les options du menu, sélectionnez OK pour accéder à... -
Page 33: C-1. Fonctionnement De La Fonction De Stockage D'urgence
1. Appuyez sur OK pour débuter et arrêter un enregistrement. 2. En mode vidéo, appuyez sur “UP” pour mettre le microphone de la caméra en sourdine. Appuyez de nouveau sur “UP” pour remettre en fonction. 3. En mode vidéo, appuyez sur “DOWN” pour désactiver l’écran afin de conserver l’énergie. -
Page 34: Utilisation De La Fonction Gps (Optionnel)
E. Utilisation de la fonction GPS (optionnel) Lorsque connecté à une unité GPS externe, vous pourrez mettre l’unité GPS en ou hors fonction par l’entremise des réglages du système. Lorsque vous sélectionnez en fonction “ON”, l’icône du apparaîtra à l’écran. Lorsque le signal de l’unité GPS est perçu, l’icône de l’unité... -
Page 35: Utilisation Du Lecteur Vidéo Personnel
G. Utilisation du lecteur vidéo personnel G-1.Exigences minimales du système UPC : Pentium 4, 2,4 GHz Écran : Résolution de 1024 x 768 Mémoire vive : 1 Go Système d’exploitation : Windows XP, Windows Vista (32 bits & 64 bits), Windows 7 (32 bits & 64 bits) G-2.Interface du lecteur et utilisation Ce lecteur ne nécessite pas d’installation et peut être lancé... - Page 36 1. Zone d'affichage de l'information du GPS : Affiche les coordonnées GPS et la vitesse de défilement de la vidéo en cours de lecture. (Optionnel). 2. Vitesse 3. Boussole 4. Zone d'affichage de la vidéo : Affiche l'image la vidéo actuellement en cours de lecture.
- Page 37 13. Bouton des réglages “Settings” 14. Commande des options de contrôle de la vidéo “Video Control” 15. Commande de volume 16. Options pendant la lecture “Playback options” Après avoir exécuté le lecteur pour la première fois, le lecteur reconnaîtra la carte SD et commencera automatiquement la lecture du premier fichier vidéo.
- Page 38 Bouton “Snapshot” : Utilisez le bouton pour sauvegarder une photo en format JPG de la vidéo affichée actuellement. Appuyez sur ce bouton pour prendre une capture d’image de la vidéo affichée, que la vidéo soit en mode de lecture ou qu’elle soit arrêtée.
- Page 39 Si la vidéo enregistrée est dotée des informations GPS (optionnel) ou du détecteur G “G-Sensor”, la vidéo sauvegardée sera également dotée de informations. Pour visionner ces informations, ouvrez le fichier AVI par l’entremise de la fonction “Open” du lecteur vidéo. Bouton “Delete”...
- Page 40 Le bouton “Settings” vous offre quelques réglages du système et apparaîtra comme ci-dessous : [Format Card] (format de carte) permettra de formater la carte SD selon les réglages personnalisés pour cette caméra et installer votre lecteur personnalisé sur la carte mémoire SD afin de vous permettre de visionner les fichiers vidéo sur n’importe quel ordinateur.
- Page 41 [Password Setup] (réglage du mot de passe) vous permet de protéger votre carte mémoire SD avec un mot de passe. Pour régler un nouveau mot de passe, inscrivez l’ancien mot de passe dans la boîte “Old Password” (s’il n’y a pas de mot de passe, laissez la boîte vide) et inscrivez votre mot de passe dans le champ “New Password”...
- Page 42 Le bouton “Repair” : Utilisez ce bouton pour réparer les vidéoclips endommagés. Les vidéoclips endommagés se produisent de différentes manières, le retrait de la carte SD pendant le processus d’enregistrement, la pile épuisée pendant l’enregistrement, etc. Lorsque ceci se produit, utilisez l’option de réparation afin de vous permettre de visionner la vidéo endommagée.
- Page 43 Le bouton “Switch display size” : Utilisez ce bouton pour permuter entre le lecteur vidéo de plus grande taille ou de taille plus petite. Le bouton “KML Google Earth” (optionnel). L’utilisation de l’option “KML Google Earth” nécessite une connexion Internet et une version de l’application “Google Earth” installée.
-
Page 44: Sortie Vidéo
Sortie vidéo Branchez le câble AV selon le schéma ci-dessous. Réinitialisation du système RÉINITIALISATION Remarque : Lorsque l’appareil ne fonctionne pas normalement, effectuez toujours la réinitialisation en premier en appuyant sur le bouton “Reset”. Accessoires 1. Alimentation du véhicule 2. Câble AV 3. - Page 45 Canada Industry Canada (IC) Unintentional emitter per ICES-003/NMB-003 This digital apparatus does not exceed the Class B limits for radio noise emissions from digital apparatus as set out in the radio interference regulations of Industry Canada. Le present appareil numerique n’emet pas de bruits radioelectriques depassant les limites applicables aux appareils numeriques de Classe B prescrites dans le reglement sur le brouillage radioelectrique edicte par Industrie Canada.
Need help?
Do you have a question about the 4SK606CDash Cam 2 and is the answer not in the manual?
Questions and answers