Table of Contents
Advertisement
Quick Links
Advertisement
Table of Contents

Related Manuals for 4Sight 4SK606


Summary of Contents for 4Sight 4SK606
- Page 1 4SK606...
-
Page 2: Table Of Contents
Contents About this manual..............1 Notices for use.................1 Know the product..............2 Using the Original Dash Cam 2..........3 Charging.................3 Inserting the microSD card............4 Powering ON/OFF the Dash Cam..........4 Installing in-vehicle bracket............5 Rotating lenses................5 Basic operation................6 A. Switching between modes..........6 B. System settings..............6 C. -
Page 3: About This Manual
4Sight continually makes updates and improvements to their devices, thus some functions of your device may vary slightly from what is contained within this manual. 4Sight shall be entitled to modify the content or software without prior notice and the manufacturer shall be entitled to modify technical specifications without prior notice. -
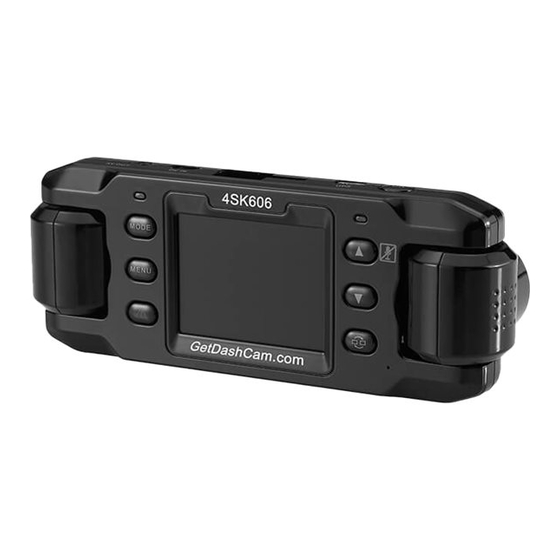
Page 4: Know The Product
Know the product Charge indicator Power button UP button microSD card slot RESET button Menu button Emergency event button AV out LCD display DC in Bracket slide Screen switch button Microphone GPS connector Confirm button (OK key) Down button Mode button Lenses GPS indicator... -
Page 5: Using The Original Dash Cam 2
While recording, pressing the UP button will mute the cameras microphone. Pressing the UP button again will reactivate the microphone. Pressing the emergency event button while recording will store the currently recorded video immediately, and a protection mark will appear on the screen. The recorded video files will then be locked, stored, and not deleted as to ensure the completeness of your video. -
Page 6: Inserting The Microsd Card
Inserting the microSD card Insert the microSD card into the microSD card slot until you hear a click; the drawing outlined on the camera indicates the correct direction. SD card insert Note: You will be prompted to format the SD card when using the unit for the first time, perform this step. -
Page 7: Installing In-Vehicle Bracket
Installing in-vehicle bracket The included suction cup bracket can be affixed to the windshield to securely place the Dash Cam. Please follow these steps to mount the Dash Cam effectively: A. Insert the sliding bracket into the port on the top of the Dash Cam and slide them together until they are locked into place. -
Page 8: Basic Operation
Basic operation A. Switching between modes Press the MODE button to switch between video and playback modes. B. System settings Press the MENU button to enter the settings menu; press the UP or DOWN keys to scroll through menu options, select OK to enter the highlighted option. The menu is laid out in the following order: Option name Sub-menu options... -
Page 9: C-1. Operation Of The Emergency Storage Function
1. Pressing the OK button will start and stop recording 2. In video mode, pressing the UP button will turn off the camera’s microphone, pressing the UP key again will turn it back on. 3. In video mode, pressing the DOWN button will turn off the display screen to save power. -
Page 10: Video Playback And Playback Setting
F. Video playback and playback setting F-1. Video playback 1. Press the MODE button to enter video playback mode,on screen will appear the last video that you recorded. 2. Use the UP and DOWN buttons to select the video you wish to playback . -
Page 11: Using The Custom Video Player
G. Using the custom video player G-1. Minimum system requirements CPU: Pentium 4 2.4 G H z Screen: 1024* 768 resolution RAM: 1GB OS: support Windows XP, Windows Vista (32bit & 64bit), Windows 7 (32bit & 64bit) G-2. Player interface and use This player does not require installation and can be directly launched from the SD card. - Page 12 1. GPS information display area: Displays GPS coordinates and running speed of the played clip. (Optional) 2. Speed 3. Compass 4. Video display area: Displays the picture of the currently being played video. 5. Map display area: When the video has GPS information included, this interface will access Google Maps and display the driving route on the map.(Optional) 6.
- Page 13 After running the player for the first time, the player will recognize the SD card and automatically begin playing the first video file. If you do not wish to begin viewing the first video, simply stop the playback and select the video you wish to review. Operation description of button functions Display Image from both lenses Display left lens image only...
- Page 14 Snapshot button: Use this button to save a screenshot . JPG of the currently displayed video. Pressing this button will take a screenshot of the currently displayed video, whether the video is playing or stopped. The user will be free to choose the destination and name of their file.
- Page 15 If the taken video has the GPS (Optional) and G-Sensor information, the saved video will have this information as well. To view this information, open the AVI file using the video player’s “Open” function. Delete button: Use this to delete videos from your SD card The videos saved on the SD card can be deleted in two ways: 1.
- Page 16 The settings button offers some system settings as laid out below: 「Format Card」will format the SD card into the custom settings for this camera and place the custom video player on the card so that you can play your files on any computer. You must format the SD card either in this program, or on the camera before use.
- Page 17 「Password setup」 Allows for password protection of your SD card. To set a new password, type the old password into the “Old Password” box (if there is no password leave it blank) and fill in your desired password in the “New Password” and “Confirm New Password”...
- Page 18 Repair button: Use to repair broken video clips Broken videos are created by several situations including, removing the SD card while recording is taking place, the battery dying mid recording. When this happens, using this repair option will allow you to view the damaged video.
- Page 19 Switch display size: select this button to switch between the larger and smaller video player KML google earth (Optional) Using the KML google earth option requires an active internet connection as well as a downloaded and installed version of google earth. 1.
-
Page 20: Video Output
Video output Connect the AV cable according to the diagram Resetting the system RESET Note: When the machine is not functioning normally, the best first course of action is to always press the reset button. Accessories 1. In-vehicle power supply 2.
Need help?
Do you have a question about the 4SK606 and is the answer not in the manual?
Questions and answers
I can see only past 3 days worth footage. How do I see the earlier video footages? The time stamp is right. But the date shows as Jan 16 instead of Apr 6. How do I fix it?
To view earlier video footage on a 4Sight 4SK606 when the date is incorrect, manually browse through the saved video files by their file names or timestamps instead of relying on the date. Use the playback feature to review videos and identify the correct footage based on content or time indicators such as G-Sensor or map data if enabled.
This answer is automatically generated