Table of Contents
Advertisement
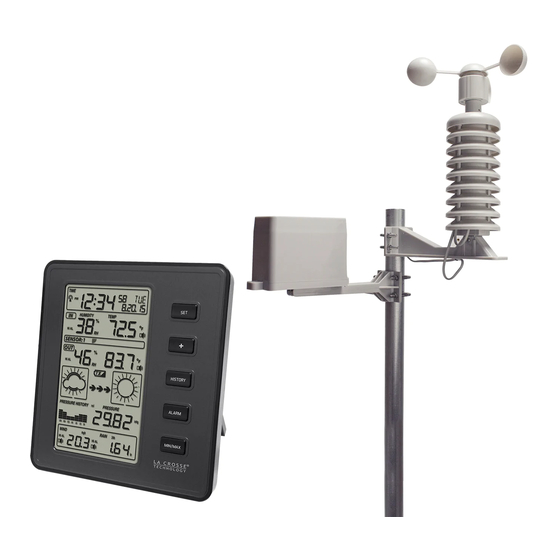
Professional Wireless Weather Station
La Crosse Technology
Professional Wireless Weather Station that provides accurate, real-time weather data straight
from your backyard. This sleek weather station offers weather forecasting, indoor/outdoor
temperature & humidity, wind & rain data, and precise atomic time & date—all on one
comprehensive device.
Wall Hanging Hole
Model: 308-2316
®
, the world leader in atomic time and weather instruments, introduces a
Radio-controlled time +
Perpetual Calendar
Indoor Temperature,
Humidity + Alerts
Outdoor Temperature,
Humidity + Alerts
Forecast Icons
24-hour Pressure History
Graph + Numeric Pressure
(Relative or Absolute
Wind Speed and Rain
Readings with Alerts
www.lacrossetechnology.com/support
Reclining Legs
and Base Stand
Battery
Compartment
3 "AA"
Model: 308-2316
Instruction Manual
DC: 122314
Page | 1
Advertisement
Table of Contents

Related Manuals for La Crosse Technology 308-2316


Summary of Contents for La Crosse Technology 308-2316
- Page 1 Model: 308-2316 Instruction Manual DC: 122314 Professional Wireless Weather Station La Crosse Technology ® , the world leader in atomic time and weather instruments, introduces a Professional Wireless Weather Station that provides accurate, real-time weather data straight from your backyard. This sleek weather station offers weather forecasting, indoor/outdoor temperature &...
- Page 2 (large) for the thermo-hygro/wind mounting bracket. Red LED Light Connection Ports for Wind (left) and Rain (right) cord Thermo-Hygro TX231TH U-Bolts Connection Ports (Included) Battery Cover Slides into mounting bracket. Secure with screw. Model: 308-2316 www.lacrossetechnology.com/support Page | 2...
-
Page 3: Table Of Contents
Maximum Records with time and date stamp: ....................... 15 Minimum Records with time and date stamp: ........................ 16 Weather Forecast Icons ..............................17 Weather Tendency Arrows ............................. 17 Pressure Sensitivity Setting ............................18 Storm Warning Threshold .............................. 18 Changing Batteries ................................ 18 Model: 308-2316 www.lacrossetechnology.com/support Page | 3... -
Page 4: Features
Step 2: Attach the Wind Cups to the wind sensor. Press on firmly. No screw required. Step 3: Connect the wind cup assembly to the top end of the shower proof casing. Align the screw holes, and fasten with long bolt and nut. Do not over tighten. Model: 308-2316 www.lacrossetechnology.com/support Page | 4... -
Page 5: Sensor Mounting And Placement
Note: Attach the Rain sensor lower than the Wind/TH sensor so that rain water does not follow the cord into the port of the TH sensor. 6. Attach the wind speed/thermo-hygro sensor mounting bracket to the wooden pole with the included U-bolts. Do not over tighten. Model: 308-2316 www.lacrossetechnology.com/support Page | 5... -
Page 6: Weather Station Placement
6. Place the weather station onto the screw, using the hanging hole on the 7. backside. Gently pull the weather station down to lock the screws into place. Note: Always ensure that the weather station locks onto the screw. Model: 308-2316 www.lacrossetechnology.com/support Page | 6... -
Page 7: Outdoor Reception Icon
30. Radio controlled time icon 14. Temperature display unit 15. General outdoor alarm icon The numbered illustration shows the full segments of the LCD with all the possible symbols, for description purposes only. Model: 308-2316 www.lacrossetechnology.com/support Page | 7... -
Page 8: Modes: Settings, Quick Display, Alarm, History And Min/Max
4. The letters DST will appear in the upper right corner and ON will flash. 5. Press + or MIN/MAX button to switch DST to OFF. 6. Press the SET button to confirm and select 12/24 hour time format. Model: 308-2316 www.lacrossetechnology.com/support Page | 8... -
Page 9: 12/24 Hour Time Format
Set the relative pressure number to a local reporting station or Internet reading for your location. 24.The relative pressure number will flash. 25.Press + or MIN/MAX button to adjust your relative pressure. 26.Press the SET button to confirm selection and move to relative air pressure sensitivity setting. Model: 308-2316 www.lacrossetechnology.com/support Page | 9... -
Page 10: Pressure Sensitivity Settings: 2, 3, Or 4
Outdoor Temperature, Wind Chill or Dew Point display 1. Press and release the SET button once. The Outdoor Temperature area will flash. 2. Press the + or MIN/MAX buttons to display: Outdoor Temperature Wind Chill Dew Point Model: 308-2316 www.lacrossetechnology.com/support Page | 10... -
Page 11: Relative Or Absolute Pressure Display
7. Press and release the SET button four times. The Rain number will flash. 8. Press the + or MIN/MAX buttons to display rainfall in: 1 hour 24 hour Week Month Total Model: 308-2316 www.lacrossetechnology.com/support Page | 11... -
Page 12: Rainfall Reset
4. Press the + or MIN/MAX buttons to adjust the values. 5. After adjusting alarm values press the ALARM button to activate or deactivate individual alarms. Note: Press the HISTORY button at any time to exit alarm settings mode. Model: 308-2316 www.lacrossetechnology.com/support Page | 12... -
Page 13: High Alarms
35.Press the ALARM button to activate or deactivate the alarm. 36.Press the SET button to select the 24 Hour Rainfall High Alarm. 37.Press the + or MIN/MAX buttons to adjust the rainfall value. 38.Press the ALARM button to activate or deactivate the alarm. Model: 308-2316 www.lacrossetechnology.com/support Page | 13... -
Page 14: Low Alarms
5. When the alarm is inactive (OFF) the alarm icon will not show. Alarm Icon When an alarm sounds and flashes Alarm will sound for two minutes. Press any button to silence the alarm. Model: 308-2316 www.lacrossetechnology.com/support Page | 14... -
Page 15: History Mode
4. Press the + button to view indoor temperature maximum value with time and date stamp. 5. With the value flashing, press the SET button to reset the record to current value date and time. Model: 308-2316 www.lacrossetechnology.com/support Page | 15... -
Page 16: Minimum Records With Time And Date Stamp
27.With the value flashing, press the SET button to reset the record to current value date and time. 28.Press the HISTORY button to exit maximum mode. View and/or Reset Minimum Records with time and date stamp 1. Press the MIN/MAX button twice to enter MIN mode. Model: 308-2316 www.lacrossetechnology.com/support Page | 16... -
Page 17: Weather Forecast Icons
The weather tendency arrows are between two forecast icons and indicate which direction the pressure is trending. Left Arrows: Pressure is falling and weather should worsen. Right Arrows: Pressure is rising and weather should improve. Model: 308-2316 www.lacrossetechnology.com/support Page | 17... -
Page 18: Pressure Sensitivity Setting
Weather data will be sent again once the WWVB search finished. If the WWVB time signal is not received, the thermo-hygro sensor will search every 2 hours until received. Weather data will be transmitted when not in search mode. Model: 308-2316 www.lacrossetechnology.com/support Page | 18... -
Page 19: Specifications
2.81" W x 8.02"H x 2.81"D (71.5 x 203.6 x 71.5mm) Thermo-hygro Sensor: TX231W Wind Sensor: 5.67" W x 2.93"H x 6.28"D (144 x 74.5 x 159.5mm) TX231R Rain Sensor: 2.81" W x 8.02"H x 2.81"D (150.4 x 95.1 x 60.1mm) Model: 308-2316 www.lacrossetechnology.com/support Page | 19... -
Page 20: Care And Maintenance
If the product is not working properly, change the batteries. Warranty Information La Crosse Technology, Ltd. provides a 1-year limited time warranty (from date of purchase) on this product relating to manufacturing defects in materials & workmanship. Before returning a product, please contact our friendly customer support with... -
Page 21: Fcc Statement
This booklet may contain errors or misprints. The information it contains is regularly checked and corrections are included in subsequent editions. We disclaim any responsibility for any technical error or printing error, or their consequences. All trademarks and patents are recognized. Model: 308-2316 www.lacrossetechnology.com/support Page | 21...
Need help?
Do you have a question about the 308-2316 and is the answer not in the manual?
Questions and answers