Table of Contents
Advertisement
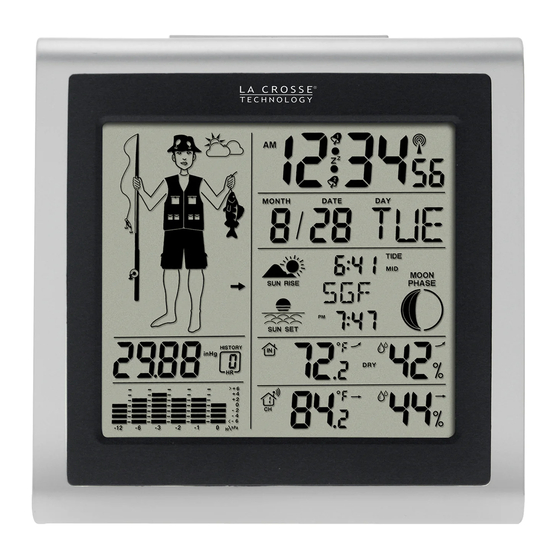
Wireless Forecast Station
Model: 308-1451 | Instruction Manual
The wireless forecast station features radio-controlled time, dual time alarms, sunrise/sunset, barometric
pressure in numbers, and pressure graph with 12-hour history, forecast icons, indoor/outdoor temperature and
humidity with high and low alarms. Five forecast Icons based on temperature & air pressure readings suggest
what kind of weather to expect. Four clothing index icon suggest what to wear. This forecast station will never
keep you guessing on current or future weather conditions.
Forecast Station
Outdoor Temperature/Humidity Transmitter TX142TH
1
Advertisement
Table of Contents

Related Manuals for La Crosse Technology 308-1451


Summary of Contents for La Crosse Technology 308-1451
-
Page 1: Forecast Station
Wireless Forecast Station Model: 308-1451 | Instruction Manual The wireless forecast station features radio-controlled time, dual time alarms, sunrise/sunset, barometric pressure in numbers, and pressure graph with 12-hour history, forecast icons, indoor/outdoor temperature and humidity with high and low alarms. Five forecast Icons based on temperature & air pressure readings suggest what kind of weather to expect. -
Page 2: Table Of Contents
Table of Contents Forecast Station Outdoor Temperature/Humidity Transmitter TX142TH Table of Contents Features Initial Setup WWVB Radio-controlled Time WWVB Reception Icon WWVB Manual Signal Search Function Buttons Program Menu WWVB Reception ON/OFF Time Zone DST Indicator ON/OFF 12/24-Hour Time Format Fahrenheit/Celsius Set Time Set Calendar... -
Page 3: Features
Clothing index • Low battery icon for forecast station and Transmitter • Sits on desktop or tabletop • 308-1451 requires 3 "AA" Alkaline batteries (not included) • TX14TH requires 2 "AA" Alkaline batteries (not included) Initial Setup Note: The forecast station will display the fisherman icon, lines etc., before batteries are installed. These items are painted on the screen. -
Page 4: Wwvb Reception Icon
reception is very limited during daylight hours. The forecast station will search for a signal every night when reception is best. The WWVB radio station derives its signal from the NIST Atomic Clock in Boulder, Colorado. A team of atomic physicists continually measures every second of every day to an accuracy of ten billionths of a second a day. -
Page 5: Program Menu
Program Menu The SET button will moves through the items in the program menu. The button will change these values. WWVB reception ON or OFF Time Zone (Seven Time Zones) Daylight Saving Indicator 12/24 hour time format Fahrenheit/Celsius selection Manual time set (Hour, Minutes, Seconds) Calendar set (Year, Month, Date) WWVB Time Reception The WWVB time reception defaults to ON. -
Page 6: Fahrenheit/Celsius
Fahrenheit/Celsius Select the temperature to display in Fahrenheit or Celsius. Default is Fahrenheit. 1. °F will flash in the time display. °F 2. Press and release the + or - button to select Celsius. 3. Confirm with the SET button and move to Set Time. Set Time To set the time manually: 1. -
Page 7: Tide
To select a city location: Select your country, state, and then city location. 1. Hold the CITY button for 5 seconds. 2. USA will flash next to the sunrise/sunset time. 3. Press and release the + or - button to select USA, CAN or MEX as your country. 4. -
Page 8: Comfort Statement
Full Moon occurs when the earth, moon and sun are in approximate alignment, with the moon and the sun on opposite sides of the earth. The illuminated portion of the moon faces the earth, giving us complete visibility of one side of the entire moon. After a full moon, the illuminated portion will decrease or wane until the new moon occurs. -
Page 9: Snooze
Set Time Alarm 2 Press and release the ALARM button twice to enter Alarm mode. The Alarm Time and A2 will show. Follow steps 1-4 above to program alarm 2. Snooze Press the SNOOZE/LIGHT button on the top of the forecast station once to activate the snooze feature for 10 minutes when either alarm sounds. -
Page 10: Channel Selection And Auto-Scroll
The temperature trend indicators are shown next to the indoor temperature and outdoor temperature readings. Channel Selection and Auto-scroll Channels: The forecast station can receive up to 3 outdoor transmitters. Extra TX142TH sensors may be found online or at your retailer to monitor remote temperature in up to 3 locations within a 200 ft. wireless range of the forecast station. -
Page 11: Weather Forecast Icons
Weather Forecast Icons These icons forecast the weather in the next 12-24 hours. The forecast icons displayed, predict the weather in terms of getting better or worse and not necessarily sunny or rainy as each icon indicates. SUNNY SLIGHTLY CLOUDY CLOUDY RAINY SNOW... -
Page 12: Min/Max Data
View MIN/MAX data: Press and release the MAX/MIN button to view the Maximum, Minimum, then Current Indoor and Outdoor Temperatures. Multiple Transmitters: Press and release the CH button to select the desired outdoor channel to view the Minimum and Maximum Outdoor Temperatures. Press and release the MAX/MIN button to view the Maximum, Minimum then Current Temperatures for that channel. -
Page 13: Install Batteries In The Forecast Station
Battery Compartment Batteries: 1. Remove battery cover. Slide tab to the right and pull out to remove battery cover. 2. Install three new AA batteries according to the polarity markings. Do Not Mix Old and New Batteries Do Not Mix Alkaline, Lithium, Standard or Rechargeable Batteries If the forecast station does not display indoor temperature after 60 seconds, remove batteries and wait for at least 60 seconds before repeating the setup process. -
Page 14: Position The Outdoor Transmitter
Improper use or unauthorized opening of housing will void the warranty. If the forecast station does not work properly, change the batteries and/or check the a/c cord connection. Position the Outdoor Transmitter Once the forecast station shows the outdoor temperature/humidity, place it and the transmitter in the desired locations and wait approximately one hour before permanently mounting the transmitter to ensure that there is proper reception. -
Page 15: Warranty Information
La Crosse Technology, Ltd for problem determination and service procedures. Warranty service can only be performed by a La Crosse Technology, Ltd authorized service center. The original dated bill of sale must be presented upon request as proof of purchase to La Crosse Technology, Ltd or La Crosse Technology, Ltd’s authorized service center. -
Page 16: Fcc Statement
For warranty work, technical support, or information contact: La Crosse Technology, Ltd 2817 Losey Blvd. S. La Crosse, WI 54601... - Page 17 This booklet may contain errors or misprints. The information it contains is regularly checked and corrections are included in subsequent editions. We disclaim any responsibility for any technical error or printing error, or their consequences. All trademarks and patents are recognized.
-
Page 18: Appendix A
Appendix A...
Need help?
Do you have a question about the 308-1451 and is the answer not in the manual?
Questions and answers