Table of Contents
Advertisement
Advertisement
Table of Contents

Related Manuals for OneTouch Ping


Summary of Contents for OneTouch Ping
- Page 1 Getting you up to speed. Quick Reference Guide...
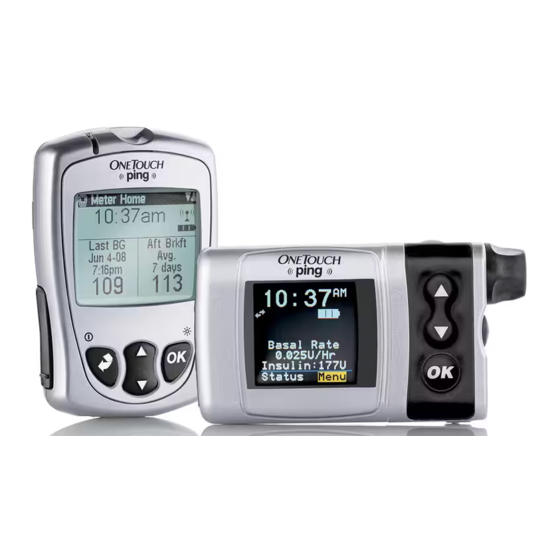
- Page 2 OneTouch Ping Insulin Pump, it also functions as a wireless (RF) remote control to deliver insulin ® ® from the pump. Your OneTouch Ping Meter-remote Blood Glucose Monitoring System is intended for ® ® use for self-testing outside the body (in vitro diagnostic use) by people with diabetes at home and by healthcare professionals in a clinical setting as an aid to monitor the effectiveness of diabetes control.
-
Page 3: Table Of Contents
Table of Contents OneTouch Ping Insulin Pump ® ® OneTouch Ping Pump Startup Overview ® ® Changing the Battery Home Screen Overview Main Menu Pump Bolus Menu Basal Menu History Suspend/Resume Prime/Rewind Changing the Insulin Cartridge and Priming Your Pump... -
Page 4: Onetouch ® Ping ® Insulin Pump
Pump Startup Steps 1. Insert Battery 2. Update Time/Date and Battery Type on Verification Screen 3. Confirm Verification Screen 4. Proceed to Rewind/Prime Procedure (See page 12) NOTE: Refer to the Owner’s Booklet that came with your OneTouch Ping Insulin ® ®... -
Page 5: Changing The Battery
Changing the Battery Energizer Lithium L91 AA battery ® Close Open 1. Unscrew the battery cap with a counter-clockwise motion. 2. Insert a Lithium AA (1.5V) battery, positive (+) end first, into the battery compartment. 3. Replace the battery cap by turning clockwise until snug. Do Not over tighten, as this can cause the pump case to crack. -
Page 6: Home Screen Overview
Home Screen Overview Time of Day 2 : 27 Battery Life Indicator Basal Rate Current Basal Rate 0.025U/Hr Insulin Remaining in Cartridge Insulin: 105U Status Screens Shortcut Main Menu Shortcut Status Menu The first screen that is displayed when you “wake up” your pump after set up is the Home screen. -
Page 7: Main Menu
Main Menu MAIN MENU Bolus Suspnd/Resum History Highlight the desired option and press Basal Setup to access pump functions. Prime/Rewind Status Home Bolus - Takes you to the Normal Bolus screen, or the Bolus Menu if you have activated Advanced Bolus features. From the Bolus Menu you can select the bolus type, program and deliver the bolus dose. -
Page 8: Pump
Pump SETUP Time/Date Time/Date: Allows you to set the current time and date. Sound Advanced Sound: Allows you to adjust sounds for pump-related functions. Main Menu • Normal Bolus • Audio Bolus • Temp Basal • Alert • Reminder • Warning •... -
Page 9: Bolus Menu
Bolus Menu BOLUS MENU Normal ezCarb ezBG Normal Bolus Combo Bolus Reminders Normal - Program an insulin dose for immediate delivery. Main Menu Advanced Bolus Features • ezCarb - Calculate and then deliver a suggested insulin dose to account for carb intake. -
Page 10: Basal Menu
Basal Menu BASAL MENU Total 0.00U Temp Setting a Basal Program A1-WEEKDAY 2-other Each basal program can be set with up to 12 different basal 3-weekend 4-exercise rates in a 24-hour period. Main Menu The BASAL MENU displays the following: •... -
Page 11: History
History Menu View and Access Important Records TIPS: BOLUS • In order to navigate through the records, scroll up to Record highlight the “Record” field and press to activate Mar 23, 2007 1:13PM Review Mode. Use buttons to scroll through records. NORMAL 2.80U of 2.80U •... -
Page 12: Prime/Rewind
Prime/Rewind ezPrime Rewind Load Cart Prime/Rewind: Enables you to properly align the cartridge Prime and piston rod as well as prime your infusion set tubing and Fill Cannula fill your cannula or needle before connecting to your pump. Main Menu CAUTION: NEVER PRIME THE TUBING OR TIGHTEN THE CARTRIDGE CAP WHILE INFUSION SET IS CONNECTED TO YOUR BODY. -
Page 13: Changing The Insulin Cartridge And Priming Your Pump
Changing the Insulin Cartridge and Priming Your Pump Changing the Insulin Cartridge 1. Disconnect infusion set from your body. Luer connector Close of infusion set 2. Remove infusion set from your skin and discard. 3. Unscrew the cartridge compartment cap using a counter-clockwise motion. - Page 14 Priming Your Pump 1. Disconnect your infusion set from your body. Leave the infusion set disconnected until the prime is complete. ezPrime 2. On the MAIN MENU screen, highlight “Prime/Rewind” Rewind Load Cart and press Prime Fill Cannula 3. Highlight “Rewind” on the ezPrime menu screen and Main Menu press REWIND MOTOR...
- Page 15 7. The LOAD CARTRIDGE ACTIVE screen will appear as your PRIME pump aligns the piston rod with the cartridge. Wait for Be sure set is disconnected the alignment action to finish. from your body. Then select Continue. 8. Your pump will beep once and the Prime screen will Insulin: 200U Continue appear.
-
Page 16: Onetouch ® Ping ® Meter-Remote
OneTouch Ping Meter-Remote ® ® LED indicator light Test strip port High contrast color display USB data port This is the pre-set unit of measure. SmartChip port ® OK button Back button Up and Down buttons... -
Page 17: Meter Home Screen/Main Menu Screen
Meter Home Screen Meter Home 10:32 am The Meter Home screen appears whenever you turn your meter- Last BG Aft Brkft Jun 19-06 Avg. remote on, and displays your most recent BG test result, along 7:40am 14 days with your average BG test results for the current meal period. Once you begin using your meter-remote and pump together as a system, your meter- remote will display either the Meter Home screen or the Pump Home screen (see next chapter). -
Page 18: Changing The Batteries/Coding Your Meter-Remote
Changing the Batteries 1. Remove the battery compartment cover by pressing the tab to the right and then lifting the cover. 2. Lift both batteries out by pulling up on the ribbon. 3. Take the plus (+) end of one battery and insert it underneath the plastic tab at the plus (+) end of one of the battery compartments. -
Page 19: Options After Taking A Bg Test
2. Verify that the code number on your meter-remote matches Test the code number on the test strip vial. If the codes do not Match Code match, press until the codes match. 3. Press Test when the codes match. You will go to the Test/ Apply Blood Apply Blood screen where you can perform a BG or control solution test. -
Page 20: Onetouch ® Ping ® System
Using Your Meter-Remote and Pump Together as a System Your meter-remote and pump are designed to work together as a system. This allows you to access certain pump functions directly from your meter-remote, and use the current BG test result on your meter-remote in ezCarb and ezBolus calculations. Before you can use your meter-remote and pump together as a system, both devices must be paired with RF activated. - Page 21 2. Highlight the “RF” field and press . Use the SETUP ADV 10 METER buttons to set the “RF” field to “ON” and press to activate RF on your pump. Search – – – – Channel Auto Home Next 3. With the “Search” field highlighted, press .
- Page 22 Pairing 2. Highlight “Start Pairing” and press to activate pairing on 1. Activate Pairing-Mode your meter-remote. Your meter-remote will search for an on pump insulin pump within RF range. 2. Select <Start Pairing> Start Pairing Cancel Confirming Pairing on Your Pump and Meter-Remote Pump Display 1.
-
Page 23: Deactivating Rf On Your Meter-Remote And Pump
Deactivating RF on Your Meter-Remote and Pump There are times when you might need to deactivate RF on your devices, such as when you are on an airplane. When you deactivate RF on your devices, they will no longer be paired, and you will not be able to use your meter-remote to deliver a bolus from your pump. -
Page 24: Pump Home And Meter Home Screens On Your Meter-Remote
Deactivating RF on Your Pump Use your pump display and buttons for the next 2 steps. 1. Highlight “Setup” on the MAIN MENU screen and press SETUP ADV 10 Then highlight “Advanced” and press . Scroll through the METER SETUP ADV screens until the SETUP ADV 10 screen appears. Search Channel [ABCD1234]... -
Page 25: Main Menu Screen
Press to go to the Meter Home screen which displays your most recent BG test result, and your average BG test results for the current meal period. NOTE: Whenever the devices are paired, the Home screens on the meter-remote will show an RF symbol indicating signal strength. -
Page 26: Calculating And Delivering A Bolus
Calculating and Delivering a Bolus To begin the steps for calculating and delivering a bolus from your meter-remote, highlight “Bolus” on the Main Menu screen and press . Then highlight the desired bolus option on the Bolus Menu screen and press . - Page 27 2. On the Bolus Total screen, choose to deliver the suggested Bolus Total Carb 2.25U amount or a different amount. Press to enter the desired 2.70U –– . – –U amount and press Total 4.95U 0.00 Type Normal Main Menu Bolus Total 3.
- Page 28 ezBG 1. On the ezBG screen, highlight the “Actual,” “Target,” ezBG Actual 12.4 mmol/L and/or “IS Factor” fields if you need to make changes, and Target -6.6 mmol/L press after each change. With “ Show Result” highlighted, +5.8 mmol/L IS Factor 2.1 mmol/L press to display the ezBG Total screen with the suggested...
-
Page 29: Checking Pump And Meter-Remote Status
Checking Pump and Meter-Remote Status You can review the status of various pump functions directly on your meter-remote. You can also verify your meter-remote serial number and software version number. Checking Pump Status 1. Highlight “System Status” on the Main Menu screen and press System Status 2. - Page 30 Status Screen 4 – Status Combo Bolus Last Combo Bolus COMPLETED Jun 19-06 Start time 12:00 pm End time 2:00 pm Delivered 8.50 / 8.50U Main Menu Status Screen 5 – Status Temp Basal Last Temp Basal ACTIVE Jun 19-06 Start 4:00 pm 6:00 pm...
- Page 31 Inside back cover - blank.
- Page 32 U.S., Canada and Puerto Rico: 1 877 YES-PUMP (937-7867) Visit us at www.Animas.ca © 2010 Animas Corporation. All rights reserved. 410-181-51 Covered by U.S. patent 6,656,148, other patents pending. OneTouch Ultra is a trademark of Johnson & Johnson. P/N: 410-181-51 Rev. A ® ®...
Need help?
Do you have a question about the Ping and is the answer not in the manual?
Questions and answers