Table of Contents
Advertisement
KDC-132
KDC-1032
KDC-132CR
CD-RECEIVER
INSTRUCTION MANUAL
Take the time to read through this instruction manual.
Familiarity with installation and operation procedures will help you obtain the best
performance from your new CD-receiver.
For your records
Record the serial number, found on the back of the unit, in the spaces designated on the
warranty card, and in the space provided below. Refer to the model and serial numbers
whenever you call upon your Kenwood dealer for information or service on the product.
Model KDC-132/ KDC-1032/ KDC-132CR Serial number
US Residence Only
Register your Kenwood product at
www.kenwoodusa.com
© B64-3239-00/00 (KW/KN)
Register Online
Advertisement
Table of Contents

Related Manuals for Kenwood KDC-1032


Summary of Contents for Kenwood KDC-1032
-
Page 1: Instruction Manual
Record the serial number, found on the back of the unit, in the spaces designated on the warranty card, and in the space provided below. Refer to the model and serial numbers whenever you call upon your Kenwood dealer for information or service on the product. Model KDC-132/ KDC-1032/ KDC-132CR Serial number... -
Page 2: Table Of Contents
Contents Warning Safety precautions Notes About CDs General features Power Selecting the Source Volume Attenuator System Q Audio Control Audio Setup Speaker Setting Clock Display Adjusting Clock Theft Deterrent Faceplate Tuner features Tuning Tuning Mode Station Preset Memory Auto Memory Entry Preset Tuning CRSC (Clean Reception System Circuit) CD player features... -
Page 3: Warning
KENWOOD CORPORATION 2967-3, ISHIKAWA-MACHI, HACHIOJI-SHI TOKYO, JAPAN KENWOOD CORP. CERTIFIES THIS EQUIPMENT CONFORMS TO DHHS REGULATIONS N0.21 CFR 1040. 10, CHAPTER 1, SUBCHAPTER J. Location : Bottom Panel FCC WARNING This equipment may generate or use radio frequency energy. -
Page 4: Safety Precautions
Also avoid places with too much dust or the possibility of water splashing. (Faceplate case : KDC-1032/ 132CR only) • To prevent deterioration, do not touch the terminals of the unit or faceplate with your fingers. -
Page 5: Notes
Notes • If you experience problems during installation, consult your Kenwood dealer. • If the unit fails to operate properly, press the Reset button. The unit returns to factory settings when the Reset button is pressed. • Characters in the LCD may become difficult to read in temperatures below 5 ˚C (41 ˚F). -
Page 6: About Cds
About CDs Handling CDs • Do not touch the recording surface of the CD. • CD-R and CD-RW are easier to damage than a normal music CD. Use a CD-R or a CD-RW after reading the caution items on the package etc. •... -
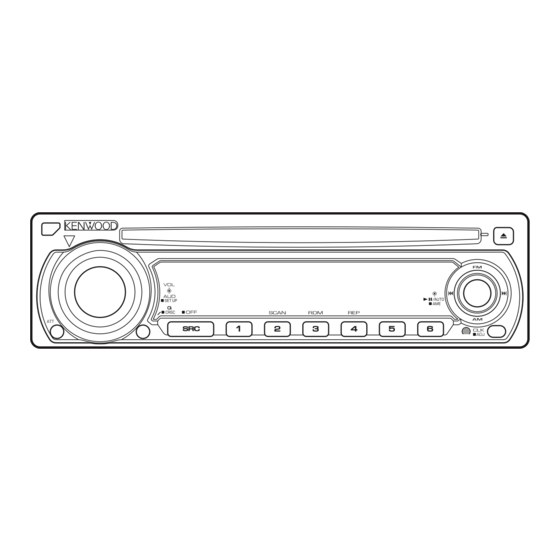
Page 7: General Features
General features Release button Power Turning ON the Power Press the [SRC] button. Turning OFF the Power Press the [SRC] button for at least 1 second. Selecting the Source Press the [SRC] button. Source required Tuner Standby (Illumination only mode) Clock display Volume Increasing Volume... -
Page 8: System Q
General features System Q Selecting the best sound setting preset for different types of music. Select the source to set Press the [SRC] button. Select the Sound type Press the [Q] button. When you press the button once, the current sound setting is displayed. -
Page 9: Speaker Setting
Speaker Setting Fine-tuning so that the System Q value is optimal when setting the speaker type. Enter Standby Press the [SRC] button. Select the "STBY" display. Enter Speaker Setting mode Press the [VOL] knob. Select the Speaker type Turn the [VOL] knob. Each time you turn the knob, the setting alternates between the settings shown in the table below. -
Page 10: Theft Deterrent Faceplate
• Keep the faceplate in its faceplate case while detached. (Faceplate case : Accessory of the KDC-1032/ 132CR) • Do not expose the faceplate and the faceplate case to direct sunlight or excessive heat or humidity. Also avoid places with too much dust or the possibility of water splashing. -
Page 11: Tuner Features
Tuner features ST indicator Tuning Selecting the station. Select tuner source Press the [SRC] button. Select the "TUnE" display. Select the band Push the Control knob towards [FM] or [AM]. Each time you push the knob toward [FM], it switches between the FM1, FM2, and FM3 bands. Tune up or down band Push the Control knob towards [4] or [¢]. -
Page 12: Station Preset Memory
Tuner features Station Preset Memory Putting a station in the memory. Select the band Push the Control knob towards [FM] or [AM]. Select the frequency to put in the memory Push the Control knob towards [4] or [¢]. Put the frequency in the memory Press the desired [1] —... -
Page 13: Cd Player Features
CD player features RDM indicator REP indicator IN indicator Playing CD When a disc is inserted Press the [SRC] button. Select the "CD" display. • When a CD is inserted, the "IN" indicator is ON. Pause and play Press the Control knob. Each time you press the knob, the audio pauses or plays. -
Page 14: Track Search
CD player features Track Search Selecting the song you want to hear. Push the Control knob towards [4] or [¢]. Track Repeat Replaying the song you are listening to. Press the [REP] button. Each time you press the button, the Track Repeat turns ON or OFF. -
Page 15: Accessories/ Installation Procedure
Accessories/ Installation Procedure Accessories Installation Procedure 1. To prevent a short circuit, remove the key from the ignition and disconnect the - battery. 2. Make the proper input and output wire connections for each unit. 3. Connect the speaker wires of the wiring harness. 4. -
Page 16: Connecting Wires To Terminals
Gray Green/Black To rear left speaker Green Purple/Black To rear right speaker Purple Car fuse box Front right output (Red) (KDC-1032 only) Front left output (White) (KDC-1032 only) FM/AM antenna input Ignition key switch Car fuse box (Main fuse) Battery... -
Page 17: Installation
Installation non-Japanese cars Metal mounting strap (commercially available) Firewall or metal support Bend the tabs of the mounting sleeve with a screwdriver or similar utensil and attach it in place. Self-tapping screw (commercially available) Screw (M4X8) (commercially available) • Make sure that the unit is installed securely in place. If the unit is unstable, it may malfunction (for example, the sound may skip). - Page 18 Installation Screwing the Faceplate on the Unit If you want to fasten the faceplate to the main unit so that it does not fall off, screw in the provided screws in the holes shown below. Accessory5 • Never insert the screw in any other screw hole than the one specified.
-
Page 19: Removing The Unit
Removing the Unit Removing the hard rubber frame Engage the catch pins on the removal tool and remove the two locks on the upper level. Upper the frame and pull it forward as shown in the figure. Accessory2 Removal tool When the upper level is removed, remove the lower two locations. -
Page 20: Troubleshooting Guide
Troubleshooting Guide What might seem to be a malfunction in your unit may just be the result of slight misoperation or miswiring. Before calling service, first check the following table for possible problems. General The power does not turn ON. ✔... - Page 21 Disc source The specified disc does not play, but another one plays instead. ✔ The specified CD is quite dirty. ☞ Clean the CD. ✔ The disc is loaded in a different slot from that specified. ☞ Eject the disc magazine and check the number for the specified disc.
-
Page 22: Specifications
Specifications Specifications subject to change without notice. FM tuner section Frequency range (200 kHz space) : 87.9 MHz – 107.9 MHz Usable sensitivity (S/N = 30dB) : 9.3dBf (0.8 μV/75 Ω) Quieting sensitivity (S/N = 50dB) : 15.2dBf (1.6 μV/75 Ω) Frequency response (±3.0 dB) : 30 Hz –...
Need help?
Do you have a question about the KDC-1032 and is the answer not in the manual?
Questions and answers