
Related Manuals for Dr Robot Jaguar V4


Summary of Contents for Dr Robot Jaguar V4
- Page 1 All-Terrain Autonomous Navigation Robot with GPS-IMU Jaguar V4 with Manipulator Arm User Guide Copyright © 2014, Dr Robot Inc. All Rights Reserved. www.DrRobot.com V.04.11.14...
- Page 2 Failure to follow these warnings could cause serious injury or death and/or damage to the robot. Copyright © 2014, Dr Robot Inc. All Rights Reserved. V.04.11.14 www.DrRobot.com...
- Page 3 All the software, firmware, hardware and product design accompanying with Dr Robot’s product are solely owned and copyrighted by Dr Robot. End users are authorized to use for personal research and educational use only. Duplication, distribution, reverse-engineering, or commercial application of the Dr Robot or licensed software and hardware without the expressed written consent of Dr Robot is explicitly forbidden.
-
Page 4: Table Of Contents
Hardware Architecture Jaguar V4 Base System Jaguar Manipulator Arm System Further Development & Programming The Jaguar Control program Advanced Development Copyright © 2014, Dr Robot Inc. All Rights Reserved. www.DrRobot.com V.04.11.14 - 4 -... -
Page 5: Specifications
802.11N connected. It integrates outdoor GPS and 9 DOF IMU (Gyro/Accelerometer/ Compass) for autonomous navigation. Jaguar V4 platform is rugged, light weight (< 30Kg), compact, weather and water resistant. It is designed for extreme terrains and capable of stair or vertical climbing up to 300mm with ease. - Page 6 Max output (after gear down) (x2): Max 80W, 100Kg.cm/track Rated current: 2.75A, Max current: 16A Flipper Motor (24V): 2 units Max output (after gear down): Max 80W, 450Kg.cm Rated current: 2.75A, Max current: 16A Copyright © 2014, Dr Robot Inc. All Rights Reserved. www.DrRobot.com V.04.11.14 - 6 -...
-
Page 7: Jaguar Core Components
22.2V 20 AH Li-Polymer Battery Pack BPN-LP-20 Head Mounted Display (800x600) HMD8H6H 802.11N Wireless AP/Router WRT802N Host Controller PC HCPC1008 Please contact support@drrobot.com for custom design and integration inquiry. Copyright © 2014, Dr Robot Inc. All Rights Reserved. www.DrRobot.com V.04.11.14 - 7 -... -
Page 8: Knowing Your Robot
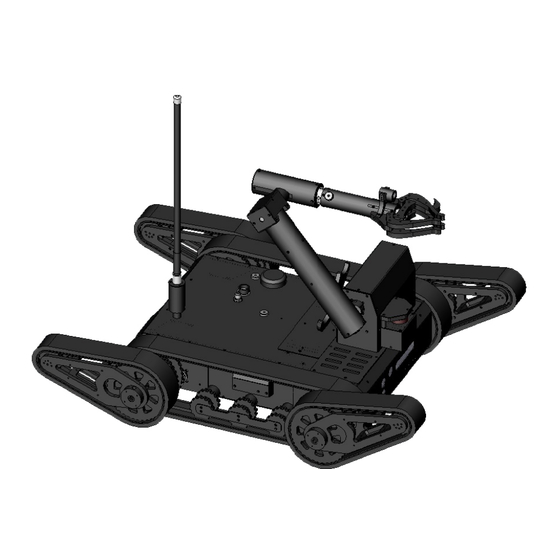
Antenna (* Optional) Laser Scanner (* Optional) Camera Headlights Rear Arm-Track Drive-Track Front Arm-Track WiFi Antenna Handle Bar Power Switch Jaguar V4 with Manipulator Arm Platform Copyright © 2014, Dr Robot Inc. All Rights Reserved. www.DrRobot.com V.04.11.14 - 8 -... -
Page 9: Operation Scenario
“Jaguar Control” program - installed by the Setup.exe from CD Google Earth program - could be downloaded from http://earth.google.com/download- earth.html. Please follow its installation instruction. Copyright © 2014, Dr Robot Inc. All Rights Reserved. www.DrRobot.com V.04.11.14 - 9 -... -
Page 10: Operation Of Jaguar Robot
Google Earth website. You will not get the correct Latitude and Longitude position by clicking on map before the map loading is finished. When loaded, click “OK” button. Copyright © 2014, Dr Robot Inc. All Rights Reserved. www.DrRobot.com V.04.11.14 - 10 -... - Page 11 This could be done by inputting the value in this xml file or navigating on Google Earth map to your interested point, then clicking “SaveSetPoint” button. The location value of the map center will then be saved to the “outdoorrobotconfig.xml” when program is closed. Copyright © 2014, Dr Robot Inc. All Rights Reserved. www.DrRobot.com V.04.11.14...
- Page 12 drive the arm forward and being flat on the ground (as shown below), we call this initial or “0” position (extend forward) then, click the “X” button on Gamepad to save this value and to set initial position. Copyright © 2014, Dr Robot Inc. All Rights Reserved. www.DrRobot.com V.04.11.14...
- Page 13 Click “Turn on” and then “Scan” button. You could use trackbar to adjust the data cut-off distance (i.e. any obstacle with distance larger than this value will be ignored). By checking , you will enable the collision avoidance function. Copyright © 2014, Dr Robot Inc. All Rights Reserved. www.DrRobot.com V.04.11.14 - 13 -...
- Page 14 KML data, there is risk of memory leak. You could manually clear these KML data by right-clicking on “Temporary Places”, then choosing “Delete Contents”. (That is why we did not hide Google Earth program) Copyright © 2014, Dr Robot Inc. All Rights Reserved. www.DrRobot.com V.04.11.14...
-
Page 15: Recharging
DO NOT exceed the 2A charging current and do not modify the battery voltage. It should be "22.2V (6S)" for Jaguar robot. 5) Connect the charging 7-Pin & 4-pin connectors to charger Copyright © 2014, Dr Robot Inc. All Rights Reserved. www.DrRobot.com V.04.11.14... -
Page 16: Hardware And Electronics
Port 10001 to base controller board UDP 115200. 8, N, 1, no flow control Port 2 Port 10002 to Laser Scanner(option) TCP 19200/115200. 8, N, 1, no flow control Copyright © 2014, Dr Robot Inc. All Rights Reserved. www.DrRobot.com V.04.11.14 - 16 -... -
Page 17: Hardware Architecture
Please contact support@DrRobot.com if you need further support. Hardware Architecture The diagram below illustrates the inter-connection between the core electronic circuits and modules (some are optional accessories). Copyright © 2014, Dr Robot Inc. All Rights Reserved. www.DrRobot.com V.04.11.14 - 17 -... - Page 18 Control Power Port Laser Scanner Power 5V Head Lights 9 DOF IMU (Gyro/ Accelerometer/ Compass) Power 5V GPS Module Power 5V 3.3V Camera (AV) Power 5V Copyright © 2014, Dr Robot Inc. All Rights Reserved. V.04.11.14 www.DrRobot.com - 18 -...
-
Page 19: Jaguar V4 Base System
Update rate Sensitivity - 185dBW minimum Accuracy Standard GPS service: Position: <= 15m 95% typical Velocity: 0.1knot RMS steady state WAAS service: Position: <= 3m 95% typical Copyright © 2014, Dr Robot Inc. All Rights Reserved. www.DrRobot.com V.04.11.14 - 19 -... - Page 20 Max 50A continuous, Max 100A peak Max charge rate Cycle life 500-1000 times Charger Charger type LiPo Charger Maximum charge current Maximum discharge current Power Input 100-240V Copyright © 2014, Dr Robot Inc. All Rights Reserved. www.DrRobot.com V.04.11.14 - 20 -...
-
Page 21: Jaguar Manipulator Arm System
Field View Frame rate H.264: 30 fps in all resolutions Motion JPEG: 30 fps in all resolution Video compression H.264 (MPEG-4 Part 10/AVC), Motion JPEG Dimension Copyright © 2014, Dr Robot Inc. All Rights Reserved. www.DrRobot.com V.04.11.14 - 21 -... -
Page 22: Further Development & Programming
The Jaguar Control program is written with Visual Studio 2008 express (in C#) under .Net 3.5 framework. You could download the development tools (Visual Studio 2008 express under .Net 3.5 framework) free from Microsoft. Please refer to the “Dr Robot Application Development Notes on C# Programming for Robot Control” for further information. - Page 23 Motion Control/Sensing System Jaguar comes with a special version of PMS5005 as its motion control and sensing board. It follows the Dr Robot WiRobotSDK protocol. User could control and access Jaguar by Dr Robot ActiveX control (DrRobotSentinelActivexControl.ocx) and WiRobot gateway program.
- Page 24 PWM 4 is turning power. To move forward with full power myJaguar.DcMotorPwmNonTimeCtr(3,0); To move backward with full power myJaguar.DcMotorPwmNonTimeCtr(3,32767); To turn left with full power myJaguar.DcMotorPwmNonTimeCtr(4,0); Copyright © 2014, Dr Robot Inc. All Rights Reserved. www.DrRobot.com V.04.11.14 - 24 -...
- Page 25 “$2,0,9,255,20,40,3,235,400,20#” Please note the magnetic sensor will be measured every 220ms, so if the output value is 0, means no magnetic sensor in this data package. Copyright © 2014, Dr Robot Inc. All Rights Reserved. www.DrRobot.com V.04.11.14 - 25 -...
- Page 26 The temperature sensor is B57164K103J, you could find how to conver the readings to temperature from the sample codes. Joint3(Motor Encoder : One circle count is 3724 Driver board 2 Angle Resolution: 3724/ (2*PI) channel 1) Copyright © 2014, Dr Robot Inc. All Rights Reserved. www.DrRobot.com V.04.11.14 - 26 -...
-
Page 27: Advanced Development
Jaguar GPS and IMU system module. Support and sample codes are available for using OpenCV, LabVIEW and MATLAB. Please contact support@drrobot.com for further information. Copyright © 2014, Dr Robot Inc. All Rights Reserved. www.DrRobot.com V.04.11.14 - 27 -...
Need help?
Do you have a question about the Jaguar V4 and is the answer not in the manual?
Questions and answers