Table of Contents
Advertisement
Models:
For your convenience, we recommend to attach the serial number label HERE.
As part of Parmco Appliances commitment to improving and updating product ranges,
we reserve the right to alter, change and update technical specifications and appearance
attributes of all Parmco Appliances products. E&OE.
Installation
and Operating
Instructions
PD6-PSL
PD6-PWL
727626012014
Advertisement
Table of Contents

Related Manuals for Parmco PD6-PSL


Summary of Contents for Parmco PD6-PSL
- Page 1 PD6-PWL For your convenience, we recommend to attach the serial number label HERE. As part of Parmco Appliances commitment to improving and updating product ranges, we reserve the right to alter, change and update technical specifications and appearance attributes of all Parmco Appliances products. E&OE.
- Page 2 Parmco Appliances before any installation is carried out. We hope you enjoy your new appliance. If you would like to find out more about this product or any other products in Parmco’s extensive range, visit us on the web at www.parmco.co.nz. Regards,...
- Page 3 Quick operation guide For detailed operating instructions, please read the corresponding section of this manual. Switch on the appliance Press the On/Off button to switch on the appliance. Open the door. Compartment A: With each wash cycle. Compartment B: Fill the detergent dispenser For programmes with pre-wash only.
-
Page 4: Table Of Contents
Read this Manual 1) Safety Information..........1 Dear Customer, 2) Operation Instructions........2 Control Panel............2 This appliance is intended for domestic household use. Dishwasher Features...........2 Carefully reading this manual before using the dishwasher, will help you to use and maintain the 3) Prior to first time use........3 dishwasher properly. -
Page 5: Safety Information
1.IMPORTANT SAFETY INFORMATION READ ALL OF THE INSTRUCTIONS BEFORE USING WARNING! When using your dishwasher, follow the precautions listed below: GROUNDING INSTRUCTIONS WARNING! This appliance must be grounded. In the event of a Improper connection of the equipment-grounding malfunction or breakdown, grounding will reduce conductor can result in the risk of an electric shock. -
Page 6: Operation Instructions
2.Operation Instructions IMPORTANT To get the best performance from your dishwasher, read all the operating instructions before using it for the first time. Control Panel 1/2 Wash Dry + 9. LED Display screen: Shows the remaining time 1. On/Off Button: To turn On/Off the power supply. and status(running, delay time etc). -
Page 7: Prior To First Time Use
Prior to using for the first time Before using your dishwasher for the first time: Fill the rinse aid dispenser Fill in detergent A. Fill the Rinse Aid Dispenser Rinse Aid Dispenser The rinse aid is released during the final rinse to prevent water leaving spots and streaks on your dishes and cutlery items. It also improves drying by allowing water to roll off the dishes. -
Page 8: B)Function Of Detergent
Adjusting Rinse Aid Dispenser The rinse aid dispenser has six or four settings. Always start with the dispenser Adjust lever set on "4". If spots and poor drying are a problem, increase the amount of rinse (Rinse) aid dispensed by removing the dispenser lid and rotating the dial to "5". If the dishes still are not drying properly or are showing spots, adjust the dial to the next higher number until your dishes are spot-free. -
Page 9: Amount Of Detergent To Use
Amount of Detergent to Use Push latch to open NOTE: If the lid is closed: press release button. The lid springs open. Always add detergent just before starting each wash cycle. Only use branded detergent and rinse aid for dishwashers. WARNING! Dishwasher detergent is corrosive! Take care to keep it out of reach of children. -
Page 10: Loading The Dishwasher Basket
4.Loading the Dishwasher Baskets Recommendation Consider buying utensils which are identified as dishwasher-proof. Use a mild detergent that is described as 'kind to dishes'. If necessary, seek further information from the detergent manufacturers. For particular items, select a program with as low a temperature as possible. To prevent damage, do not take glass and cutlery out of the dishwasher immediately after the programme has ended. -
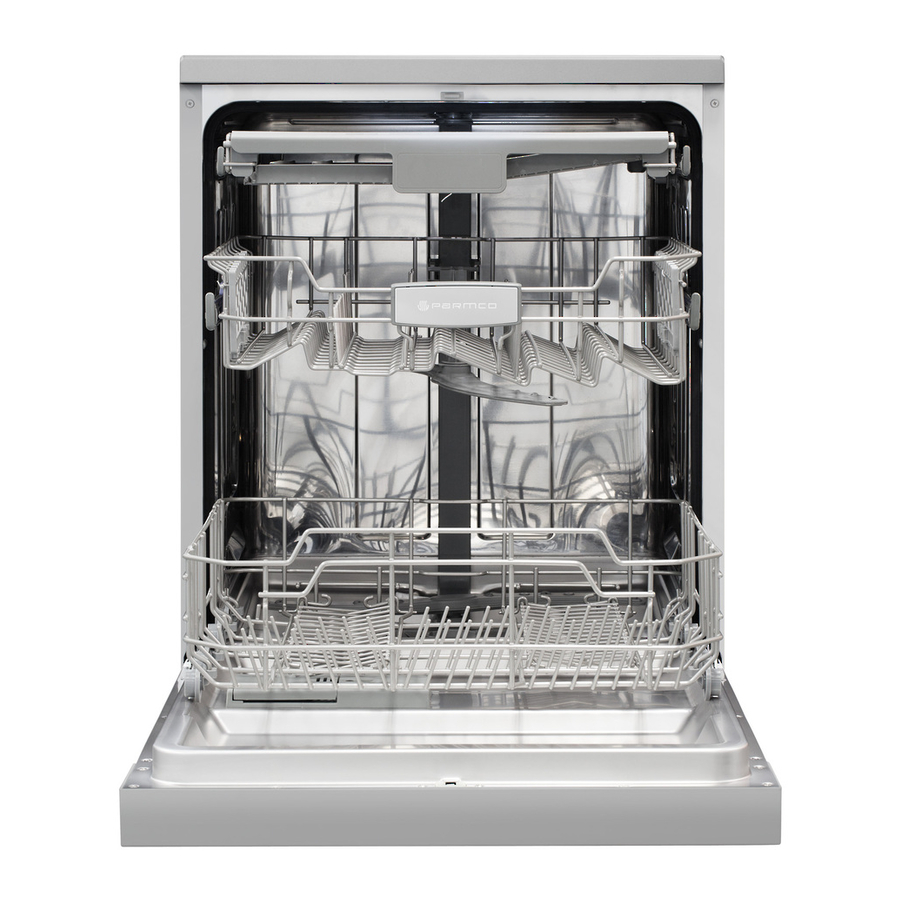
Page 11: Loading The Baskets Of Your Dishwasher
Loading the baskets of your dishwasher Loading the Lower Basket Loading the Upper Basket The upper basket is designed to hold more delicate and We suggest that you place large items and the most lighter dishware such as glasses, coffee and tea cups, difficult to clean items are to be placed into the lower saucers, as well as plates, small bowls and shallow pans basket: such as pots, pans, lids, serving dishes and... - Page 12 Cutlery basket has 5 positions: Mode 1 Position one: lift the left basket up, and both left and right baskets are slanting. Mode 2 Position two: adjust the left basket to the lower position, and the left basket is flat and right basket is slanting. Mode 3 Position three: lift the right basket up, and both left and right baskets are flat.
-
Page 13: Starting A Washing Programme
5.Starting a washing program Wash Cycle Table Wash Cycle Table Means: need to fill the Rinse-Aid Dispenser. NOTE: NOTE: Description Detergent Cycle Selection Energy Running Rinse Water Program of Cycle pre/main Information (Kwh) time(min) Pre-wash(50 ) For heaviest soiled crockery, Wash (65 ) pots, pans, dishes etc Rinse... -
Page 14: Change The Programme
NOTE: When you press the Start/Pause button to pause during washing, the running indicator will stop blinking and the dishwasher will be beeping every minute unless you press the Start/Pause button to start. Changing the Program during Use A cycle that is underway can only be modified if it has been running for a short time. Otherwise, the detergent may have already been released, and the appliance may have already drained the wash water. -
Page 15: Maintenance And Cleaning
6.Maintenance and Cleaning Filtering System The filter prevents larger remnants of food or other objects from getting inside the pump. The residues may block the filter, in this case they must be removed. The filter system consists of a Coarse filter, a Main filter (flat) And a microfilter(fine filter). -
Page 16: Caring For The Dishwasher
5.Remove the filter at the bottom of the tub and use a sponge to soak up water in the sump. NOTE: If your dishwasher cannot work because of the ice, please contact a service agent or Parmco. Cleaning the Spray Arms It is necessary to clean the spray arms regularly, as hard water chemicals can clog the spray arm jets and bearings. -
Page 17: Installation Instruction
How to Keep Your Dishwasher in Shape When not in Use for a Long Time Remove the Plug It is recommend that you run a wash cycle with the Before cleaning or performing maintenance, always dishwasher empty, then remove the plug from the remove the plug from the socket. -
Page 18: Water Connection
Improper connection of the equipment earthing conductor can result in the risk of an WARNING! for personal safety: electric shock. DO NOT USE AN EXTENSION CORD OR AN ADAPTER PLUG WITH THIS APPLIANCE. Check with a qualified electrician or service representative if you are in doubt whether the DO NOT, UNDER ANY CIRCUMSTANCES, CUT OR REMOVE THE EARTHING appliance is properly earthed. -
Page 19: Start Of Dishwasher
How to Drain Excess Water From Hoses If the sink is 1000mm higher from the floor, the excess water in hoses cannot be drained directly into the sink. It will be necessary to drain excess water from hoses into a bowl or suitable container that is held outside and lower than the sink. -
Page 20: Troubleshooting Tips
8.Troubleshooting Tips Before Calling for Service Problem Possible Causes What To Do Dishwasher doesn t Fuse blown, or the home Replace fuse or reset circuit breaker. Remove any other circuit breaker has been appliances sharing the same circuit with the dishwasher start triggered. -
Page 21: Error Codes
Problem Possible Causes What To Do The dishes The dishes were not See notes in " Loading the Dishwasher Baskets ". loaded correctly. are not clean The programme was Select a more intensive programme. not powerful enough. See" Wash Cycle Table ". Not enough detergent Use more detergent, or change your detergent. -
Page 22: Technical Information
If overflow occurs, turn off the main water supply before calling service. If there is water in the base pan because of an overfill or small leak, WARNING! the water should be removed before restarting the dishwasher. Technical Information Height : 845mm Width : 598 mm... - Page 24 09 573 5678 f: 09 573 5699 e: sales@parmco.co.nz w: www.parmco.co.nz Parmco Appliances 2 year warranty The Warranty: The Warranty is not valid: • If the product is not installed and operated in accordance with the operating • Subject to the terms and conditions contained within this instructions. warranty, if the product is not of Acceptable Quality (as • If the product is not installed to comply with the electrical, gas, plumbing defined in the Consumer Guarantees Act) within 2 years of and other Regulations and Codes of Practice in New Zealand. the date of original purchase, then Parmco Sales undertakes • If the product is operated on voltages or frequencies outside the normal range for domestic appliances in New Zealand. to repair or, at it’s sole discretion, replace the product. • If the product is not used in normal domestic use, or if it is used in a • The warranty does not cover the costs of transport, mileage...
Need help?
Do you have a question about the PD6-PSL and is the answer not in the manual?
Questions and answers