
Related Manuals for L&W LW 300 E


Summary of Contents for L&W LW 300 E
-
Page 1: Operating Instructions
Operating Instructions Breathing Air Compressor LW 300 E / LW 450 E Version: 11/12-E... -
Page 2: Table Of Contents
Check V-belt tension / Tension V-belt ....................44 Compressor lubrication / Check oil level ..................45 Oil change ............................46 Oil sieve change ..........................47 Final pressure switch ........................48 LW 300 E / LW 450 E Page A - 2 Version: 261012-001 E... - Page 3 Pressure gas vessel test ........................66 Maintenance records ....................... 67 - 72 Storage Conservation / storage of the compressor ..................73 De-conservation, commissioning ....................73 Transportation instructions / Disposal ..................... 74 LW 300 E / LW 450 E Page A - 3 Version: 261012-001 E...
-
Page 4: General Information / Description Of Warning Symbols
Indicates a potentially hazardous situation which, if not avoided, could result in physical injury or damage to the product or environment. Note Indicates additional information on how to use the unit. LW 300 E / LW 450 E Page A - 4 Version: 261012-001 E... -
Page 5: Scope Of Delivery
• Oil pressure monitoring c/w auto shut down • Direction of rotation monitoring • Cylinder head temperature monitoring with • Power cable and plug auto shut down LW 300 E / LW 450 E Page A - 5 Version: 261012-001 E... -
Page 6: Technical Data
Dimensions L x W x H [mm]: 1150 x 680 x 1000 1150 x 680 x 1000 Weight [kg]: ca. 280 ca. 280 Content Volume Filter housing [l]: LW 300 E / LW 450 E Page A - 6 Version: 261012-001 E... -
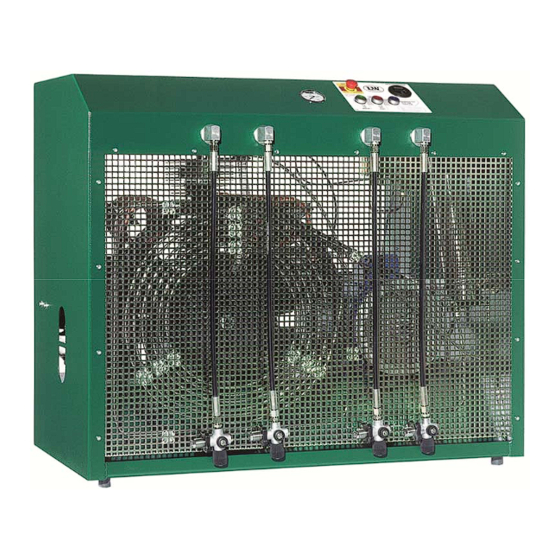
Page 7: Unit Assembly
D E S C R I P T I O N Unit Assembly Designation Filling pressure gauge Switchboard Filling hoses (optional: without filling hoses) Filling valves LW 300 E / LW 450 E Page A - 7 Version: 260912-001... -
Page 8: Switchboard
D E S C R I P T I O N Switchboard Designation Emergency shut-off switch Hour counter ON button OFF button Drain test button LW 300 E / LW 450 E Page A - 8 Version: 261012-001 E... -
Page 9: Flow Chart
Steuerleitung 2.Stufe / Control Cable 2nd Stage Öl-/Wasserabscheider / Oil-/Water Separator Füllanschlüsse / Filling Connections 3. Verdichterstufe / 3rd Pressure Stage Hochdruckabgang (Option) / HP Outlet (option) Kondensatablassschlauch / Condensate Release Hose LW 300 E / LW 450 E Page A - 9 Version: 261012-001 E... -
Page 10: Safety Precautions
S A F E T Y P R E C A U T I O N S... -
Page 11: Intended Use / Operators
Only trained personnel are permitted to work on the unit! Warning Work on the electrical equipment on / with the machine / unit may only be carried out by qualified electricians. LW 300 E / LW 450 E Page A - 11 Version: 261012-001 E... -
Page 12: Safety Instructions On The Unit
Importance of notes and warning signs that are affixed to the compressor according to the applica- tion or its equipment. Warning Note High voltage! Ensure correct direction of rotation! LW 300 E / LW 450 E Page A - 12 Version: 261012-001 E... -
Page 13: General Safety Precautions
• Do not use the product in areas prone to explosion or in the presence of flammable gases. The product is not designed for these applications. An explosion might be the result if certain conditi- ons apply. LW 300 E / LW 450 E Page A - 13 Version: 261012-001 E... -
Page 14: Unit Customised Safety Notices
• Soundproofing equipment on the compressor has to be activated in safety function during ope- ration. • When handling with fats, oils and other chemical agents, observe the note for the product- related safety. LW 300 E / LW 450 E Page A - 14 Version: 261012-001 E... -
Page 15: Maintenance Instructions
• Only personnel with particular knowledge and experience with pneumatics may carry out work on pneumatic equipment. • Only personnel with particular knowledge and experience in gas equipment may carry out work on gas equipment. LW 300 E / LW 450 E Page A - 15 Version: 261012-001 E... -
Page 16: Transportation Instructions / Safety Regulations
No guarantees whatsoever are valid for damage caused or favoured by the non-consideration of these directions for use. LW 300 E / LW 450 E Page A - 16 Version: 261012-001 E... -
Page 17: Locating The Unit
L O C A T I N G T H E U N I T... -
Page 18: Installation In Closed Rooms
• Intake air must be free from noxious gas e.g. smoke, solvent vapours, exhaust fumes etc. • Observe the specified operating temperature (see "Technical Data")! LW 300 E / LW 450 E Page A - 18 Version: 261012-001 E... -
Page 19: Dimensions
L O C A T I N G T H E U N I T Dimensions 1040 1140 Fig. Dimensions LW 300 E / LW 450 E Page A - 19 Version: 261012-001 E... -
Page 20: Minimum Distances
Front side min. 1500 mm, sides min. 500 mm, rear side min. 500 mm. Avoid anything in this area which can restrict the cooling air flow. 1500 Fig. Minimum distances LW 300 E / LW 450 E Page A - 20 Version: 291112-001 E... -
Page 21: Ventilation
• The fan capacity for fresh air and warm air must meet at least the required cooling air flow. The fans must have the same capacity. Fig. Ventilation through facade Fig. Ventilation via ventilation stack LW 300 E / LW 450 E Page A - 21 Version: 291112-001 E... -
Page 22: Electrical Installation
• Fuse the motor correctly (see table; use slow-blow fuses). Fig. Compressor name plate Designation Circuit diagram number Compressor type Power supply Frequency Motor current consumption Nominal motor power LW 300 E / LW 450 E Page A - 22 Version: 261012-001 E... - Page 23 Recommended fuses for 220 - 240 V operating voltage Nominal motor power Fusing start A Connection in mm² [kw] Direct Star/Delta Contactor supply Motor S/D 14.8 19.6 26.4 18.5 LW 300 E / LW 450 E Page A - 23 Version: 121212-001 E...
-
Page 24: Operation
O P E R A T I O N... -
Page 25: Important Operation Instructions
Ensure that all persons handling the compressor are familiar with function and operation of the unit. Wear hearing protection When working on a running machine, always wear hearing protection. LW 300 E / LW 450 E Page A - 25 Version: 261012-001 E... -
Page 26: First Commissioning
- Drain test - press the test button - If correct, air escapes Stop the compressor by pushing the OFF button. 10. Open all filling valves carefully to vent. LW 300 E / LW 450 E Page A - 26 Version: 261012-001 E... - Page 27 Settings Motor Type Initial Installation Operation after running in Electric motors 50Hz 600 N 450 N Electric motors 60Hz 500 N 400 N LW 300 E / LW 450 E Page A - 27 Version: 261012-001 E...
- Page 28 2nd and 3rd stages can not be sufficiently lubricated, with the consequence that the pistons will be damaged. Further- more, cooling air flow will not be sufficient. Rotation direction arrow LW 300 E / LW 450 E Page A - 28 Version: 261012-001 E...
-
Page 29: Daily Commissioning
• Check compressor oil level by the oil sight glass. • Check if filter cartridge is in place / observe filter cartridge life! • Ensure toxic-free, pure intake air. LW 300 E / LW 450 E Page A - 29 Version: 261012-001 E... -
Page 30: Filling Procedure
Fill compressed air cylinders to the desired pressure, subsequently close the filling valves slowly. Close and vent all filling valves. Disconnect all compressed air cylinders from filling valves. LW 300 E / LW 450 E Page A - 30 Version: 261012-001 E... -
Page 31: Switch Off The Compressor
(only in case of emergency!). Note After automatic or manual switching off, all pressure vessels and filter housings of the compressor will be automatically vented. LW 300 E / LW 450 E Page A - 31 Version: 261012-001 E... -
Page 32: Remedying Faults
R E M E D Y I N G F A U L T S... - Page 33 Cylinder(s), piston(s) or piston ring(s) used up Replace V-belt slips Tension V-belt See chapter "Final pressure can not be reached" See chapter "Final pressure can not be reached" LW 300 E / LW 450 E Page A - 33 Version: 261012-001 E...
- Page 34 Mole carbon filter cartridge saturated Replace Compressor oil unsuitable Use prescribed oil quality Filter cartridge unsuitable Use prescribed filter type Cylinder(s), piston(s) or piston ring(s) defective Replace LW 300 E / LW 450 E Page A - 34 Version: 121212-001 E...
- Page 35 Check fusing of the power supply / observe Valid only for E models regulations Emergency stop switch has tripped Unlock emergency stop switch, close compressor housing door correctly LW 300 E / LW 450 E Page A - 35 Version: 261012-001 E...
- Page 36 Observe prescribed operating temperatures Oil leak at the compressor block Tighten corresponding mounting screws, if nec- essary replace corresponding paper sealing / o- ring / shaft seal LW 300 E / LW 450 E Page A - 36 Version: 261012-001 E...
-
Page 37: Maintenance And Service
M A I N T E N A N C E A N D S E R V I C E... -
Page 38: Service, Repair And Maintenance
Carry out maintenance or service work when the unit is switched off and protected against unexpected restart. Warning Risk of burns! Carry out maintenance or service work when the unit has cooled down. LW 300 E / LW 450 E Page A - 38 Version: 261012-001 E... -
Page 39: Maintenance Lists / Maintenance Intervals
Clean all oil/water separators, if less than 500 operating hours Service intake filter (depends on condition - if less than 500 operating hours) Check all connections for leakage LW 300 E / LW 450 E Page A - 39 Version: 261012-001 E... - Page 40 M A I N T E N A N C E A N D S E R V I C E Every 500 operating hours Maintenance work Type Quantity Order No. Change intake filter 000170 Check pressure maintaining/non-return valve Check V-belt tension and condition LW 300 E / LW 450 E Page A - 40 Version: 261012-001 E...
- Page 41 Clean oil sieve / replace if necessary 000798 Oil change 000001 Replace o-rings of the final filter housing 001287 Replace back-up rings of the final filter housing 001285 LW 300 E / LW 450 E Page A - 41 Version: 231112-001 E...
- Page 42 Upper gasket 2nd 000254 Lower gasket 1st 000258 Lower gasket 2nd 000253 Replace oil intake hose 000376 Replace needle bearings for conrod 003836 2nd and 3rd stage LW 300 E / LW 450 E Page A - 42 Version: 191212-001 E...
-
Page 43: Service Kits
O-Rings, Sinter Filter, Inlet Filter, V-Belts, Silencers, In-&Outlet Valve, Valve Seals and Compressor oil. Service Kits Service Kits LW 300 E / LW 450 E for 50 Hz Compressor Frequency Operating Hours Order No. -
Page 44: Check V-Belt Tension / Tension V-Belt
Settings Motor Type Initial Installation Operation after running in Electric motors 50Hz 600 N 450 N Electric motors 60Hz 500 N 400 N LW 300 E / LW 450 E Page A - 44 Version: 261012-001 E... -
Page 45: Compressor Lubrication / Check Oil Level
Never start the compressor with a too low oil level. Refill new compressor oil at least when the oil level reached the middle of the indicated area. Oil sight glass LW 300 E / LW 450 E Page A - 45 Version: 261012-001 E... -
Page 46: Oil Change
Oil and oil capacity Approx. 2,200 ml synthetic compressor oil is necessary for one oil change. Only use synthetic compressor oil which is recommended as suitable from L&W. LW 300 E / LW 450 E Page A - 46 Version: 261012-001 E... -
Page 47: Oil Sieve Change
The oil sieve change is now completed. Maintenance intervals • We recommend cleaning or replacing the oil sieve every 1,000 working hours. Correct oil sieve mounting direction LW 300 E / LW 450 E Page A - 47 Version: 261012-001 E... -
Page 48: Final Pressure Switch
Example settings: Safety valve Max. Operating Pressure 225 bar 215 bar 250 bar 240 bar 330 bar 320 bar LW 300 E / LW 450 E Page A - 48 Version: 261012-001 E... -
Page 49: Maintenance And Service
All oil / water separators have an integrated sinter filter which has to be replaced every 1,000 operating hours. Oil / water separators final stage LW 300 E / LW 450 E Page A - 49 Version: 261012-001 E... -
Page 50: Oil / Water Separator 1St Stage - Maintenance
Oil / water separator maintenance is now completed. Fig. 2 - Loosen nut at the separator Fig. 3 - Change sinter filter Fig. 4 - Change o-ring LW 300 E / LW 450 E Page A - 50 Version: 261012-001 E... -
Page 51: Oil / Water Separators 2Nd Stage - Maintenance
The oil / water separator maintenance is now completed. Fig. 2 - Loosen nut at the separator Fig. 3 - Change sinter filter Fig. 4 - Change o-ring Fig. 5 - Bottom part LW 300 E / LW 450 E Page A - 51 Version: 261012-001 E... -
Page 52: Oil / Water Separators Final Stage - Maintenance
The oil / water separator maintenance is now completed. Fig. 1 - Loosen ring nut Fig. 2 - Change sinter filter Fig. 3 - Change o-ring LW 300 E / LW 450 E Page A - 52 Version: 261012-001 E... -
Page 53: Pneumatic Condensate Valve - Maintenance
• Tighten pipe connections and mounting screws. Pneumatic Condensate Valve Pneumatic condensate valve maintenance is now completed. Fig. 2 - Loosen connection Fig. 3 - Change sinter filter LW 300 E / LW 450 E Page A - 53 Version: 261012-001 E... -
Page 54: Filter Housing / Filter Cartridge
Filter cartridges should be changed at the following intervals, at +20°C or more often, depending on humidity and ambient temperature: • 33 hours for LW 450 E • 50 hours for LW 300 E LW 300 E / LW 450 E Page A - 54... -
Page 55: Filter Cartridge Change
Ensure that the old filter cartridge is disposed cor- rectly at an approved waste point. Fig. 3 - Pull the cartridge out of the hou- sing. LW 300 E / LW 450 E Page A - 55 Version: 261012-001 E... -
Page 56: Filter Housing - Maintenance
The filter housing maintenance is now completed. Fig. 2 - Change o-ring and back-up Fig. 3 - Loosen pipe connections and Fig. 4 - Change o-ring and back-up rings nuts rings LW 300 E / LW 450 E Page A - 56 Version: 261012-001 E... -
Page 57: Inlet Filters / Inlet Filter Cartridge Change
• Refit cover and snap the three clips until a loud ‘click’ can be heard. The inlet filter cartridge change is now completed. Clips Cover Filter cartridge inlet filter Filter cartridge inlet filter LW 300 E / LW 450 E Page A - 57 Version: 261012-001 E... -
Page 58: Cylinder Heads And Valves
There are no special tools required to replace these valves. Available special tools Special tools are not necessary for dismounting inlet and out- let valves but make work easier. Order number: 006847 Special tool LW 300 E / LW 450 E Page A - 58 Version: 261012-001 E... -
Page 59: Replace Inlet And Outlet Valves 1St And 2Nd Stage
• Check valve head if defective Install Inlet / Outlet Valve - see following page Fig. 1 - Loosen valve head screws Fig. 2 - Pull out inlet and outlet valve LW 300 E / LW 450 E Page A - 59 Version: 261012-001 E... -
Page 60: Replace Inlet And Outlet Valves 1St And 2Nd Stage
2. nd Stage 30 Nm The replacement inlet and outlet valves 1st and 2nd stage is now completed. Fig. 4 - Ensure the correct mounting position of the paper gasket LW 300 E / LW 450 E Page A - 60 Version: 261012-001 E... -
Page 61: Replacement Inlet And Outlet Valves 3Rd Stage
Fig. 2 - Remove lower valve gasket Fig. 3 - Remove inlet and outlet valve Fig. 4 - Ensure correct mounting position of the upper valve gasket LW 300 E / LW 450 E Page A - 61 Version: 261012-001 E... -
Page 62: Safety Valves
If a safety valve blows off, it indicates problems with either inlet or outlet valve of the following stage. Note Replace defective safety valves immediately! Safety valve 3rd stage LW 300 E / LW 450 E Page A - 62 Version: 261012-001 E... -
Page 63: Pressure Maintaining / Non Return Valve
The value of the opening pressure of the pressure maintaining valve can be read at the final pressure gauge. When opening pressure is reached, the pressure gauge value increases within a few seconds. LW 300 E / LW 450 E Page A - 63 Version: 261012-001 E... -
Page 64: Safety Valve Test
• Mount the cover of the switch box. • Connect the compressor to the electrical power supply. The safety valve test is now completed. Safety valve test switch (up) LW 300 E / LW 450 E Page A - 64 Version: 261012-001 E... -
Page 65: Leak Test
• Mount the cover of the switch box. • Connect the compressor to the electrical power supply. The leak test is now completed. Leak test switch (lower) LW 300 E / LW 450 E Page A - 65 Version: 261012-001 E... -
Page 66: Pressure Gas Vessel Test
2. Examination after 10 years by a qualified person Visual inspection, inside and outside. In addition, a water pressure test is carried out at 1.3 times of the permissible vessel operating pres- sure. LW 300 E / LW 450 E Page A - 66 Version: 261012-001 E... -
Page 67: Maintenance Records
M A I N T E N A N C E R E C O R D S... - Page 68 By adding themselves to this list, the person that signs it confirms having been given a yearly introduction/instruction about the function and operation of the compressor unit.Furthermore, they have be informed about the relevant safety rules and regualtions (TRG, DGRL, BetrSichV, GSG, GSGV). LW 300 E / LW 450 E Page A - 68 Version: 161012-001E...
- Page 69 M A I N T E N A N C E R E C O R D S Top up oil, oil change Date Operating hours Oil quantity [l] Name LW 300 E / LW 450 E Page A - 69 Version: 161012-001E...
- Page 70 M A I N T E N A N C E R E C O R D S Cartridge change Date Operating hours Difference Name LW 300 E / LW 450 E Page A - 70 Version: 161012-001E...
- Page 71 M A I N T E N A N C E R E C O R D S Maintenance work Description Date, signature LW 300 E / LW 450 E Page A - 71 Version: 161012-001E...
-
Page 72: Maintenance Records
M A I N T E N A N C E R E C O R D S Replaced Parts Designation Part number Date, signature LW 300 E / LW 450 E Page A - 72 Version: 161012-001E... -
Page 73: Conservation / Storage Of The Compressor
• Check all connections and pipe work for leaks, retighten if necessary. Once the above steps are completed to satisfaction, the unit is ready to use. LW 300 E / LW 450 E Page A - 73 Version: 261012-001 E... -
Page 74: Transportation Instructions / Disposal
The device can be returned to L&W. Please do not hesitate to contact us if you have any further questions on this issue. LW 300 E / LW 450 E Page A - 74 Version: 261012-001 E...
Need help?
Do you have a question about the LW 300 E and is the answer not in the manual?
Questions and answers